In this tutorial, we will explain the Schema options in Rank Math and How To Configure Schema Markup In Rank Math. Google has been moving more towards rich results in recent years, and with the advent of smart devices, the importance of having structured data on your website is more important than ever.
Schema is the most recognized form of structured data, and Rank Math supports it out of the box without any external plugins. And in the article, we’re going to explain the entire process from start to finish.
How To Configure Schema Markup In Rank Math
Enabling Schema From Global Options
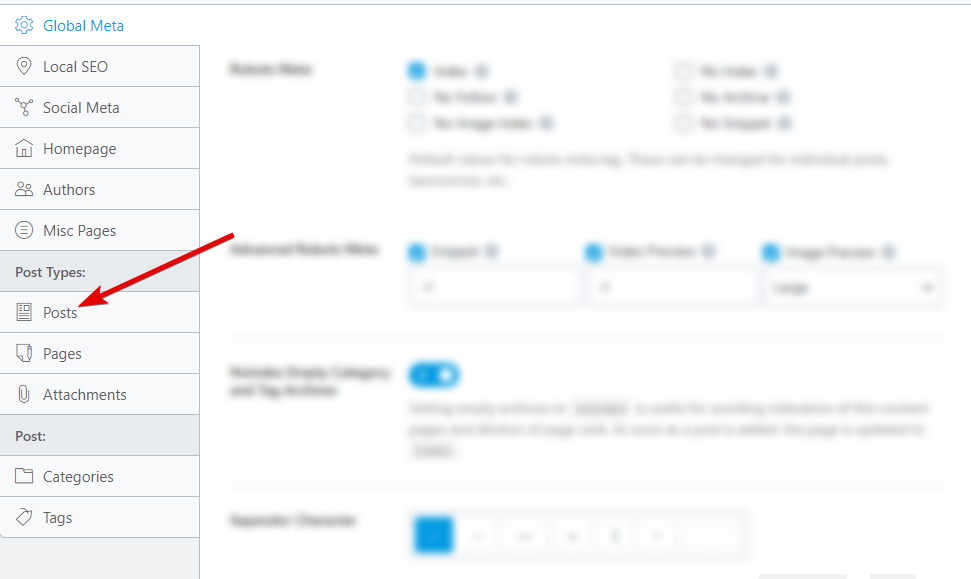
First things first. Assuming that you’ve already installed and configured Rank Math on your website, the first thing you need to do is to activate the Schema module from the settings.
To do that, head over to Rank Math >> Dashboard.
And make sure that the Schema (Structured Data) module is enabled.
How To Configure Schema Markup In Rank Math
Setting Up Default Schema For Your Website
Since schema is more important than ever, every post or page on your website should have schema or structured data. With Rank Math, we’ve made it easy to select a default schema type to appear on all your posts and pages. You’ll find the options inside Rank Math settings. Head over to Rank Math >> Titles and Meta.
You will reach Rank Math’s Title and Meta settings. On the page that appears, click the Posts option from the left-tab menu.
On the page, scroll a bit to find the Schema Type options.
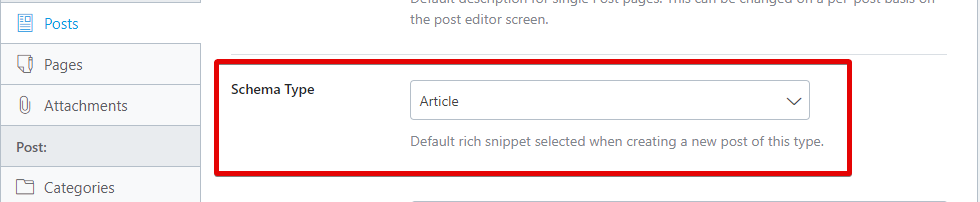
To see all the Schema Types supported, click the drop-down menu. You can then scroll or search for all the different schema types supported by Rank Math.
Select the schema type that you use the most on your website, and save your settings.
After saving, repeat the process for your pages. If your website has custom post types, they will show up in the menu as well. It is recommended to do this for all post types.

It is important to understand that till now, we’ve not added any schema to any of our posts; we’ve just selected the default schema type that will be added to the post, which we can then customize on a per-post or per-page basis.
How To Configure Schema Markup In Rank Math
Adding Schema On Posts and Pages
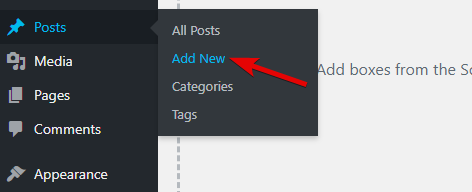
Now that we’ve selected a default schema type to be added to your pages, we can start adding or customizing the schema that will be added to our posts. To demonstrate, we will create a new post by going to Posts > Add New.
We’ll then give our post a title and add some dummy text to it. Then, we’ll open up Rank Math by clicking the Rank Math icon on the WordPress menu.

Once the Rank Math menu is open, we’ll open the Schema Tab by clicking the icon from the menu.
This is how the new Schema Generator will look like. If you remember, we set up a default schema type (Article) above, which is why it shows up here. If you selected a different schema type as default, that one would show up here.
Since we will cover adding all kinds of schema, we will delete the existing schema by clicking the delete icon next to the schema and clicking Yes on the confirmation dialogue.
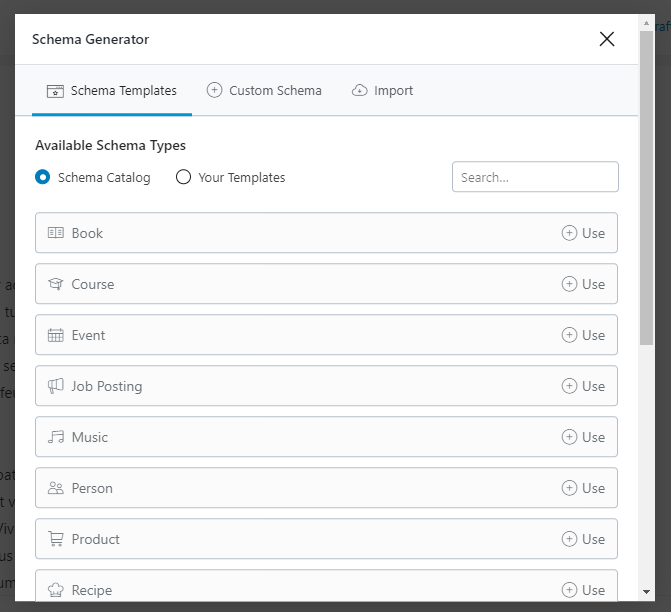
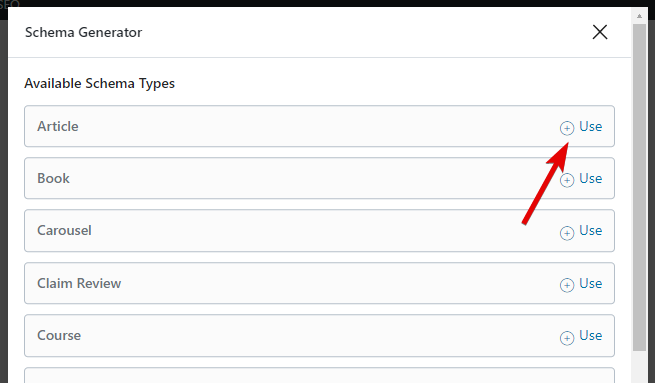
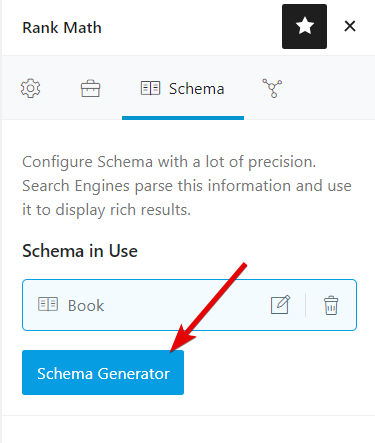
Now we’re starting with a blank slate. Let us add a brand new schema by clicking the Schema Generator button.
This is what you will see on the screen. You will see all the different types of schema that Rank Math supports, and a bunch of other options that we will explain in the article.
If you’re using the free version of Rank Math, you might not see some of the features. Those features will only be available in Rank Math Pro. Here is a side by side comparison of how the Free vs. Pro will look like.
On the Free version, you do see the Custom Schema tab, but it is not operational. If you access it, it will prompt you to upgrade to Rank Math Pro.
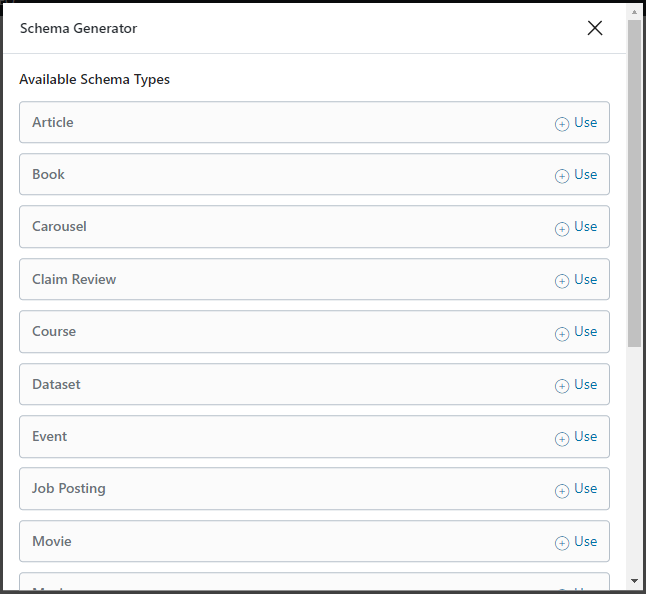
Here is a complete list of all the schema types supported by Rank Math.
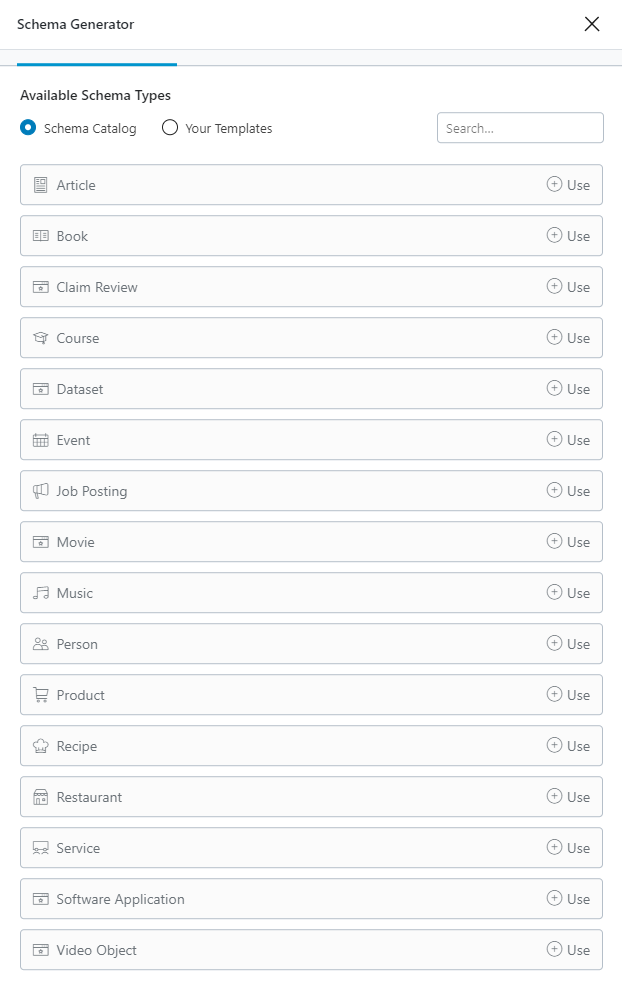
Here is the text version. Click on any of the names to go directly to it.
Schema Types offers by Rank Math
- None
- Article
- Book
- Claim Review
- Course
- Dataset
- Event
- Job Posting
- Movie
- Music
- Person
- Product
- Recipe
- Restaurant
- Service
- Software Application
- Video Object
We’ve also added a search option to find the schema you’re looking for quickly. In this article, we’ll be using Rank Math Pro, and we will highlight the features exclusive to Rank Math Pro so you can differentiate them easily.
For the rest of the tutorial, we will be using the PRO version, as we want to highlight all the features in Rank Math.
Schema in Rank Math vs. Rank Math Pro
Before starting, let us make it easy for you to understand the features exclusive to Rank Math Pro. They are:
- Global Templates
- Importing Schema
- Custom Schema
- Code Validation
- Adding Multiple Schema on a Page
How To Configure Schema Markup In Rank Math
How To Configure Each Schema Type with Rank Math
Now we’ll show you how to configure each type of schema with Rank Math. To understand the process better, you first need to understand a simple concept, variables.
Variables are nothing but containers for values, and they are common in programming and any scientific field. Inside Rank Math’s perspective, variables represent a value that will be derived from your post. Let us explain.
If you have any experience in using schema, then you must have observed that many times the value that you add to a schema is already present on your post in some way.
Want to add a headline for schema? It could be the same as the title of your post.
The description in schema could be the same as your post’s meta description.
And so forth.
To avoid re-work, Rank Math lets you refer to this content using variables instead of adding the value every time. That is like saying, “Hey Rank Math, just use my post’s title as the headline for schema for all my posts. I don’t want to add it manually to every post”. And you can do this for many other schema fields, not just your titles.
Rank Supports plenty of variables, and each of them allows you to refer to different areas of your post, your website, or other metadata. This makes it useful to set up standard schema to be used on multiple pages.
Here is a full list of variables you can use for Schema:
Basic
%sep%
%search_query%
%count(varname)%
%filename%
%sitename%
%sitedesc%
%currentdate%
%currentday%
%currentmonth%
%currentyear%
%currenttime%
%currenttime(F jS, Y)%
%org_name%
%org_logo%
Advanced
%id%
%focuskw%
%customfield(field-name)%
%page%
%pagenumber%
%pagetotal%
%pt_single%
%pt_plural%
Post
%title%
%parent_title%
%excerpt%
%excerpt_only%
%seo_title%
%seo_description%
%url%
%post_thumbnail%
%date%
%modified%
%date(F jS, Y)%
%modified(F jS, Y)%
%category%
%categories%
%categories(limit=3&separator= | &exclude=12,23)%
%tag%
%tags%
%tags(limit=3&separator= | &exclude=12,23)%
Author
%userid%
%name%
%user_description%
WooCommerce
%wc_price%
%wc_sku%
%wc_shortdesc%
%wc_brand%
Important Note: The WooCommerce (wc_) variables only work on WooCommerce related pages/products.
Now that you understand that let us move to the actual schemas.
1 No Schema
While Schema is important, not all your pages need it. If you setup schema from the global options, then by default, all your pages and posts will get some default schema added to them. To avoid that, you can either have add the schema manually by keeping global schema off, or you could use Rank Math Pro to setup display conditions and have schema appear on specific pages only.
If you’re using global schema and want to remove the schema from a page, then you can just delete it. First, head to the post. You should see the schema added to the page or post like this.
Then, you need to do this.
And the schema will be deleted from your page.
2 Article
The Article Schema Type should be used on all articles on your website. That is why we recommend that you set up the Article Schema as the default schema type on your website. Here are all the options that you’ll see when you select the Article Schema Type.
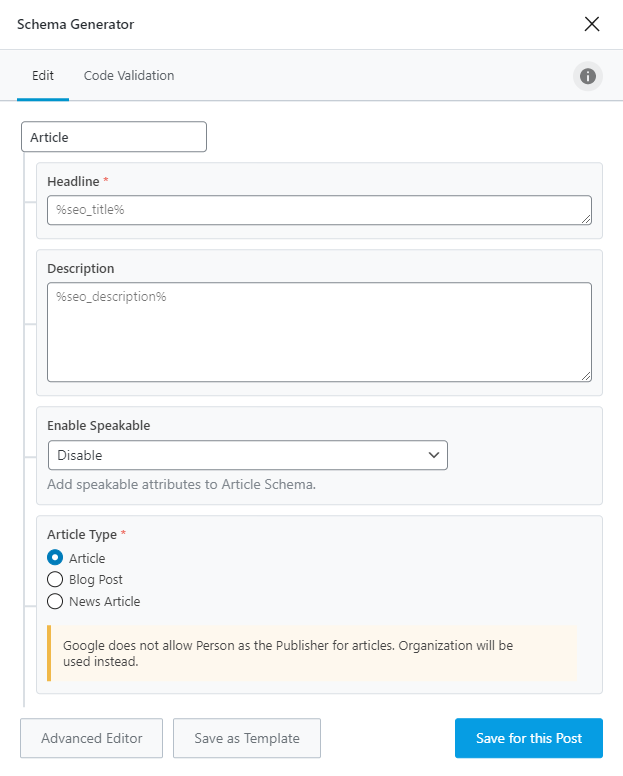
Headline
The Headline is where you will need to enter the meta-headline or the SEO headline for your post. You can either write the headline manually or use supported variables to have Rank Math fetch the appropriate headline. You can also use variables and add text of your choice to the headline.
Description
In the Description field, you enter the meta-description of the post that you want the search engines to see. The same variables that you have access to in the Title field are also available to you in the Description field as well.
Enable Speakable (Pro)
With devices such as Google Home, Alexa, and Apple Homepod becoming more popular than ever, more and more people are searching using voice every day. Due to the nature of these devices, they can only respond with their voice.
The Enable Speakable option in the Article Schema lets you tell Google that your article is speech-friendly. Once enabled, Rank Math will add the appropriate markup to the post, informing Google where it should pick the text to speak to the user.
Once you enable this field, you will also see additional fields on the screen.
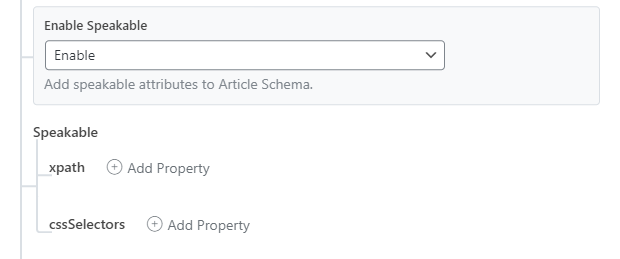
These help you define the sections on the page where Google should use the text from. You can use XPath, CSS selectors, or both depending on how you structure your website.
If you wish to learn more about the Speakable property, you can refer to this article by Google on the subject.
Article Type
In the Article Type field, you have access to 3 options.
- Article
- Blog Post
- News Article
These options let you select the type of article your blog post is. The Article and Blog Post field can be used interchangeably, but the News Article should only be used for factual news content.
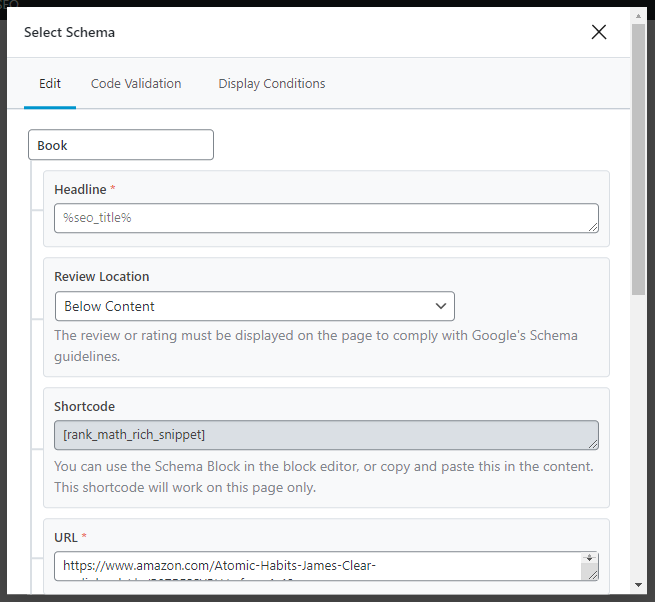
3 Book
If your post is about books of any kind, then you should use the Book Rich Snippet type. When you select Book, here are the options that you should see.

Here is how you would configure each of the settings.
Headline
The Headline option is where the headline of the book should be. Often, it will be the title of the book. Rank Math is configured to automatically fill this option with the title of the page using variables.
Review Location
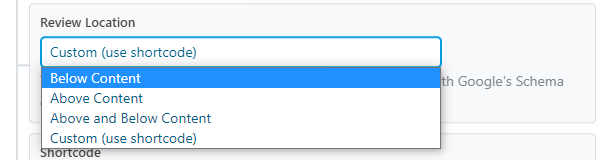
This option lets you configure where the schema for the book type will be displayed on the page. This is a mandatory requirement by Google. You have several options to choose from, which are:
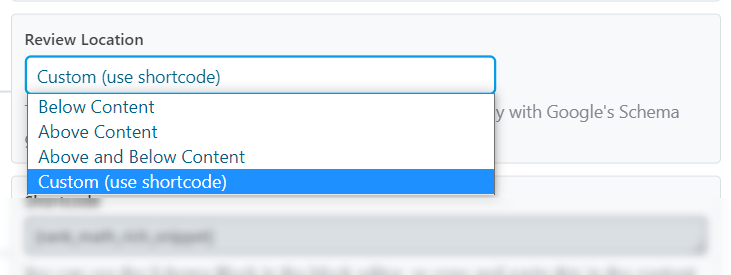
If you use the first 3 options, then the schema will be added to the page automatically. With the last (Custom) option, you’d have to use the shortcode from the next setting.
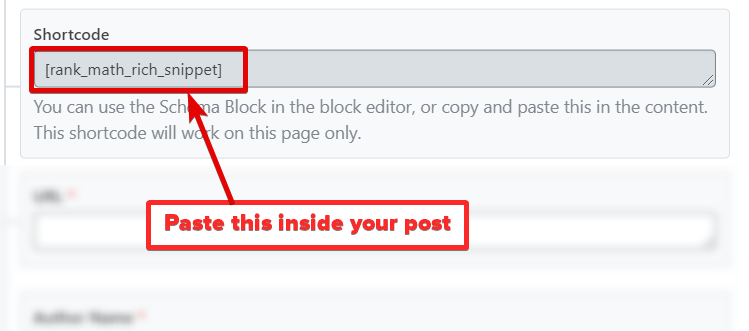
Shortcode
The shortcode option is only to be used if you use the Custom option in the Review Location option. If you did choose that option, then make sure to paste this shortcode inside your post where you’d like the schema data to appear.
URL
The URL option is where the URL of the book needs to be. This is another mandatory field, so make sure to fill it here or on the post itself.
Author Name
As you probably guessed, the Author Name field should contain the name of the author of the book. Rank Math pulls in the name of the post author as the default setting using the variable %name%, and you might have to change it.
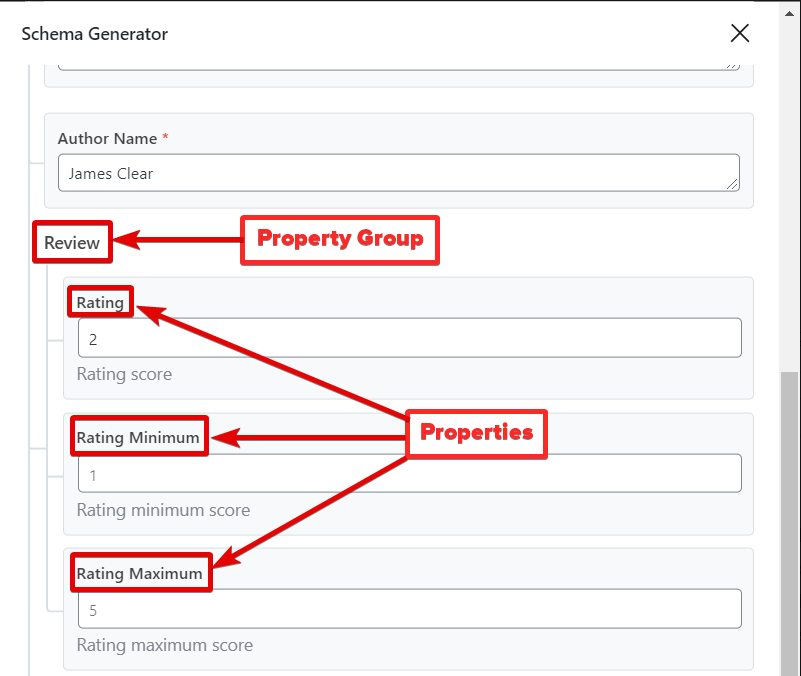
Review
The Review field has 3 options.
- Rating: The rating that you want to assign to the book
- Rating Minimum: The minimum rating on your rating scale
- Rating Maximum: The maximum rating on your rating scale
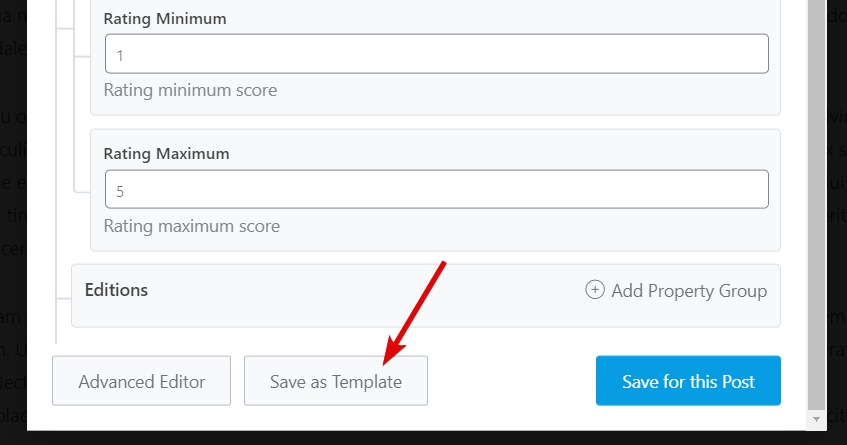
Edition
Many books come in different editions, like paperback, hardcover, etc. This information is important to add in the schema to tell Google the exact type of book you’re talking about. The Edition option lets you do exactly that.
Once you click the Add Property Group button, the following new fields will appear on the screen.
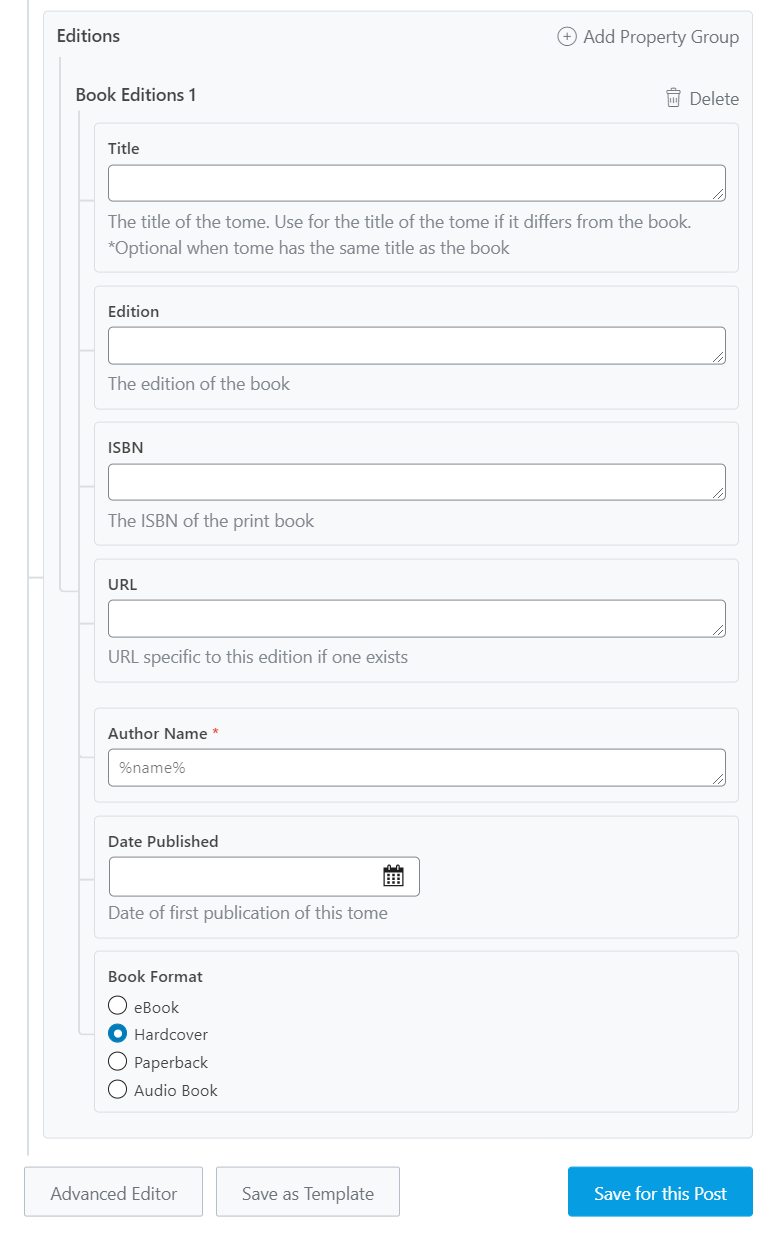
Here is how you fill in these fields.
- Title: If the title of the specific edition is different from the original, add it here.
- Edition: Enter which edition the book is in
- ISBN: Enter the ISBN of the book here
- URL: Enter the URL of only this specific edition
- Author Name: Enter the name of the author here
- Book Format: Select which format the book is in
Since a book can have multiple formats, you can add more property groups to a single book schema and add the information to those as well.
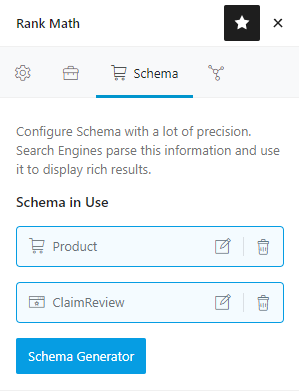
4 Claim Review (Pro)
The Claim Review is used when you fact-check certain claims made by individuals or organizations. You can learn more about it on Schema.org. Google has also created a dedicated page to explain the Claim Review structured data. Google calls it Fact Check. Here are all the options that you see in the Claim Review Schema.
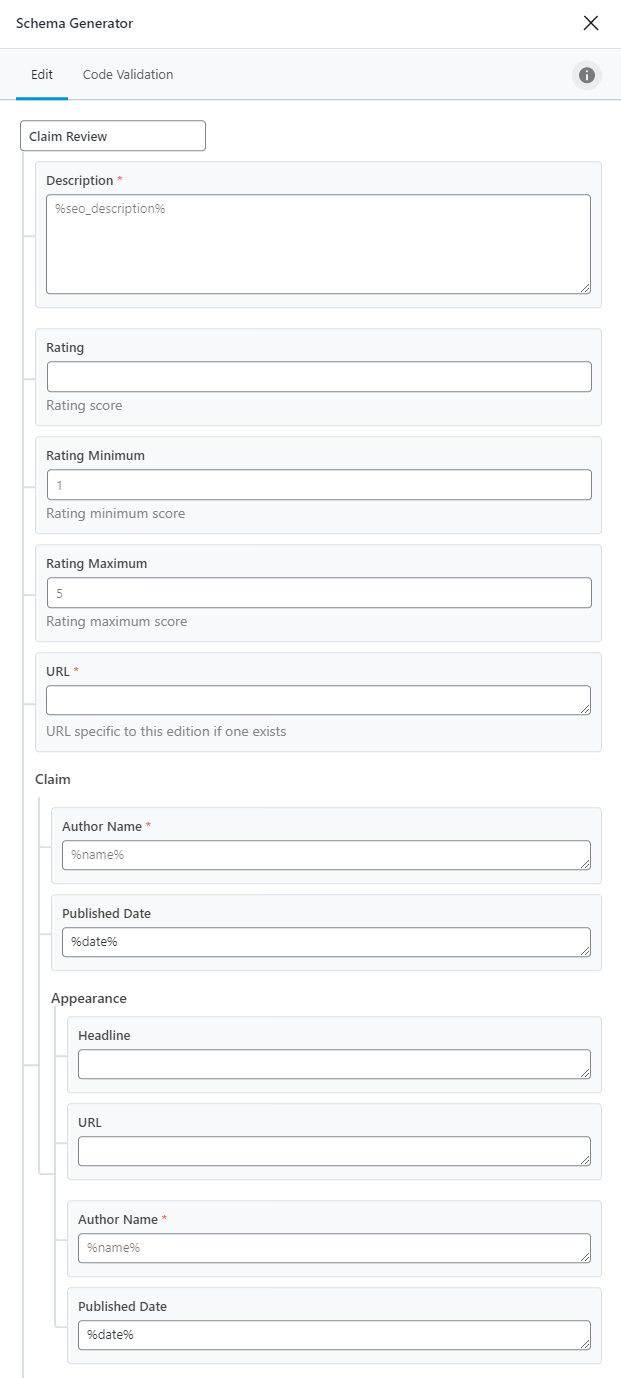
Description
Here you will describe the content that you’re talking about on the page. Of course, you should include some information about the facts that you are checking in the post. You can use variables your website or post metadata and create a dynamic description.
Rating
How much would you rate this? Enter the number here.
Rating Minimum
What is the minimum rating based on your scale? Enter that number here.
Rating Maximum
What is the maximum rating based on your scale? Enter that number here.
URL
Enter the URL where the claim exists.
Claim > Author Name
Enter the name of the author, who is performing the fact check.
Claim > Published Date
Enter the date when the fact check was performed.
Claim > Appearance > Headline
Enter the headline of the post where the claim was published
Claim > Appearance > URL
Enter the URL of the post where the claim was published
Claim > Appearance > Author Name
Enter the name of the author who made the claim
Claim > Appearance > Published Date
Enter the date the claim was made.
5 Course
If you’re reviewing or talking about an online course, then you can use the Course Rich Snippet. Here are all the options that you would see if you select the Course Rich Snippet.
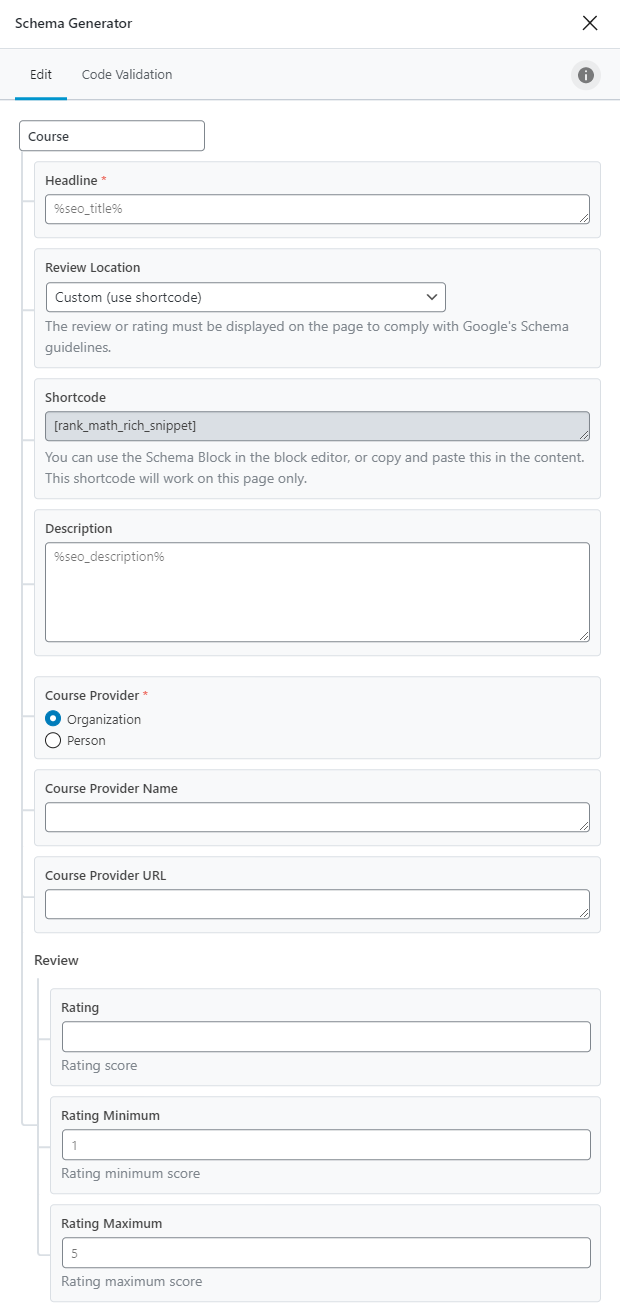
Here is how you configure the Course Schema Type.
Headline
This is the headline for the course. It is the first thing people will see, so make sure it has the name of the course and the right keywords to make it appealing to the audience. You can also use variables to create a headline dynamically using your post or website metadata.
Review Location
As per Google guidelines, review information for schemas should be visible on the page as well. This option lets you configure where the information should be added. You can also choose a custom location by choosing the Shortcode option.
Shortcode
If you chose the shortcode option in the setting above, you should paste the shortcode from this field into your post where you want the review to be displayed.
Description
Here you will enter the course description. Be liberal and describe the course in detail to make it enticing. Make sure to use variables to create a dynamic description.
Course Provider
Here you can choose between the course provider. If the course if by an individual, choose that option. If an organization has created the course, select that option.
Course Provider Name
Enter the name of the course provider here.
Course Provider URL
Enter the URL where the course is available.
Review
- Rating: The actual rating you want to give to the course
- Rating Minimum: The maximum rating allowed under your rating methodology
- Rating Maximum: The maximum rating allowed under your rating methodology
6 Dataset (Pro)
The Dataset schema type is best suited for pages or posts where you are talking a publically accessible data set. You might just talk about the data, or even draw conclusions from it—the schema applies in both cases. You can learn more about the schema type here.
Here are the fields you will need to configure in the schema.
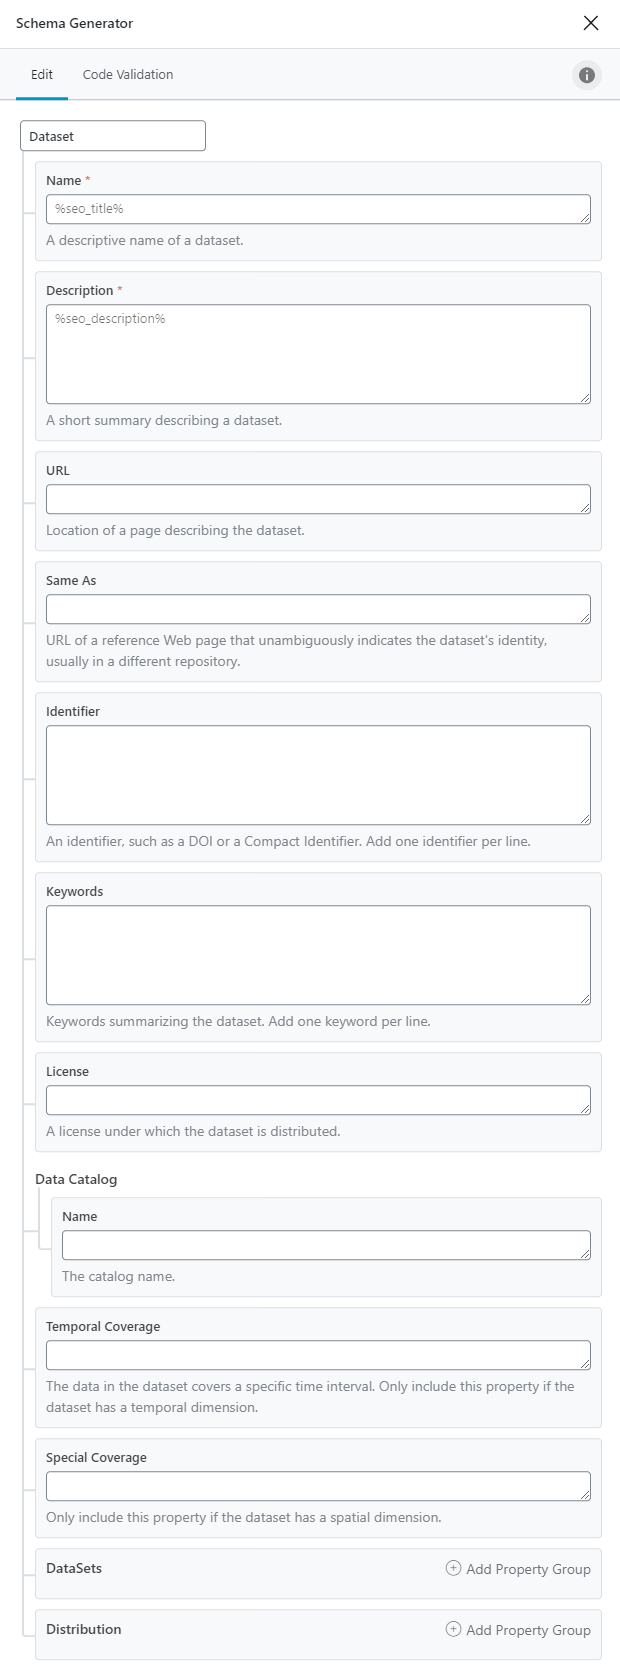
Name
Here you will name the dataset or mention the name of the existing dataset. Make sure to mention it correctly, so users can find it easily.
Description
Here you will describe the dataset and the conclusions you are trying to or coming to with the dataset.
URL
Here you can add the URL of an external page that describes the dataset.
Same As
If another page describes the dataset in a similar way as the field above, then add the link here.
Identifier
Here you can add identifiers that help explain the data set. Add one per line.
Keywords
Add additional keywords here that describe the dataset. Add one keyword per line.
License
Mention the license under which the dataset is distributed.
Data Catalog Name
If the data catalog has a name, mention it here.
Temporal Coverage
If the dataset covers only a set time period, mention the time period here.
Spatial Coverage
If the dataset covers specific geographic locations, mention it here.
DataSets
If you’re talking about multiple datasets on your page, you can add information about them here. If you click the Add Property Group link, these fields will appear.
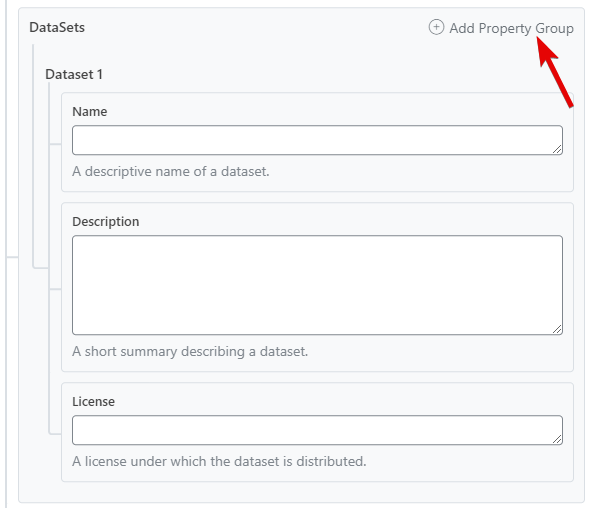
You can add in the information for a particular dataset, then click the Add Property Group link to add another group. You can then fill in the information in that dataset as well.
Distribution
If you are making some dataset available for download, then click the Add Property Group link to see these fields.
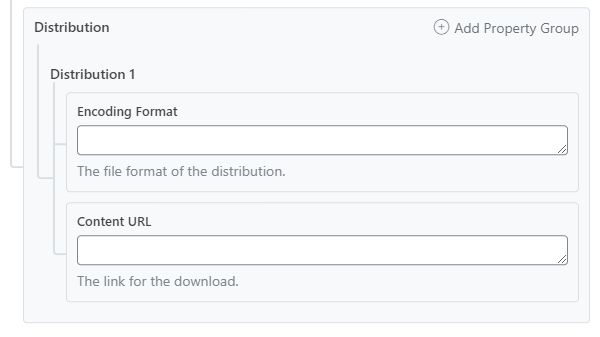
In the fields, you will add the Encoding Format and the URL where the dataset is available for download. If you are sharing more than one dataset, click the link again to add more property groups.
- 8 Types Of Toxic Coworkers And How To Deal With Them
- Bad Things To Avoid Doing At Work [9 Things You Should Never Do At The Office]
- How To Be More Productive At Work [9 Easy To Learn Tips]
7 Event
Is your post or page about a public event? Then use the event type to markup your metadata. Here are all the fields that you should see when using the Event Schema in your post.
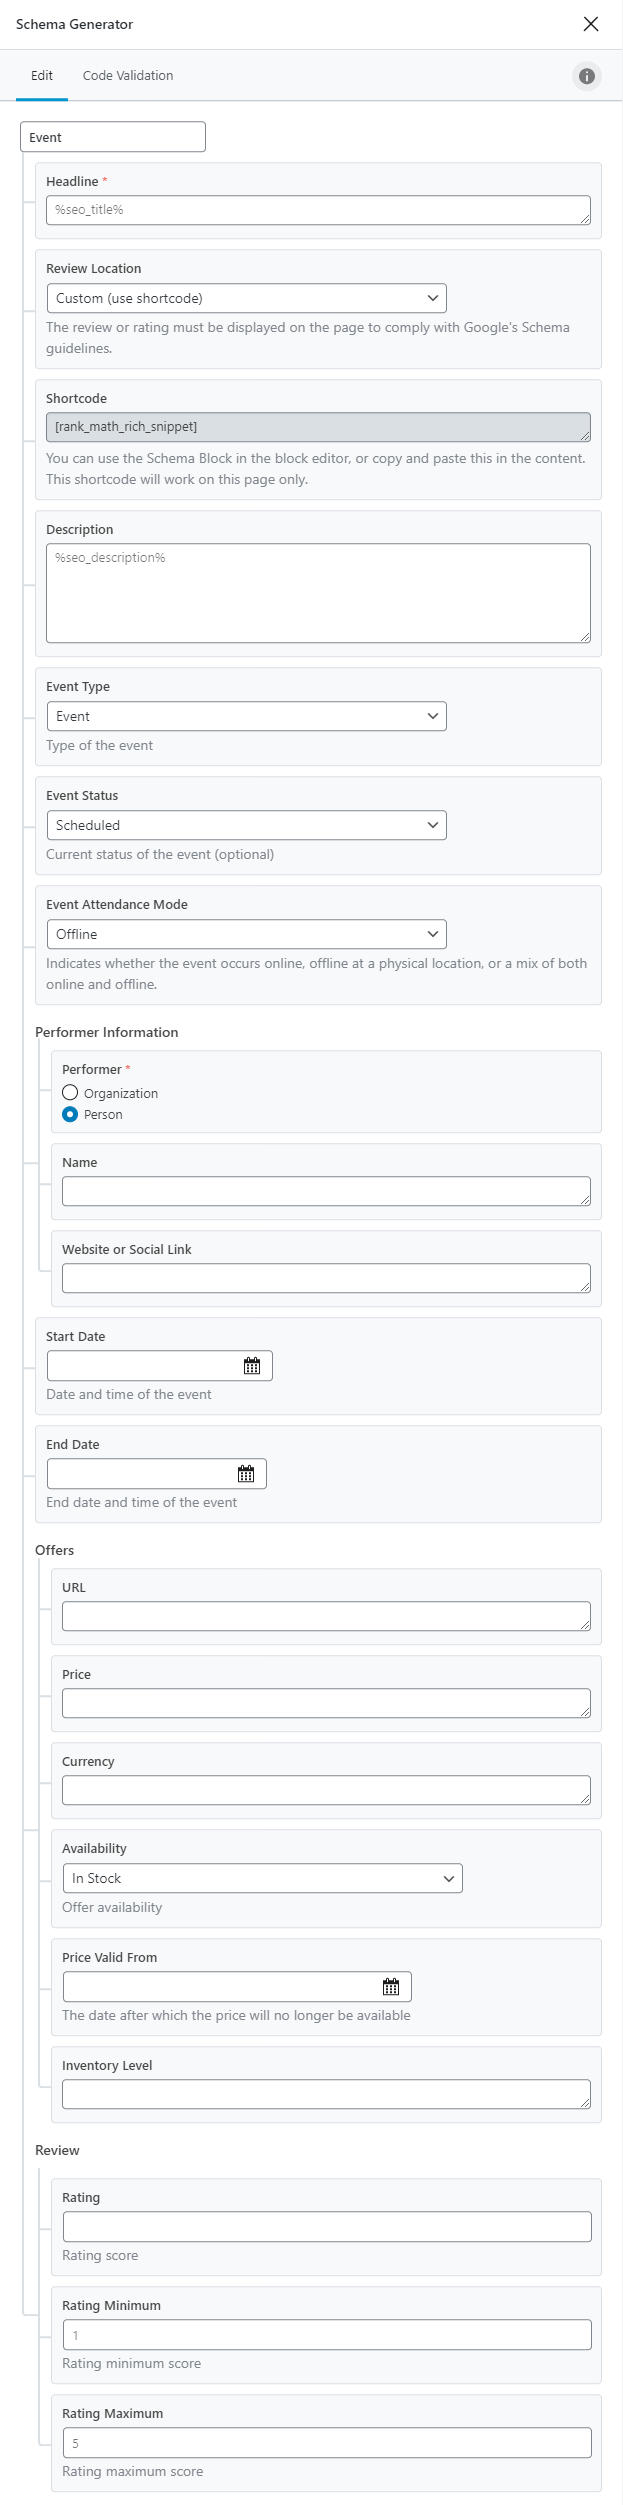
The Event Type Schema has plenty of options, so let us go through them quickly.
Headline
Here you set the meta-headline for the event that you mention in your post. You can use variables, text, or a combination of both to create a working headline.
Review Location
When posting a review of something, Schema guidelines state that the review information (ratings, etc.) should be present on the page as well, i.e., visible to the user. Not complying with this can lead your website not to qualify for rich results. Since that is obviously something you don’t want, therefore, it is wise to include the ratings on the page as well using this option.
Rank Math offers a few ways using which you can add the rating information on the page. You can add it to the top of the post, the bottom of the post, both the top and bottom of the post, or a custom location using a shortcode.
Shortcode
The Shortcode field is only visible if you select the Shortcode option in the Review Location field. With this shortcode, you can display the rating information inside the post. Simply copy the shortcode and paste it in the location of your choice.
Description
Here you set a meta-description of the event you’re talking about. Similar to the Headline, you can either create a static description or use the variables to create a dynamic one. The same variables that are available to set the headline are also available for the description.
The description should be short, but try to make it “sell” the event. Readers should know:
- What the event is
- Who it’s for
- Why they should care
Event Type
Here you select the type of event you’re talking about on the page. There are lots of different event types that are recognized in Schema.org markup – too many to list here! Just scroll through the options and find the one that best describes your event.
Here is the list of supported events:
- Event
- Business Event
- Children’s Event
- Comedy event
- Dance Event
- Delivery Event
- Education Event
- Exhibition Event
- Festival
- Food Event
- Literary Event
- Music Event
- Publication Event
- Sale Event
- Screening Event
- Social Event
- Sports Event
- Theater Event
- Visual Arts Event
Event Status
Here you can select the current status of the event. Update this field is the status of the event changes after you’ve published your post so the correct information can be displayed in Google. This is an optional field, so keep it to “None” if you’re not sure.
Here is the list of statuses you can choose from.
Event Attendence Mode
With the rise of webinars and online events, it is important to distinguish where the actual event will take place. This option lets you configure exactly that with the following options.
Performer Information
Here you will choose if the event is performed by an organization or an individual.
Name
Enter the name of any one of the performers here. For example, for a Person performing, you may write “Taylor Swift”, and for a group, you can write the name of the band, ex. “Metallica”. If there are multiple performers, enter the name of any one of them.
Website or Social Link
If the performer you mentioned (person or organization) has a website, enter the URL here. Make sure to enter the URL of the performer you mentioned in the Performer Name field, not others.> If you can’t find an exact URL, you can also enter the social media link of any popular social network here.
Start Date and End Date
When is the event scheduled to happen, and how long will it last. The start date and the end date can be used to configure those options.
Both the Start Date and the End Date have a date picker and time picker, which you can use to enter the precise time and date for the event.
Offers > URL
Where can people buy tickets for the event? Enter the URL for that here. If the event is free, just leave this blank,
Offers > Price
How much does the event cost? Enter only the number in the field without any currency symbol. If the event is free, or you don’t know the price, you can leave this field blank.
Offers > Currency
As we mentioned, you should not enter the currency symbol in the Entry Price field, as you will specify the currency here using the ISO 4217 Currency Code. If you don’t know your country’s currency’s ISO code, Wikipedia has an active code list.
Offers > Availability
Are the tickets still available, or have they sold out?
The options are:
- None
- In stock
- Sold Out
- Preorder
Offers > Price Valid From
Select the date until which the price for the ticket is valid.
Offers > Inventory Level
If you know how many tickets are available for sale, enter the number here, or leave this field blank.
Review
- Rating: How would you rate the event? Numbers only.
- Rating Minimum: What is the minimum rating on your rating scale?
- Rating Maximum: What is the maximum rating on your rating scale?
8 Job Posting
If you are talking about specific jobs on your website, you should add the Job Posting Schema on the page. This schema type will be most valuable to job sites, job boards, and similar websites. Here are all the options to configure in the schema type.
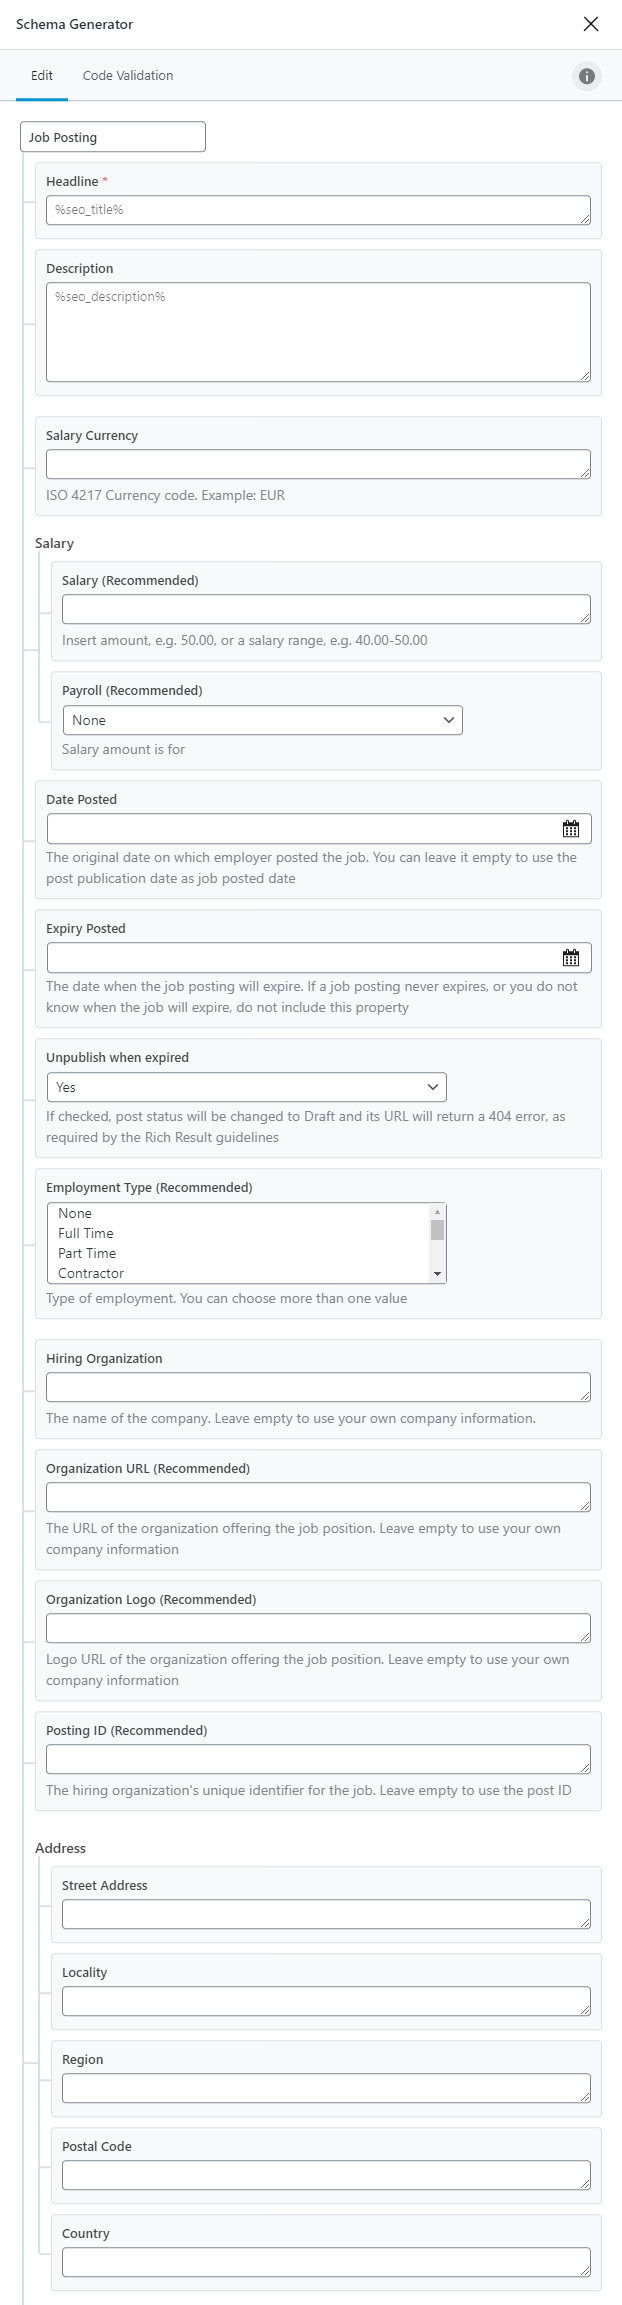
Headline
Here you will create a meta-headline for the job. Depending on your post, you can use the title of the post using variables, or write a new headline. Make sure to describe the job or at least mention the designation of the job to make it enticing for the candidate.
Description
Apart from the headline, the description is the part where you add information to attract the right candidate. Make sure to add all the necessary information about the job to make the job appealing to potential candidates.
Similar to the headline, you can use variables to access your metadata and use it alongside your default post description.
Salary Currency
Here you enter the ISO code of the currency that the salary will be paid in. This is very important to fill correctly. You don’t want to mention the salary in Indonesian Rupiah while the candidate expects the same salary in USD.
Salary (Recommended)
Insert the approximate salary range that is being offered for this job. Just enter the number here without any currency symbol. You can also enter a range, for example, “25000-33000” (without quotes) if the salary is not fixed.
If you don’t know the ISO code of the currency, then Wikipedia has a complete list.
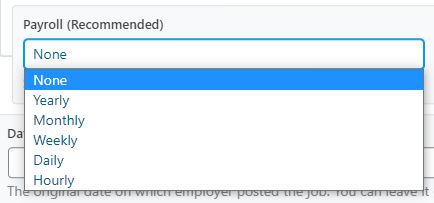
Payroll (Recommended)
Here you enter the time period for the salary will be paid for. Setting this up correctly is important. The last thing you want is to post a quarterly salary range while the candidates expect it as the monthly salary. Here are the time periods that you can specify.
Date Posted
This field should contain the date the job is posted. You don’t need to enter the date and time manually; you can use the date and time pickers to do it instead. If you don’t know the date the job was posted, you can leave the field blank, and Rank Math will pick the post-publication date as the posting date.
Expiry Posted
Here you need to enter the date when the job listing will expire. Similar to the Date Posted field, you can use the date and time picker to enter the date and time instead of doing it manually.
Unpublish When Expired
How would you feel if you found the perfect job opportunity only to discover that the job listing expired months ago?
To prevent this from happening, the Rich Result guidelines state that after a job listing expires, the post should be taken down. Rank Math has incorporated this feature and lets you control the behavior of your post when the job listing expires. When you enable this setting, then Rank Math will convert the post to “Draft” status and serve a 404 in its place. We recommend that you enable this setting.
Employment Type (Recommended)
What kind of employees is the employer looking for? Full-time, part-time, or freelance? The Employment Type field lets you define that easily. Simply check the Employment types that are qualified for the job listing. You can and should select all the types that are qualified for the job.
Hiring Organization
Which organization has posted the job? Enter the name of that organization here. If you leave this blank, then Rank Math will use the information that you entered while setting up your website.
Organization URL (Recommended)
If the company posting the job offer has a website, list the URL in this field. If you leave this field blank, then your information will be used to populate this field.
Organization Logo
Enter the URL of the logo of the company posting the job. If you’re posting the job for another company, ask them to provide a URL, or you can upload their logo to your website and use it instead. Here is how to do it.
Open the Media Library from your admin account and upload the logo of the organization to your website.
Click the logo to open its details. You will find the URL with some additional information on the sidebar.
Then paste the URL in the field.
Posting ID (Recommended)
Enter a unique ID for this specific job. This can be provided by the employer, or you can enter one yourself for record-keeping. If you leave the field empty, then the post ID will be used instead.
Address > Street Address
Enter the street address of the employer who is posting the job opportunity.
Address > Locality
Enter a locality close to the address the job listing is posted for.
Address > Region
Here you can enter the city or region where the job is posted.
Address > Postal Code
Enter the postal code for the location where the job is posted.
Address > Country
Enter the country where the job is actually posted.
9 Movie
If you’re talking about a movie in your post, you should use the Movie schema type. Here are the options that you’ll need to configure.
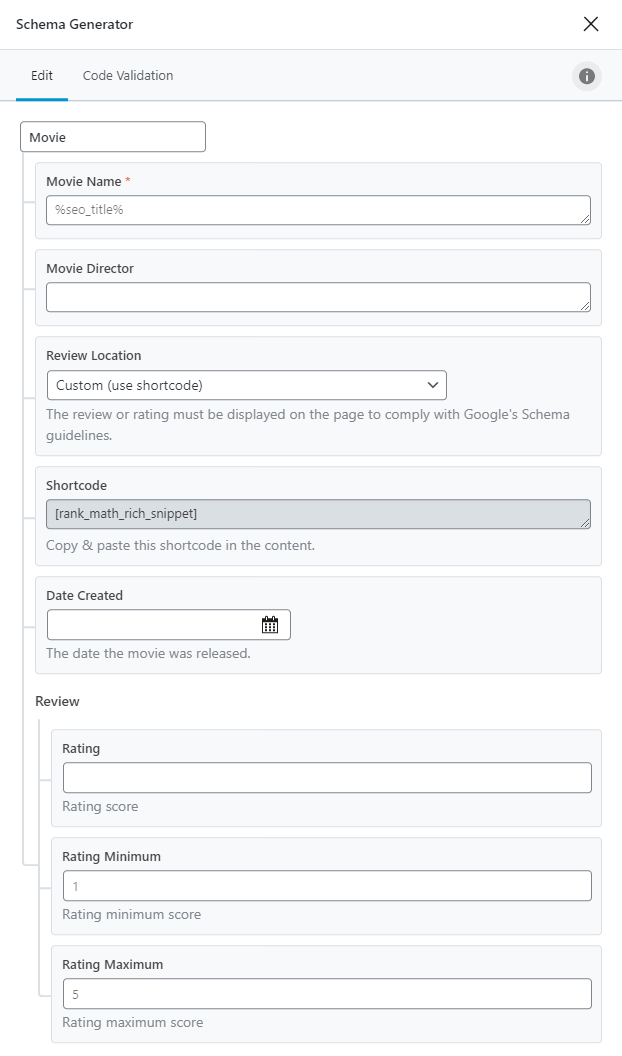
Movie Name
Here you need to enter the movie name. If you’ve already mentioned it in the title, you can use variables to refer to it; otherwise you can write the name in.
Movie Director
Here you need to enter the name of the director of the movie.
Review Location
As per Google guidelines, review information for schemas should be visible on the page as well. This option lets you configure where the information should be added. You can also choose a custom location by choosing the Shortcode option.
Shortcode
If you chose the shortcode option in the setting above, you should paste the shortcode from this field into your post where you want the review to be displayed.
Date Created
Use the date picker to pick the date the movie was released.
Rating
How would you rate the movie? Enter the number here.
Rating Minimum
What is the minimum score on your rating scale? Enter the number here.
Rating Maximum
What is the maximum score on your rating scale? Enter the number here.
10 Music
If your post discusses music, then you should use the Music Rich Snippet. Here are all the options that should be available for the Music Rich Snippet Type.
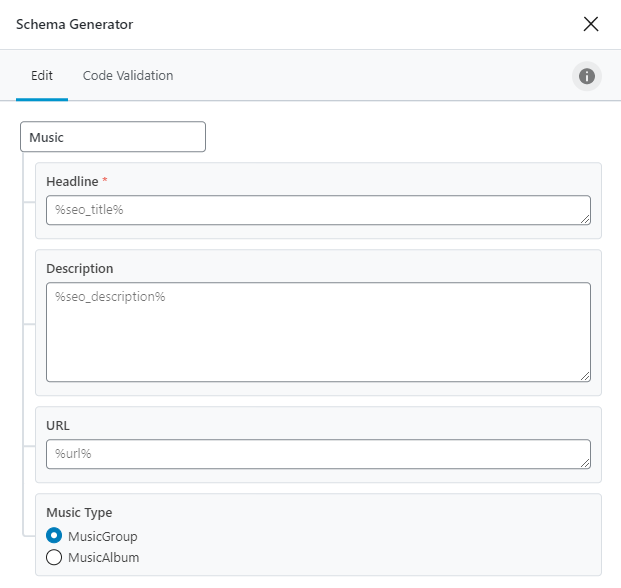
Headline
Here you should enter the meta headline that you want Google and other search engines to read. Make sure to mention the name of the song, band, and even the artist, and it is relevant. If you’ve already added it to the title of the post, use variables to reference them here.
Description
In the Description field, you can describe the music or the album. You can talk about how it was created, the genre, and more. Write a description that would attract users and please the search engines at the same time. You can also use the variables to create a dynamic description of the music.
URL
Enter the URL where the users can preview and purchase the music.
Type
Here you configure if you’re talking about music or the artists that created the music. Select the appropriate option for your post from the available options.
11 Person
The Person Rich Snippet is to be used when you’re discussing a specific person. The person can be alive, dead, undead, or even fictional. Here are all the options that should be visible to you when you select the Person Rich Snippet.
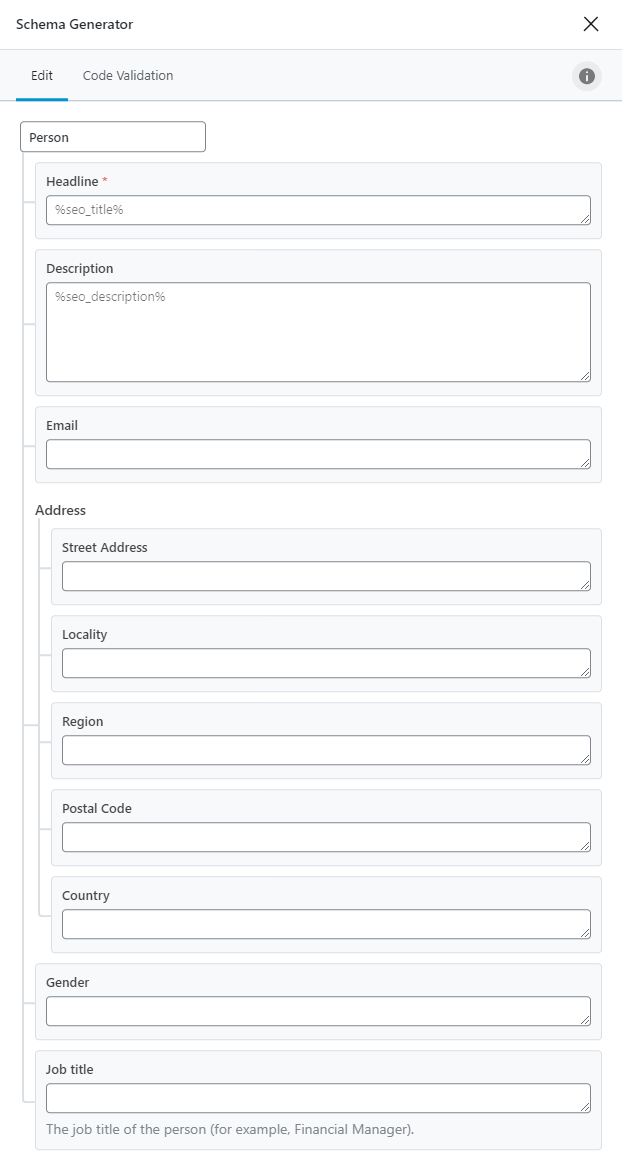
Headline
This would be the meta-headline for the search engines. You can name the person here, or have a headline that includes their name. If the post headline already does that, you can reference that with the right variable and create a unique headline by adding some more text here.
Description
Here you can describe the person. If you’re talking about a recent event, write about that. Make sure to make it compelling, so people reading about it are bound to click-through to your website.
In this field, you can enter the email address of the person.
Address
All the fields in the Address section, namely, Street Address, Locality, Region, Postal Code, and Country, should be filled in based on the person’s address.
Gender
Here you can enter the person’s gender. You can write Male, Female, or even enter a string for non-binary genders.
Job Title
Here you can enter the job title of the person. A few examples would be the Director of Operations, Customer Service Executive, etc.
12 Product
The Product Rich Snippet is the most useful when you’re talking about products. If you’re an ecommerce store, adding the Product Rich Snippet to your product pages is highly recommended. Here are all the options that you would see in the Product Rich Snippet.
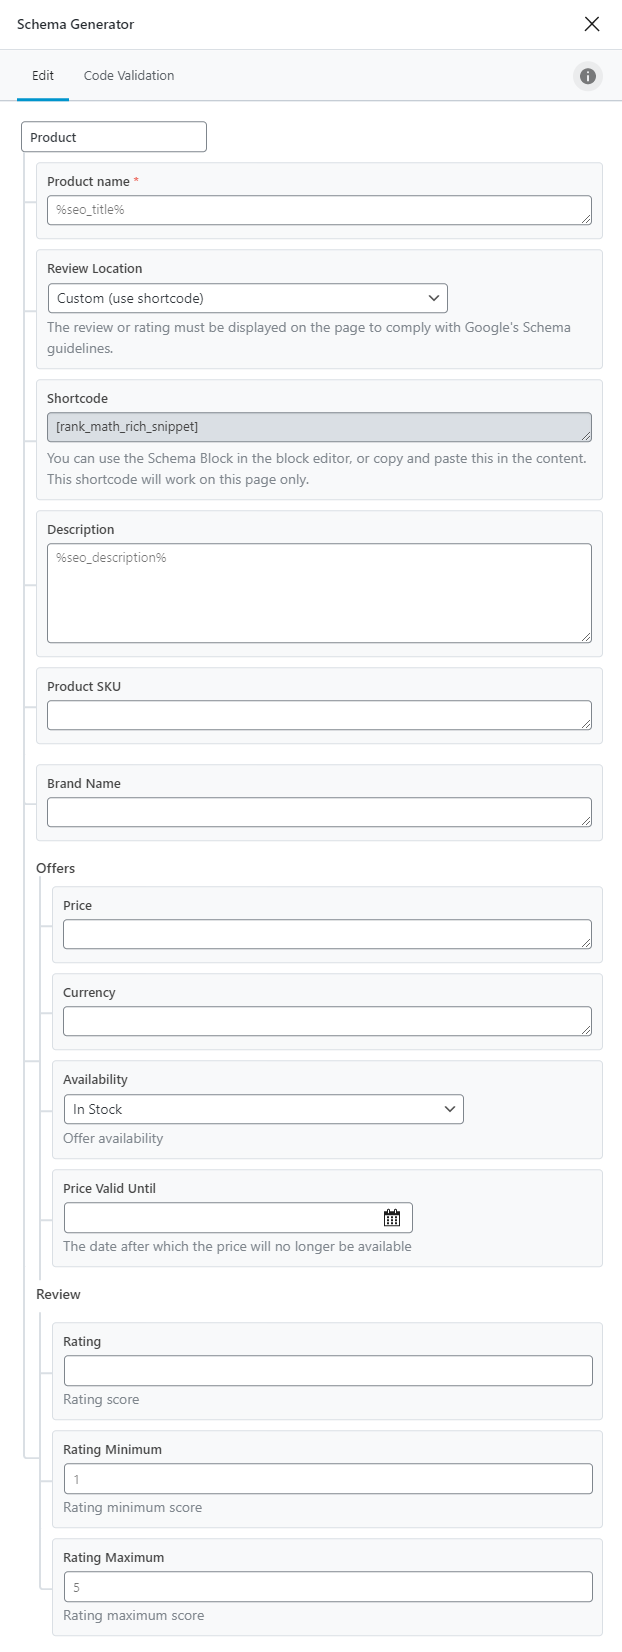
Product Name
Here you have to specify the name of the product. If you’ve already mentioned the name in the post title, you can reference it here using variables.
Review Location
Google requires the review information for products to be shown on the page, not just the metadata. This option lets you pick where you want Rank Math to place that information. You can also choose a custom location using the shortcode option.
Shortcode
If you choose the shortcode option in the setting above, you will have to paste the shortcode from this field on your page at the location where you want the review information to appear.
Description
Here you would describe the product. Think of this as the product description itself. In fact, you can refer to the exact product description from your page using variables.
Product SKU
Here you enter the product’s unique Stock Keeping Unit.
Brand Name
Which brand is the product from? Enter the name of that brand here.
Price
How much is the product selling for? Enter the number here without any currency information.
Currency
Here you enter the ISO 4217 currency code of the currency the product is priced in. You can find the ISO code of your country’s currency from this Wikipedia Article.
Availability
Is the product currently available, sold out, or on pre-order? Choose the most appropriate option here.
Price Valid Until
Pick a date till which the entered price is valid.
Rating
How would you rate the product? Enter the number here.
Rating Minimum
What is the minimum score on your rating scale? Enter the number here.
Rating Maximum
What is the maximum score on your rating scale? Enter the number here.
13 Recipe
Are you talking about food or beverages? The recipe schema is the perfect addition to your page. Here are all the options that you’ll need to configure.
Before you look at the settings, let us tell you; there are a lot of settings to configure. But, recipes are a competitive world, and almost all the search results are filled with rich results. If you’re serious about gaining traction with a recipe website, you should fill in all the fields.
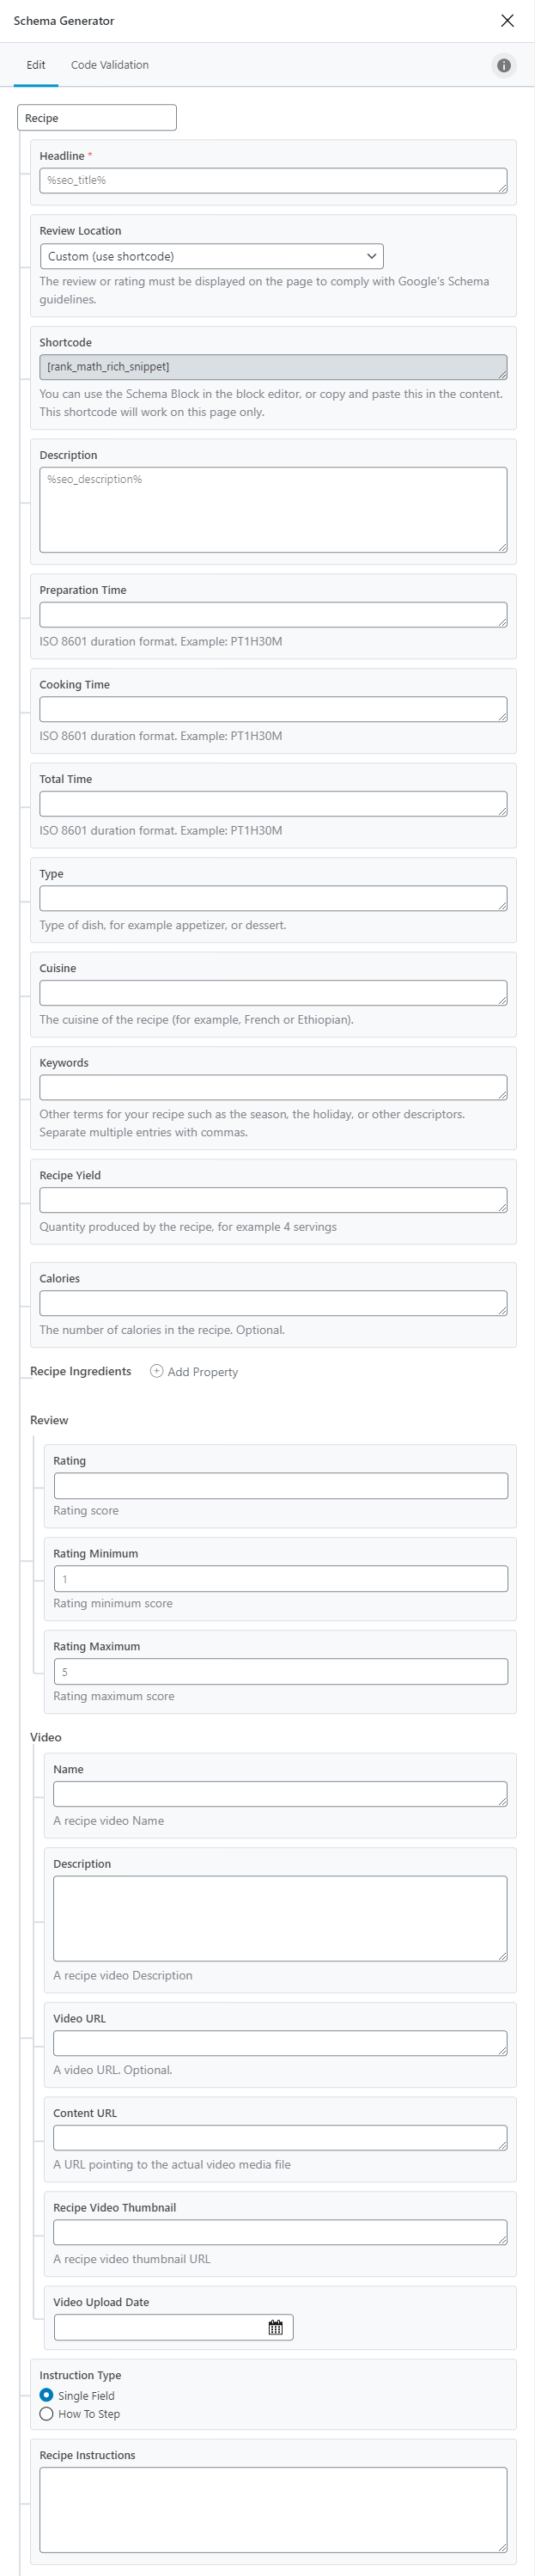
Headline
This is the meta-headline that the search engines (and hopefully humans) would read. Write a headline that has the name of your dish, and make it attractive so that users are bound to click it. You can use variables to pull in the title of your post and other metadata.
Review Location
Google requires the review information from schema to be shown on the page, not just the metadata. This option lets you pick where you want Rank Math to place that information. You can also choose a custom location using the shortcode option.
Shortcode
If you choose the shortcode option in the setting above, you will have to paste the shortcode from this field on your page at the location where you want the review information to appear.
Description
Here, you describe the dish. Obviously, you want the description to be as enticing as possible, so all the people reading it are tempted to click it. You can reference your post metadata using variables to make a dynamic description.
Preparation Time
How much time does it take to prepare before cooking the dish? Enter the time here in ISO 8601 format.
Cooking Time
How much time does the dish take to cook completely? Enter the time here in ISO 8601 format.
Total Time
Prep time + cooking time = total time. Enter the time here in ISO 8601 format.
Type
Are you cooking an entree, main course, dessert, or a salad? Enter the type here.
Cuisine
Which cuisine are you cooking? Mexican, Indian, Thai, Egyptian, or something else? Enter that here.
Keywords
Enter comma-separated keywords that describe your dish closely. Think of how you would add hashtags to an Instagram post.
Recipe Yield
How much food does this recipe produce? Portions, grams, feed x people? Enter it here.
Calories
How many calories does the dish have? Enter it here, if you know it correctly.
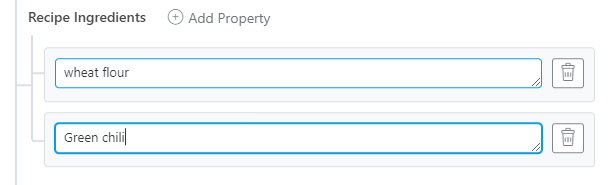
Recipe Ingredients
Here you will enter the ingredients that you used to create the recipe. Since this is an important thing to consider for the end-user, you have to create entries for each ingredient that you use by clicking the Add Property button.
You can add as many entries as you like. Just make to write just the name of the ingredient, and only 1 per entry, something like this.
Rating
How would you rate the dish? Enter the number here.
Rating Minimum
What is the minimum score on your rating scale? Enter the number here.
Rating Maximum
What is the maximum score on your rating scale? Enter the number here.
The next few settings are specific to a video that shows the recipe in action. Although it is optional, adding video information to your schema will make it much more powerful and likely to be ranked. So, try to fill in all the information in the video section.
Video > Name
Enter the name of the video showing the recipe.
Description
Here you can describe the video and the recipe.
Video URL
Enter the URL where users can find and watch the video.
Content URL
Enter the path to the actual video file here.
Recipe Video Thumbnail
Enter the URL of the thumbnail that you’d like to use for the video.
Video Upload Date
When was the video uploaded? Pick the date using the date picker.
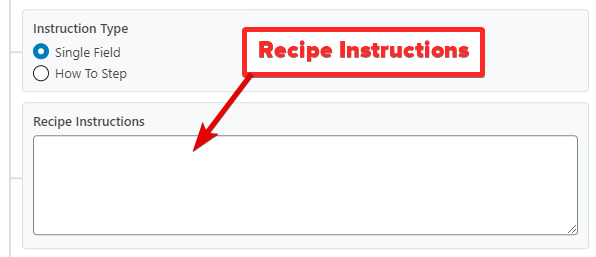
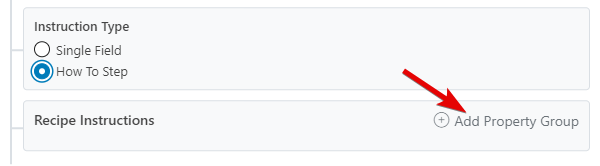
Instruction Type
In schema, there are 2 ways to describe a recipe. You could write a paragraph describing the steps, or you could break down the individual step and present it to the search engines.
Of course, the latter is much more useful to the user and search engines, but it is also time-consuming. As you’ve seen with the recipe schema, there is a lot of metadata to be configured, and it won’t make sense to not complete it all the way. We recommend that you follow the How To Step option, but you can choose the Single Field if you don’t have the time or resources.
If you choose the Single field option, simply type in or copy the steps from your recipe in the text field.
If you choose the How To Step option, the story is a bit different. On choosing the option, you’ll see something similar to the image below. Click the Add Property Group option to reveal more options.
This is where it might get a bit confusing, so let us clarify.
Each recipe is a collection of steps, but each step might also have steps. Sub-steps, if you will. For example, if you’re making pasta, here is what instructions can look like.
- Boil Pasta
- Boil Water
- Add pasta to water
- Take the pasta out
- Prepare sauce
- Step 1
- Step 2
- Step 3
So there are steps, and there are steps in steps. With that, here is how to understand and configure the How To Step recipe schema.
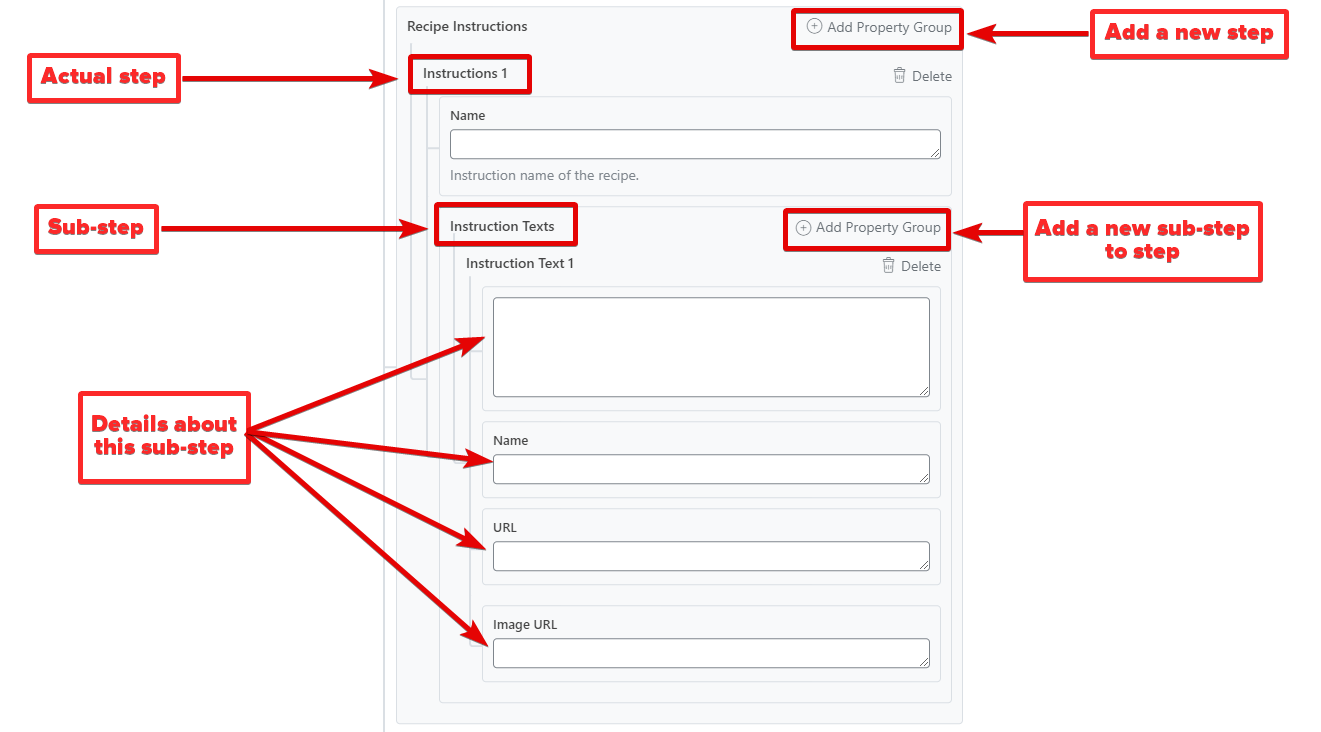
Please note that the Name, URL, and Image URL fields fields are only available in Rank Math Pro.
14 Restaurant
The restaurant rich snippet should be used when your post talks about a food joint, a cafe, or a restaurant. Here are all the options that you would see when you select the Restaurant Rich Snippet.
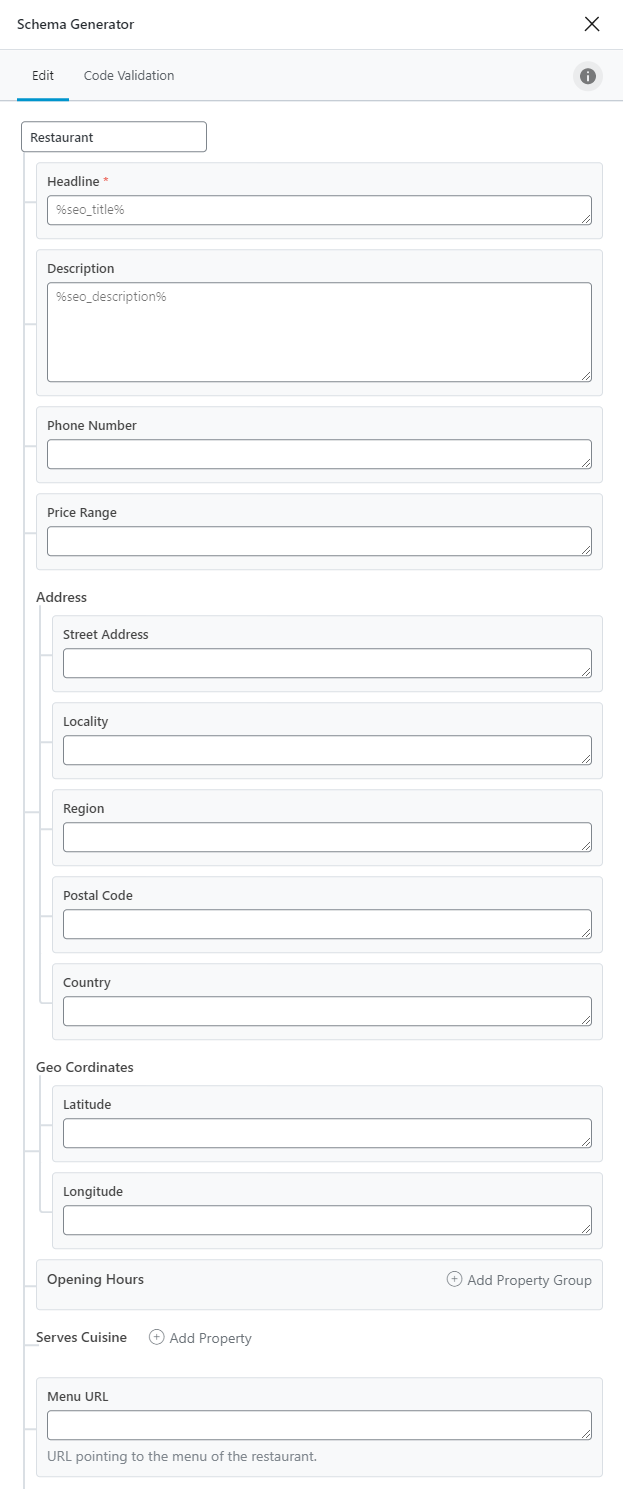
Headline
The Headline is the field where you will add the meta-name for the restaurant. Meta-name being the name that the search engines will crawl and index.
The Headline should obviously contain the Restaurant’s name, and optionally some additional data about the restaurant. You can use variables, text, or a combination to create a headline that works for you.
Description
The description field is where you describe the restaurant. You can describe the location, the ambiance, the staff, the food, the service, and the overall experience here. Again, you can use variables to create a dynamic description on-the-fly.
Phone Number
Enter the restaurant’s phone number here.
Price Range
Enter the price range for the restaurant here. No need for numbers here; just add currency symbols. For example, £ means cheap, while £££ means expensive.
Address
Fill in all the fields in the address section, namely, the Street Address, locality, region, postal code, and the country for the restaurant you’re talking about.
Geo Coordiniates
Enter the Latitude and the Longitude of the restaurant you’re talking about. You can find them by searching on Google Maps, or even the restaurant’s Google Business Listing.
Opening Hours
Since restaurants can open at varied times throughout the week, you have to enter specific information about the opening hours for the schema information to be accurate. Start by clicking the Add Property Group button next to the opening hours.
You will see a few fields open up. Specifically, you will see a day-of-the-week picker, opening time, and closing time.
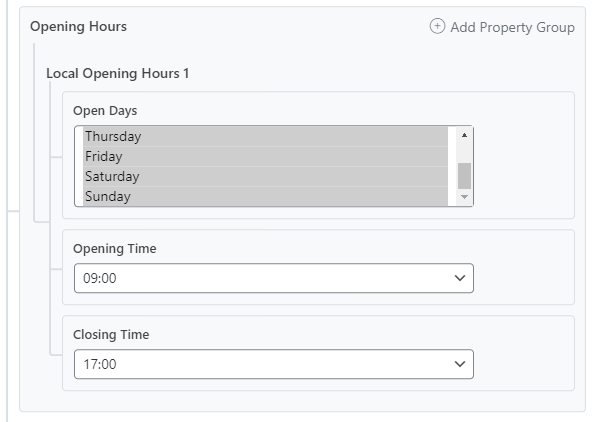
Here you will select all the days in the week the restaurant opens at a particular time and then select the opening and closing time for those days.
For varying schedules, pick only the days the restaurant opens at a particular time, then click the Add Property Group once again to add another set to the list. There pick the rest of the days and the opening and closing times respective to those days.
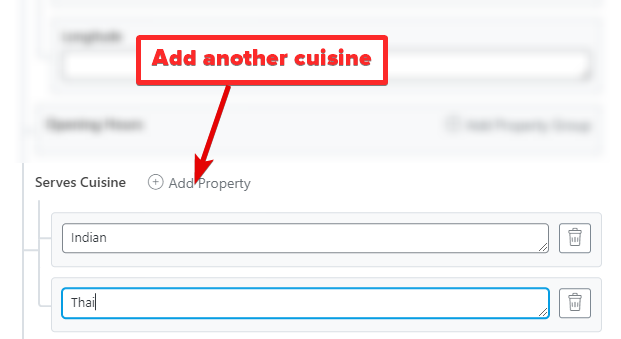
Serves Cuisine
Here you will enter the various cuisines the restaurant offers. You will have to click the Add Property button to fields where you should mention the cuisine. Here is an example.
Menu URL
Enter the URL where customers can find the menu of the restaurant.
15 Service
The Service Rich Snippet should be used when you’re talking about a specific service. For example, if you’re talking about a local business, a plumber, or an electrician, you’d use the service schema. You can also use this schema type on your own local business website. Here are the options that you’ll need to configure.
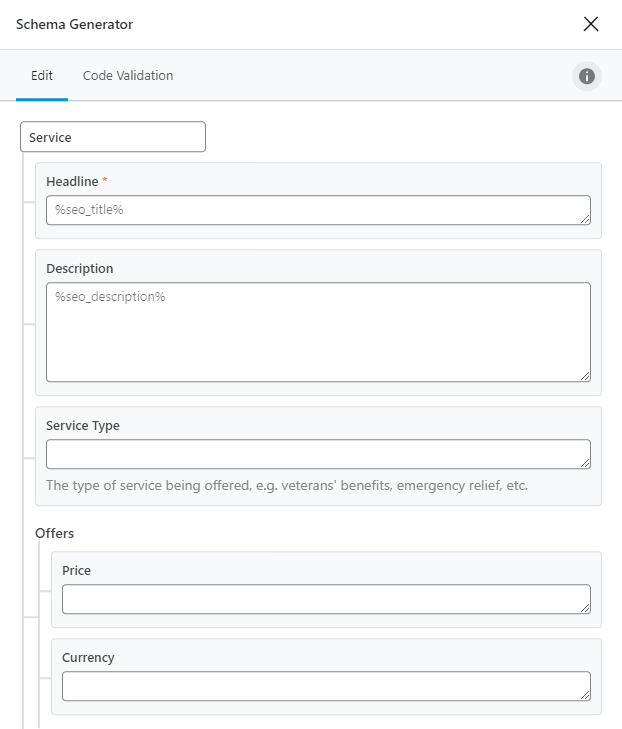
Headline
The Headline should consist of the meta-title of the service. Here you should include the service name and some related keywords. You can create a static Headline by typing it in, or use variables to create part of the Headline (or all of it) dynamically.
Description
Here you need to enter a basic description of the service. Make sure to describe the service a bit and include reasons why potential customers should care. Similar to the Headline, you can create a Description by typing it in or using variables. The same variables that we demonstrated in the Headline section are also available to be used in the Description section.
Service Type
What type of service is being offered? Enter it here. A few examples would be landscaping, car washing, etc.
Price
What is the price of the said service? Enter the price here without any currency symbols.
Currency
Here you need to enter the currency you used to price your service. Enter the ISO 4217 compliant Currency Code here.
16 Software Application
The Software Application Rich Snippet is used when you’re talking about software applications. If you sell or talk about software products on your website, then you should use this Rich Snippet Type. Here are all the options that should be visible to you.
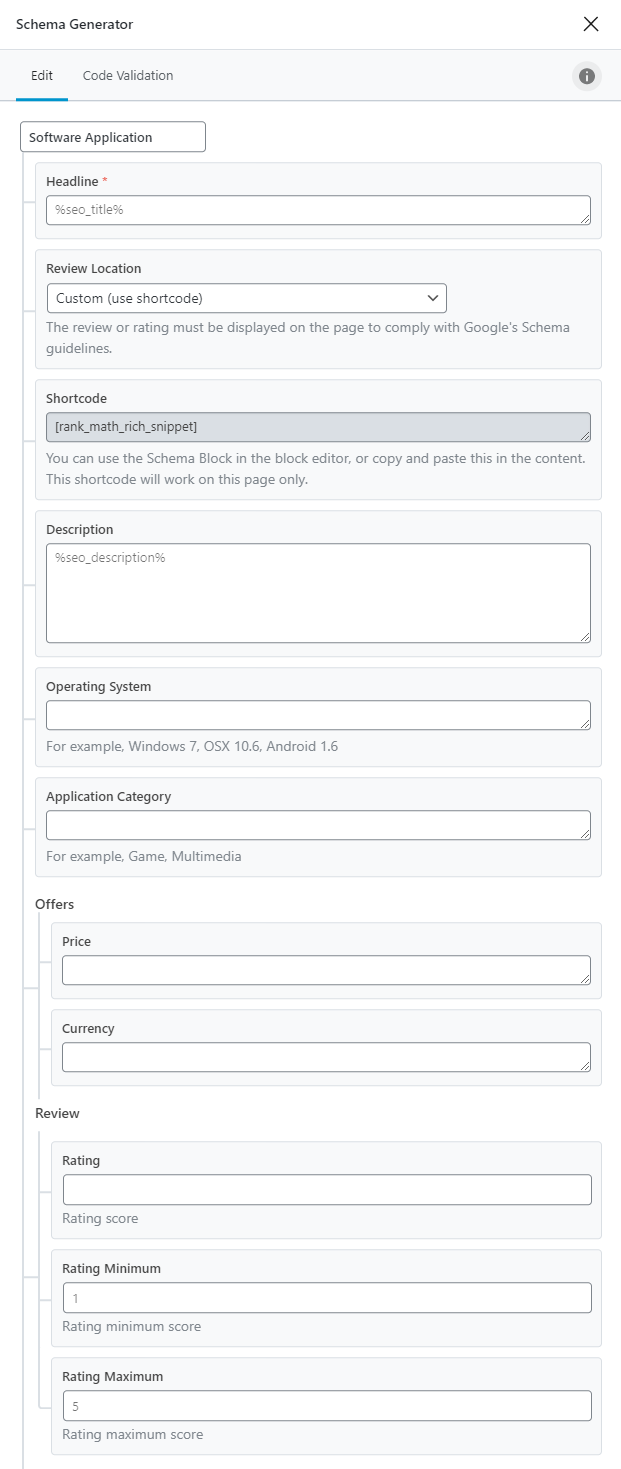
Headline
This is where you will enter a headline for the software application. In most cases, the name of the software application should suffice, but you can also add some other keywords to make it more enticing. You can obviously use variables to use dynamic information from your post to create this headline as well.
Review Location
As per Google guidelines, review information for schemas should be visible on the page as well. This option lets you configure where the information should be added. You can also choose a custom location by choosing the Shortcode option.
Shortcode
If you chose the shortcode option in the setting above, you should paste the shortcode from this field into your post where you want the review to be displayed.
Description
Here you need to enter the Headline (or the title) for the software application. In most cases, you’d enter the name of the software here. You have the option to type the headline yourself or use variables to create a headline dynamically.
Operating System
Enter all the Operating Systems, the software application supports. Make sure to enter the names of the operating systems in quotes and separate them with commas. For example, here is how you would enter the names in the field:
“Windows 7”, “Windows 8”, “Windows 10”
Application Category
What application does the software fall in? It is a game app, a multimedia app, or a utility? Make sure to enter all the categories in quotes and separate them with commas.
Price
Here you need to enter the price of the software application without any currency symbols.
Currency
Here you need to enter the ISO 4217 compliant currency code that you priced your software in. Here is a reference list from Wikipedia to help you find yours.
Rating
How would you rate the movie? Enter the number here.
Rating Minimum
What is the minimum score on your rating scale? Enter the number here.
Rating Maximum
What is the maximum score on your rating scale? Enter the number here.
17 Video Object
When you’re talking about a video in your post, then you should use the Video Rich Snippet. Here are the options that you would see when you select the Video Snippet.
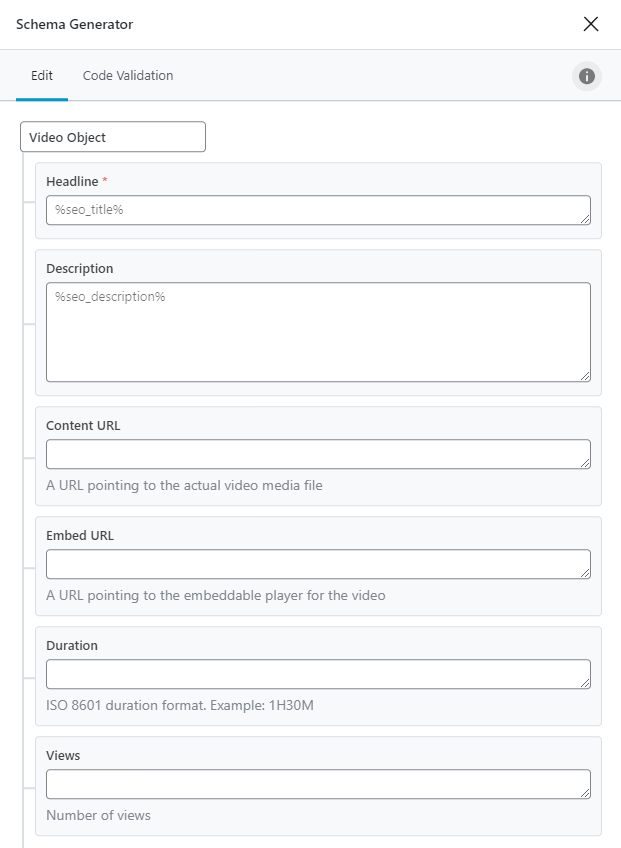
Headline
The Headline is where you configure the title of the video. You can either create a static title by typing it in, create a dynamic title by using variables, or a combination of both. Using the variables makes the most sense when you’ve already entered the relevant information about the video in the post title.
Description
The Description field is where you enter the description of the video. Just like the Headline, you can create a dynamic description or a static one. All the variables available for the headline are also available for use in the description field, as well.
Content URL
Enter the URL to the actual video file.
Embed URL
Enter the URL that points to an embedded version of the video.
Duration
How long is the video? Enter the duration in ISO 9601 format
Views
Enter the number of views that the video already has.
Saving Your Schema
Once you’ve filled in all the information in the schema, it is time to save. But, when you go to save, you’ll see two different options (if you’re using Rank Math Pro). The options to Save for this Post and Save as Template.
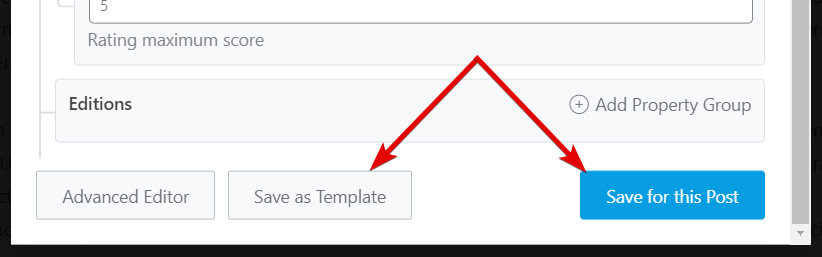
Let us understand the differences.
Introducing Schema Templates – Supercharging Schema (Pro)
Traditionally, Schema in Rank Math worked in the following steps.
- You chose a type of schema to be added to your post/pages
- You customize the data added to the schema code from the page itself
This system works beautifully, but it has its limitations. As your website grows and introduces multiple types of pages, you would want to have more control over the schema data that you add to the pages.
That is why we created Schema Templates.
Using templates with Schema will make working with Schema much faster, easier, less prone to errors, and also will avoid issues with keeping schema update on pages—all at the same time.
As we mentioned above, when you create a schema from the post itself, you can create a template for your current configuration by simply clicking the “Save as Template” button. But, you also have a dedicated interface from where you can start creating templates. And that interface offers additional benefits. We will cover them in detail later in the article; right now, let us get back to the schema creation option and finish setting it up.
Saving the Schema (Again)
We’ve filled up all the information in the Schema post, and now we’ll save it as a template.
Once saved, you should see the button change to something similar. We’ll also save the schema for this post.
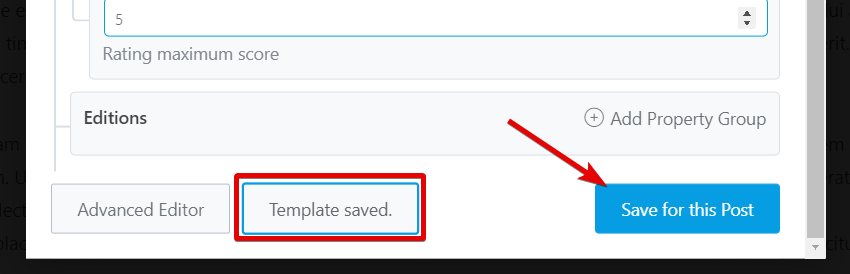
The template button change is temporary, after which it goes back to “Save as Template”. If you don’t see it and try to save the schema as a template again, you will get a warning, which is a sign that the template was already saved.
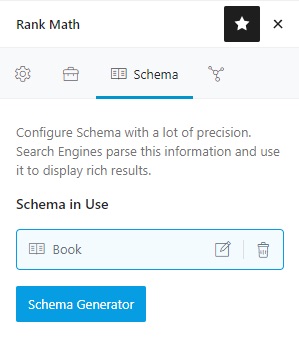
Once the schema is saved for the page, this is how the added schema will look like inside the Rank Math menu.
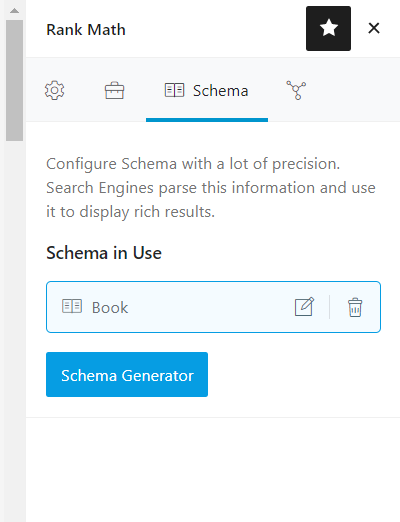
If you noticed, then you still have the Schema Generator button on the page. That is because Rank Math now supports adding multiple schema types on a single post or page (Rank Math Pro only). You can click the button and add another schema type the same way we demonstrated.
Schema Templates Explained
Rank Math Pro supports Schema Templates, a powerful new way to create different types of schema and add them to multiple pages or posts. When you showed how to create a schema with the new Rank Math, we also showed you how to save a schema as a template.
But, that is not the only way to create a schema template. If you’re using Rank Math Pro, you’ll see an entirely new option inside the Rank Math menu called Schema Templates.
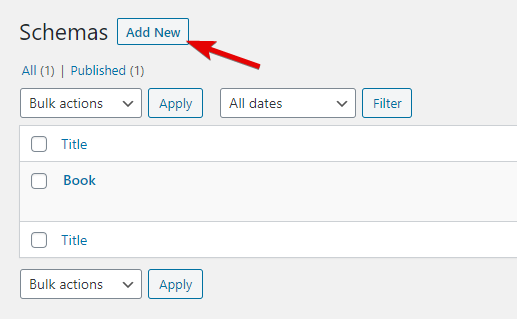
Schema Templates is where you will find all the different types of Schema you create. Think of it as a repository for all your schemas. This is how ours looked like when we opened it.
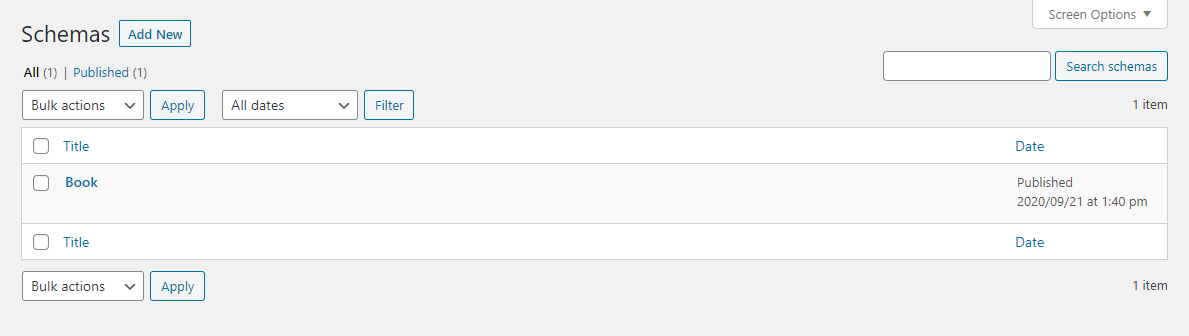
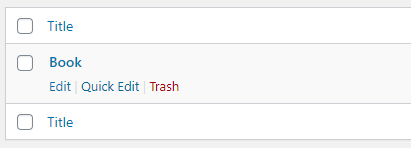
As you see, it has the Book Schema that we created earlier in the article. You will see all the templates that you create here.
Before we see the options for individual schema, let us look at the options in the interface. It is similar to what you would see inside WordPress for posts and pages. You have bulk edit options, search options, filter by date, and you will also see a trash field when you delete a schema template.
From the Schema Templates section, you can create new Schema Templates or edit existing ones. You also get options to quickly edit and delete a schema template if you hover your mouse of a specific schema template.
Let us start by creating a new schema by clicking the Add New button on the top.
On clicking the button, you will see the familiar option of choosing the Schema type to use for your template.
This is nothing new. You’ve already seen this when you created a schema on the page. The only difference is that there you chose to save the schema on the page or as a template, and here, it will be saved as a template by default.
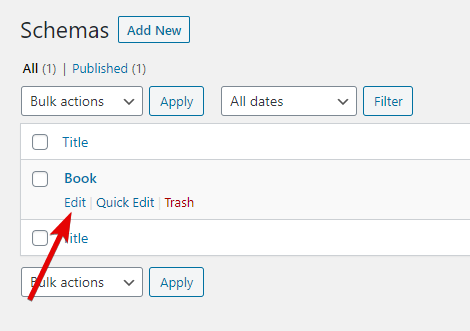
Let us edit an existing schema template and see all the options that we see. We will do that by clicking the Edit link that appears just below the schema template.
Once you do, the schema editor will open up, similar to what you saw on the post screen. You will see all the options to configure the schema, as you saw on the post as well.
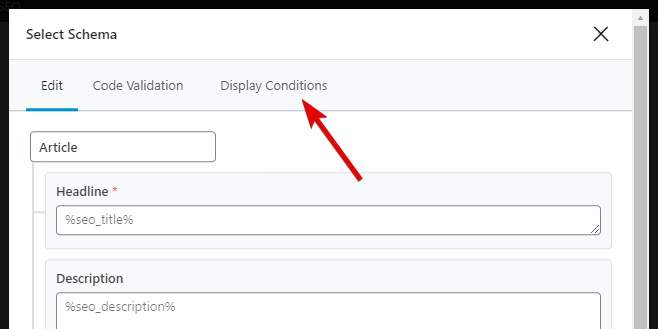
But, as we said, the options here are similar to the ones you see on the post; they are not the same. Specifically, there is one feature that you will not see on the post screen. That option is the Display Conditions option.
Display Conditions (Pro)
What are Display Conditions? Let us answer this question in a simple way.
When you create schema on a post or page, you have the option of adding it to the post or save it as a template. When you add it to the post, the schema is added to that specific post, right?
But, if you save the schema as a template, which posts or pages does it get added to? That is decided by the Display Conditions.
The Display Conditions are a powerful way to add schema to a lot of pages and posts. With Display Conditions, you can add the right type of schema to hundreds, even thousands of posts at once. It is schema automation at scale. Let us show you how they work.
For this example, we will create a new schema template so that we can show you the process of creating targeting options from scratch. We’ll click the Add New button and choose the Article type schema, for example.
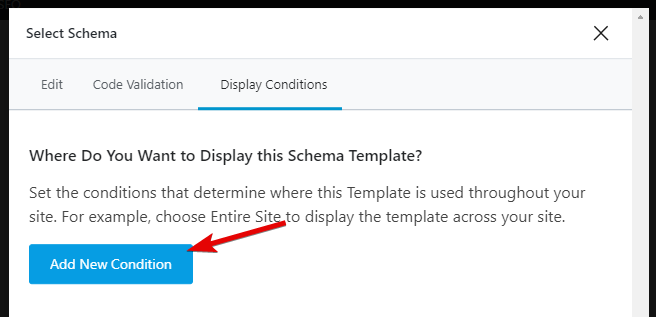
When the schema page appears, we’ll switch to the Display Conditions tab.
A sample display condition will be set. We will remove it to start from scratch.
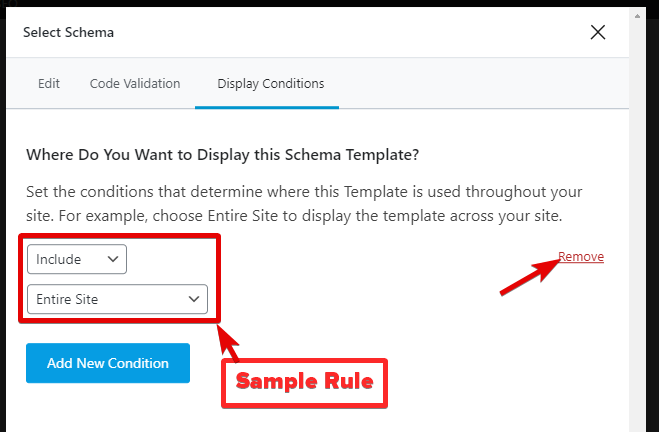
Then, we will click the Add New Condition to create a new condition.
Before showing you the options, let us briefly explain how they work.
On a typical WordPress website, you have a few different types of posts. You have posts/pages, then you have taxonomies, which include categories and tags, and you also singular pages and archive pages. You use these types to organize your website into logical structures.
For example, if you had a website about watches, you would generally have a category dedicated to watching related articles. Also, if you reviewed watches, then you would also have a category for those.
Here is the fun part. Most of the time, all the posts/pages of a single type would need the same type of schema. Following the watch example, if you had a category called “reviews”, then all the pages/posts in that category would use the review schema, right?
If you had an ecommerce store, then all the products would use the “product” schema, right?
This is the exact type of thing that the Display Conditions help you achieve. By creating templates and rules, you can have one type of schema appear on all the pages or posts that fulfill that condition. Combine that with variables in Rank Math, and you have an amazing schema recipe.
Now that you understand that let us get back to the practical example. Since we added the first display condition already, a sample condition was presented to us.

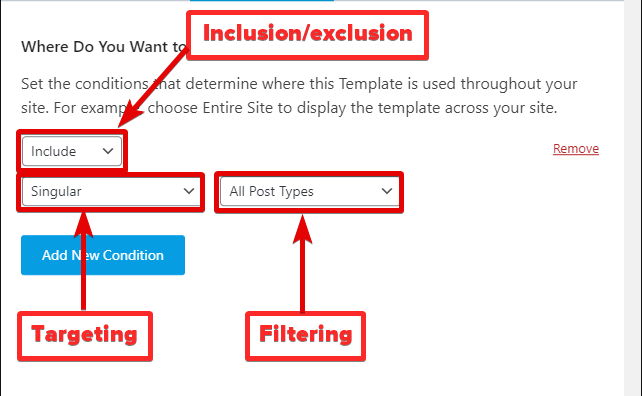
In the Display Conditions, you have 3 things to configure.
- Whether the condition is inclusion or exclusion
- Does it target the entire site, or archives, or only singular pages
- Additional filtering
Here is how you configure these options.
Let us quickly explain these options.
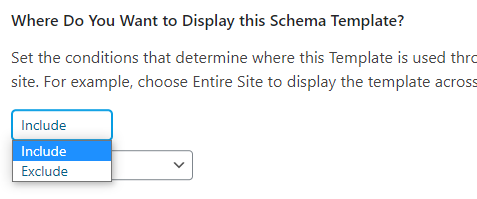
Inclusion and Exclusion
Display conditions can be of 2 types. Inclusive or exclusive.
In the simplest of words, when you choose inclusion rules, then all the pages that fulfill the conditions will get the schema. And when you choose an exclusion rule, all the pages that fulfill the conditions will not get the schema. This way, you have complete control over the pages that the schema is added to. You can choose the type of rule by clicking the drop-down menu and selecting the rule-type of your choice.
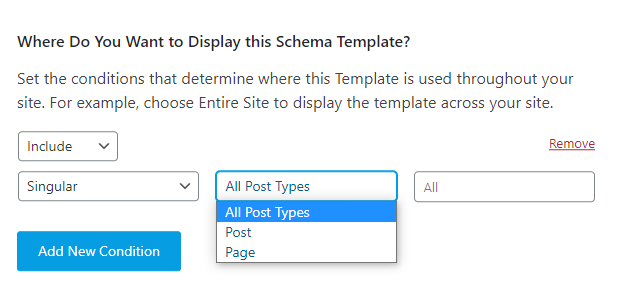
Targeting
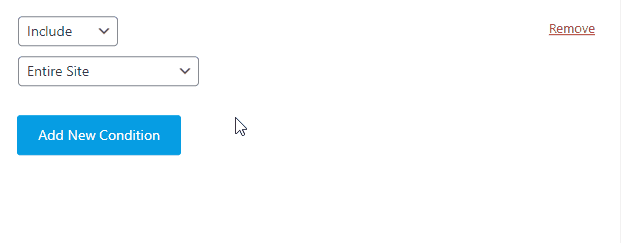
The targeting option is where you set which pages you want to target. You might want a schema to appear on your entire website, just your posts, or just a specific category. And the targeting options lets you choose just that. Here are all the options you’ll find inside.
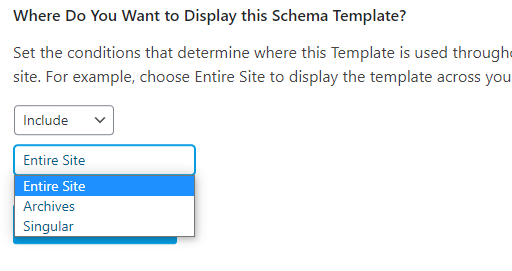
As you can see, you have the option to choose the entire website, just the archives, or singular pages.
Depending on the option you choose, you will additional options come up on the screen.
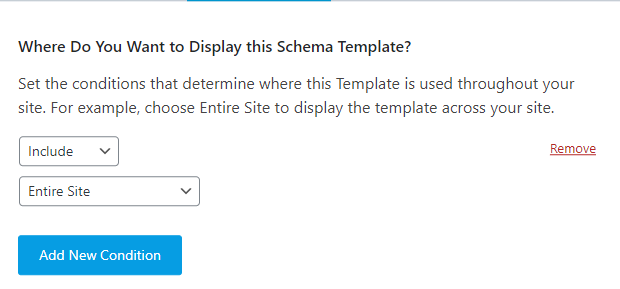
Here is what you will see if you choose the Entire site.
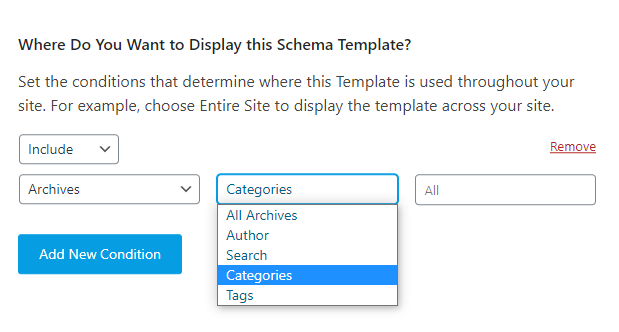
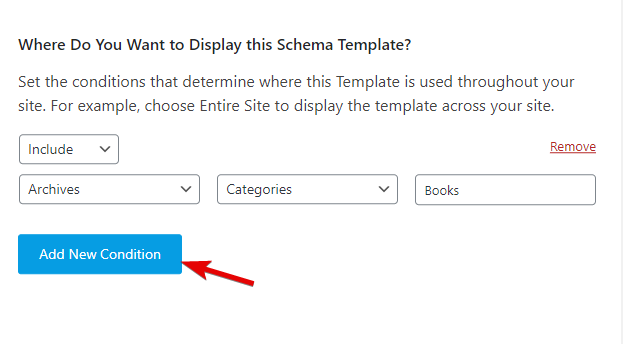
Here is what you will see if you choose Archives.
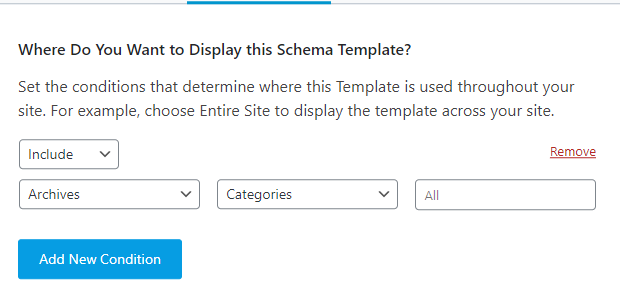
From the new drop-down, you will be able to choose which archive pages the schema be added to.
Here is what you will see if you choose Singular.
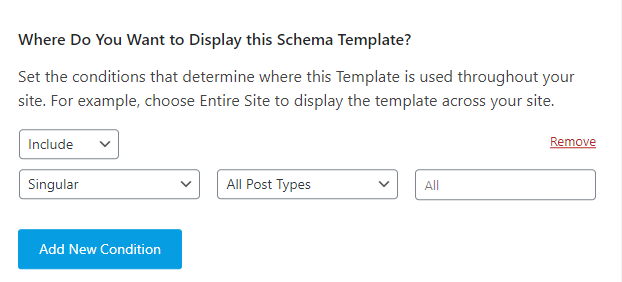
You’ll be able to choose Posts, Pages, or custom posts types (if your website had them) from the new drop-down.
Filtering
The filtering option is where you finally decide the pages or posts the schema gets added to. For example, if you chose Archives > Category for targeting, then the filtering will help you choose which category the schema will actually be added to.
All you have to do is start typing the name of the category, post, page, or whatever targeting you’ve chosen, and Rank Math will search for them and let you select them. Here is a demo.
The same process will be used regardless of what targeting you’ve chosen; it works for authors, categories, tags, pages, and posts.
If you want to add more than one category to the display condition, you will need to add another rule.
Adding and Deleting Rules
To make the targeting precise, you can only choose specific display conditions. But, there will be many cases where you’ll need to add the same schema to multiple categories.
That is where stacking comes into play. In simple words, you can create multiple rules that stack on top of each other to create the complex targeting options with ease. Here are a few examples of complex targeting options that can be created with Rank Math’s targeting options easily.
- Posts that appear in category 1 and category 2, except for posts that are also in category 3
- All singulars in a particular category except pages that have a certain tag
- All pages on your website except a few pages that you handpick
- All posts are written by a specific author
And many more.
To stack or add another condition to the display condition, click the Add New Condition button.
Which will add another condition, similar to the one above, for you to configure easily.
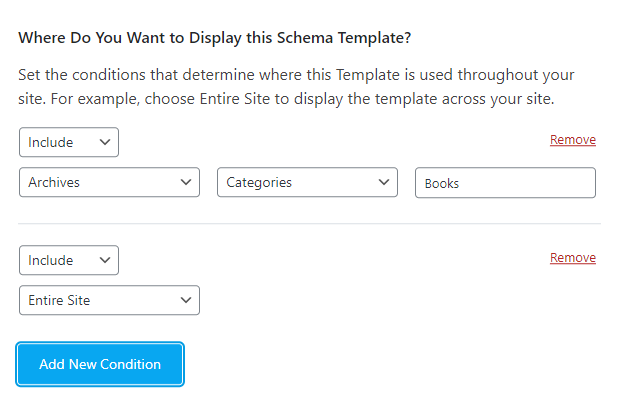
You can also delete a specific condition by clicking the Remove link next to the condition.
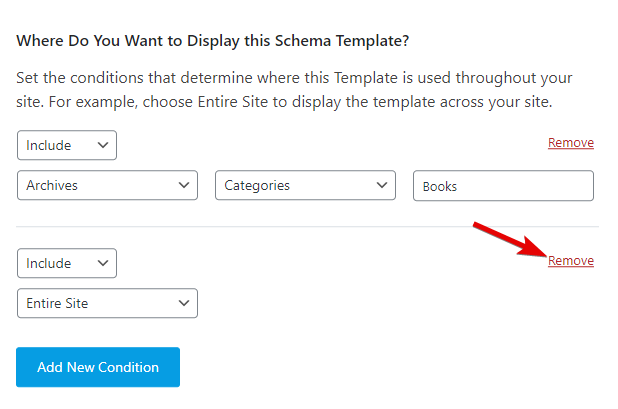
With the Display Conditions, you will be able to target every page or post on your website with the correct schema type once you create the right template and the right rules. And since there is no limit to the number of templates and display conditions that you can apply, you have complete granular control over which pages get which schema.
Rule Priority
Since there are many rule types, it is important to know which rules take precedence over others. Without going into too much detail, you should know the following:
- Exclude takes priority over Include
- And Singular & Archive takes priority over the Entire site option.
Hopefully, this will help create better rules on your website.
Importing Schema (Pro)
With the arrival or Rank Math Pro, not only can you add schema of your own with templates, but you can also import schema from other tools and even other webpages. Let us show you how.
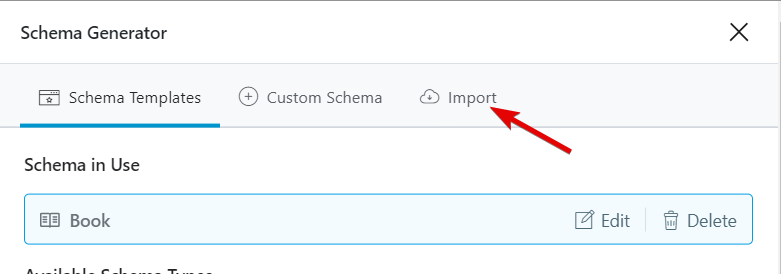
To import schema, first, open up the Schema Generator as usual by clicking the button in the Rank Math menu.
On the Schema Generator, you should see the Import tab. Click to open it. You’ll see it only if you’re using Rank Math Pro.
This is how the Import section will look like.
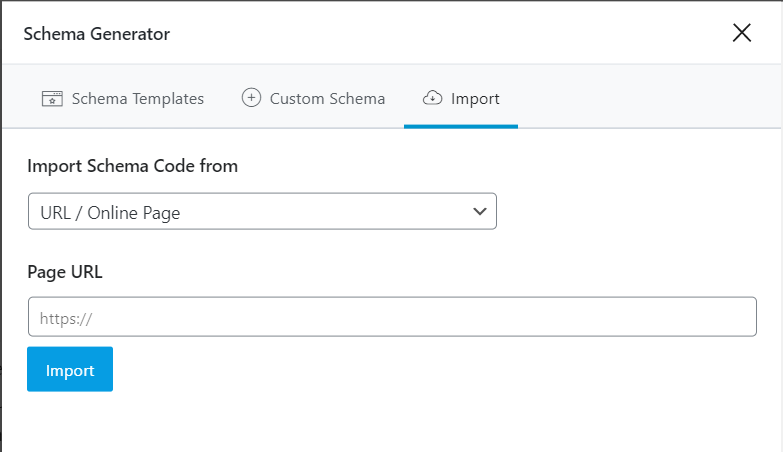
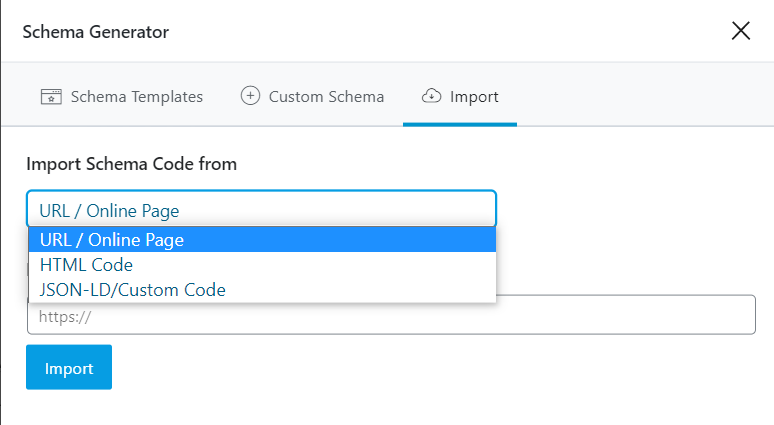
You have 3 options to import schema from. You can choose a live web page, add HTML code, or add JSON-LD formatted schema to import schema from.
Let us explore the importing options quickly.
Importing URL/Online Page
This option is perhaps the easiest to understand and follow. In this step, you give the schema importer the URL of a live page, and it will extract the schema from it. Let us test it out.
Add the URL of the page you want to extract schema data from, and click the Import button.
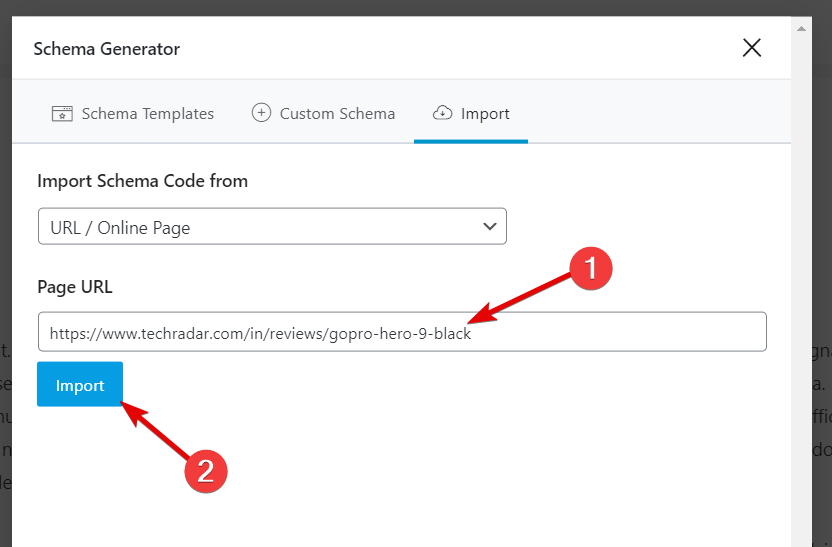
And in just a few moments, the schema importer will extract all the different kinds of schema from the page and present it to you.
Then, you can click on any of the individual schemas that were fetched neatly organized by type. You can also check the schema by clicking the individual schema. Once you do check it, you will have the option to add it to the post or save it as a template.
Importing HTML Code
The HTML import option lets you import the schema from HTML code. This option is fairly useful when working on local websites or in scenarios where it is not possible to extract the schema from a live page.
The process is quite similar to fetching schema from a live URL. But, in this case, you have to paste the HTML code of the page in the field. To demonstrate, let us add the HTML code of the same page that we fetched schema from. Then, we’ll click the Process HTMLbutton.
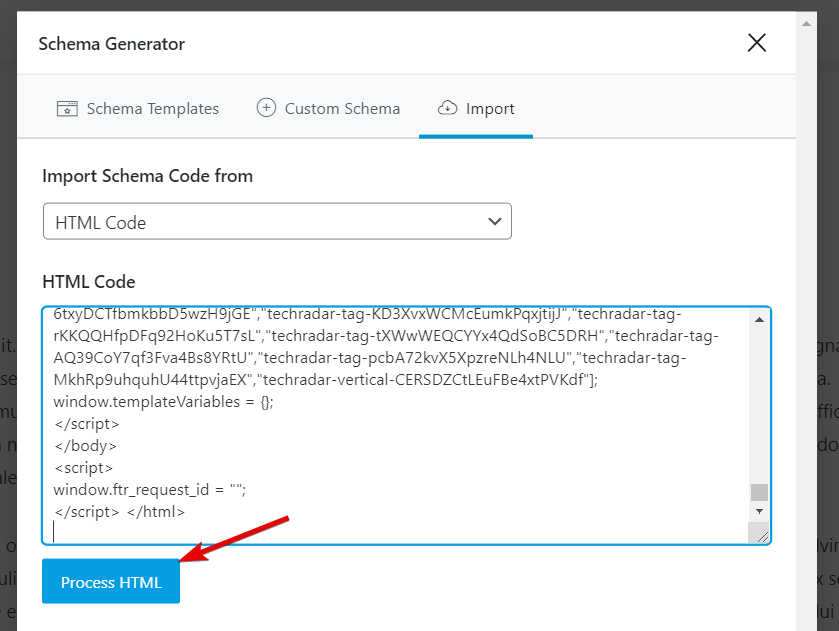
And in the same way, Rank Math will parse the schema from the page and present it to you.
Again, you can check out all the Schema types imported and save them as a template or individually to the post.
Importing JSON-LD/Custom Code
There are plenty of JSON-LD Schema Generators out there, and instead of using them to add schema to your pages individually, you can import them as a template with Rank Math and add it to multiple pages. Here is how to do it.
We used this tool to create simple schema markup for a blog post. Then, we copied it and pasted it inside Rank Math’s schema importer and clicked the Process Code button.
In just a few seconds, Rank Math was able to parse the code and generate the schema. We can now add this to the page or use it as a template to add on multiple posts.
Advantages of Importing Schema
The schema importing tool gives you access to interesting tools that are not available with other plugins. But, what are the advantages of using importing tools when Rank Math can generate schema of its own?
There are several advantages to this approach. But, we must clarify that it is not useful for everyone. It is likely that only advanced users will use these options. But, we’ve kept these options as we want all kinds of users to benefit from Rank Math.
Many people don’t realize that Schema.org definitions are not limited to the ones that Rank Math supports; it actually supports hundreds of products and services. But, if we add support for all of them in Rank Math, it will become a huge mess and make it difficult to use. That is why we’ve added the Schema Generator for the most popular schema types and created the Custom Schema maker and the Schema Importer.
Using these options, you can import a variety of schema types and even create the perfect custom schema for your website.
Custom Schema (Pro)
As we mentioned earlier in the article, schema is not limited to a handful type of structured data. That is for simplicity. In reality, schema, or Schema.org’s, structured data definitions extend to hundreds of types of schema.
In a majority of cases, the schema types included in Rank Math are sufficient, and the schema creator makes it easy to create and add schema to your page. However, for some advanced users, that might not be sufficient.
When you think about it, schema is just metadata, and it doesn’t have to be bound by certain definitions. In theory, you can add any sort of structured data on your page, and Google will parse it. It might not be used for any rich results, but Google will still parse it.
To make the process of adding custom schema to your pages, we built the Custom Schema generator in Rank Math Pro. Let us have a look at it.
The Custom Schema creator can be accessed on the same page as the Schema Generator, and you’ll see the tab, similar to this. If you don’t see it, make sure you have Rank Math Pro installed, as this is a Pro feature.
Once you click the tab, you should see something similar to this.
Now, we understand that this is scary and intimidating. But, as we said, this is only for a select few who want to add custom schema on their websites or pages.
The idea here is quite simple. The Schema Generator creates the fields in which you fill in the data, and the Custom Schema maker allows you to creates the fields as well. You start with a blank slate, and then you add properties and properties groups to your schema.
The difference between properties and property groups is quite simple. When properties can be organized in a logical way, it is better to put them in a group. For example, Review is a property group, while Rating, Rating Minimum, and Rating Maximum are properties.
Using the Custom Schema option, you can create a custom schema, fill in the schema, and add it to a page. Or, you could create a blank schema structure and save it as a template to be used on multiple pages.
Advanced Schema Editor (Pro)
Rank Math now also includes an Advanced Schema editor, which lets you customize the schema that you’ve created with the Schema Generator and also the Schema that you’ve created with the Custom Schema Maker.
To use the Advanced Editor, open any of the schemas that you’ve added to the page or post.

If you haven’t yet added any schema, you will need to add one before using the Advanced Editor.
You’ll find the option right next to the Save as a Template option, and the reason why we’ve discussed this now is that we wanted to first explain the Custom Schema creator.
Once you click the Advanced Editor button, you will see a confirmation button on the screen. Click OK to proceed to the Advanced Editor.
Note: Once you switch to the advanced editor, that specific schema type will always have to be edited with the Advanced Editor. But, there is nothing to worry about. If you’re curious, you can use the Advanced Editor on any schema you create, then don’t save the post. If you refresh the post without saving it, then you will still be able to use the regular Schema Generator option for the schema.
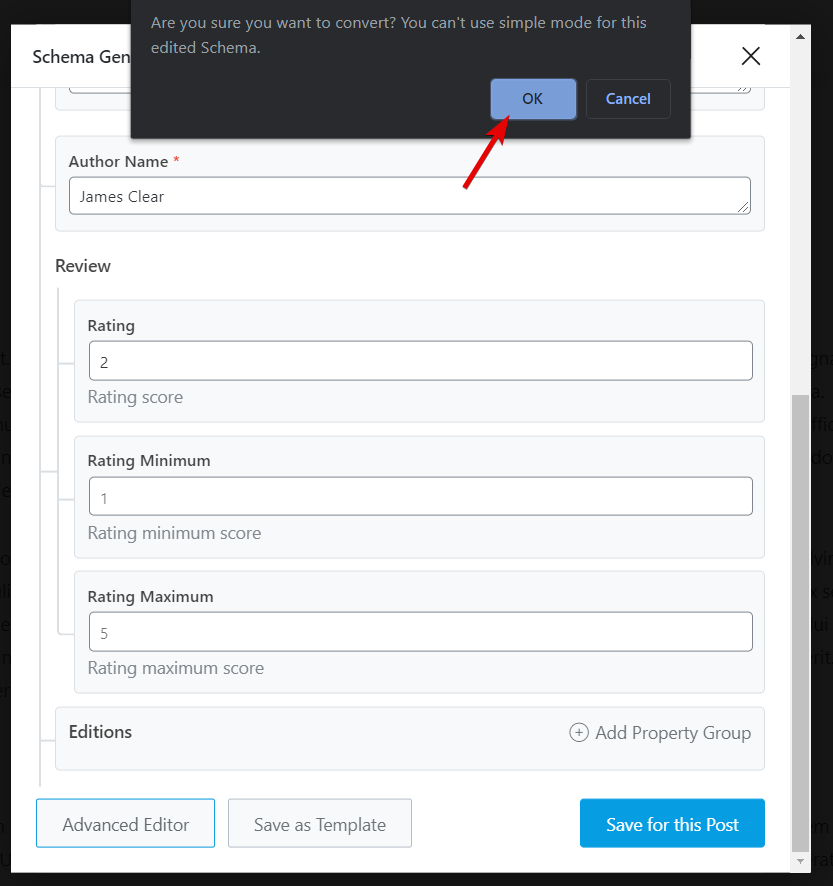
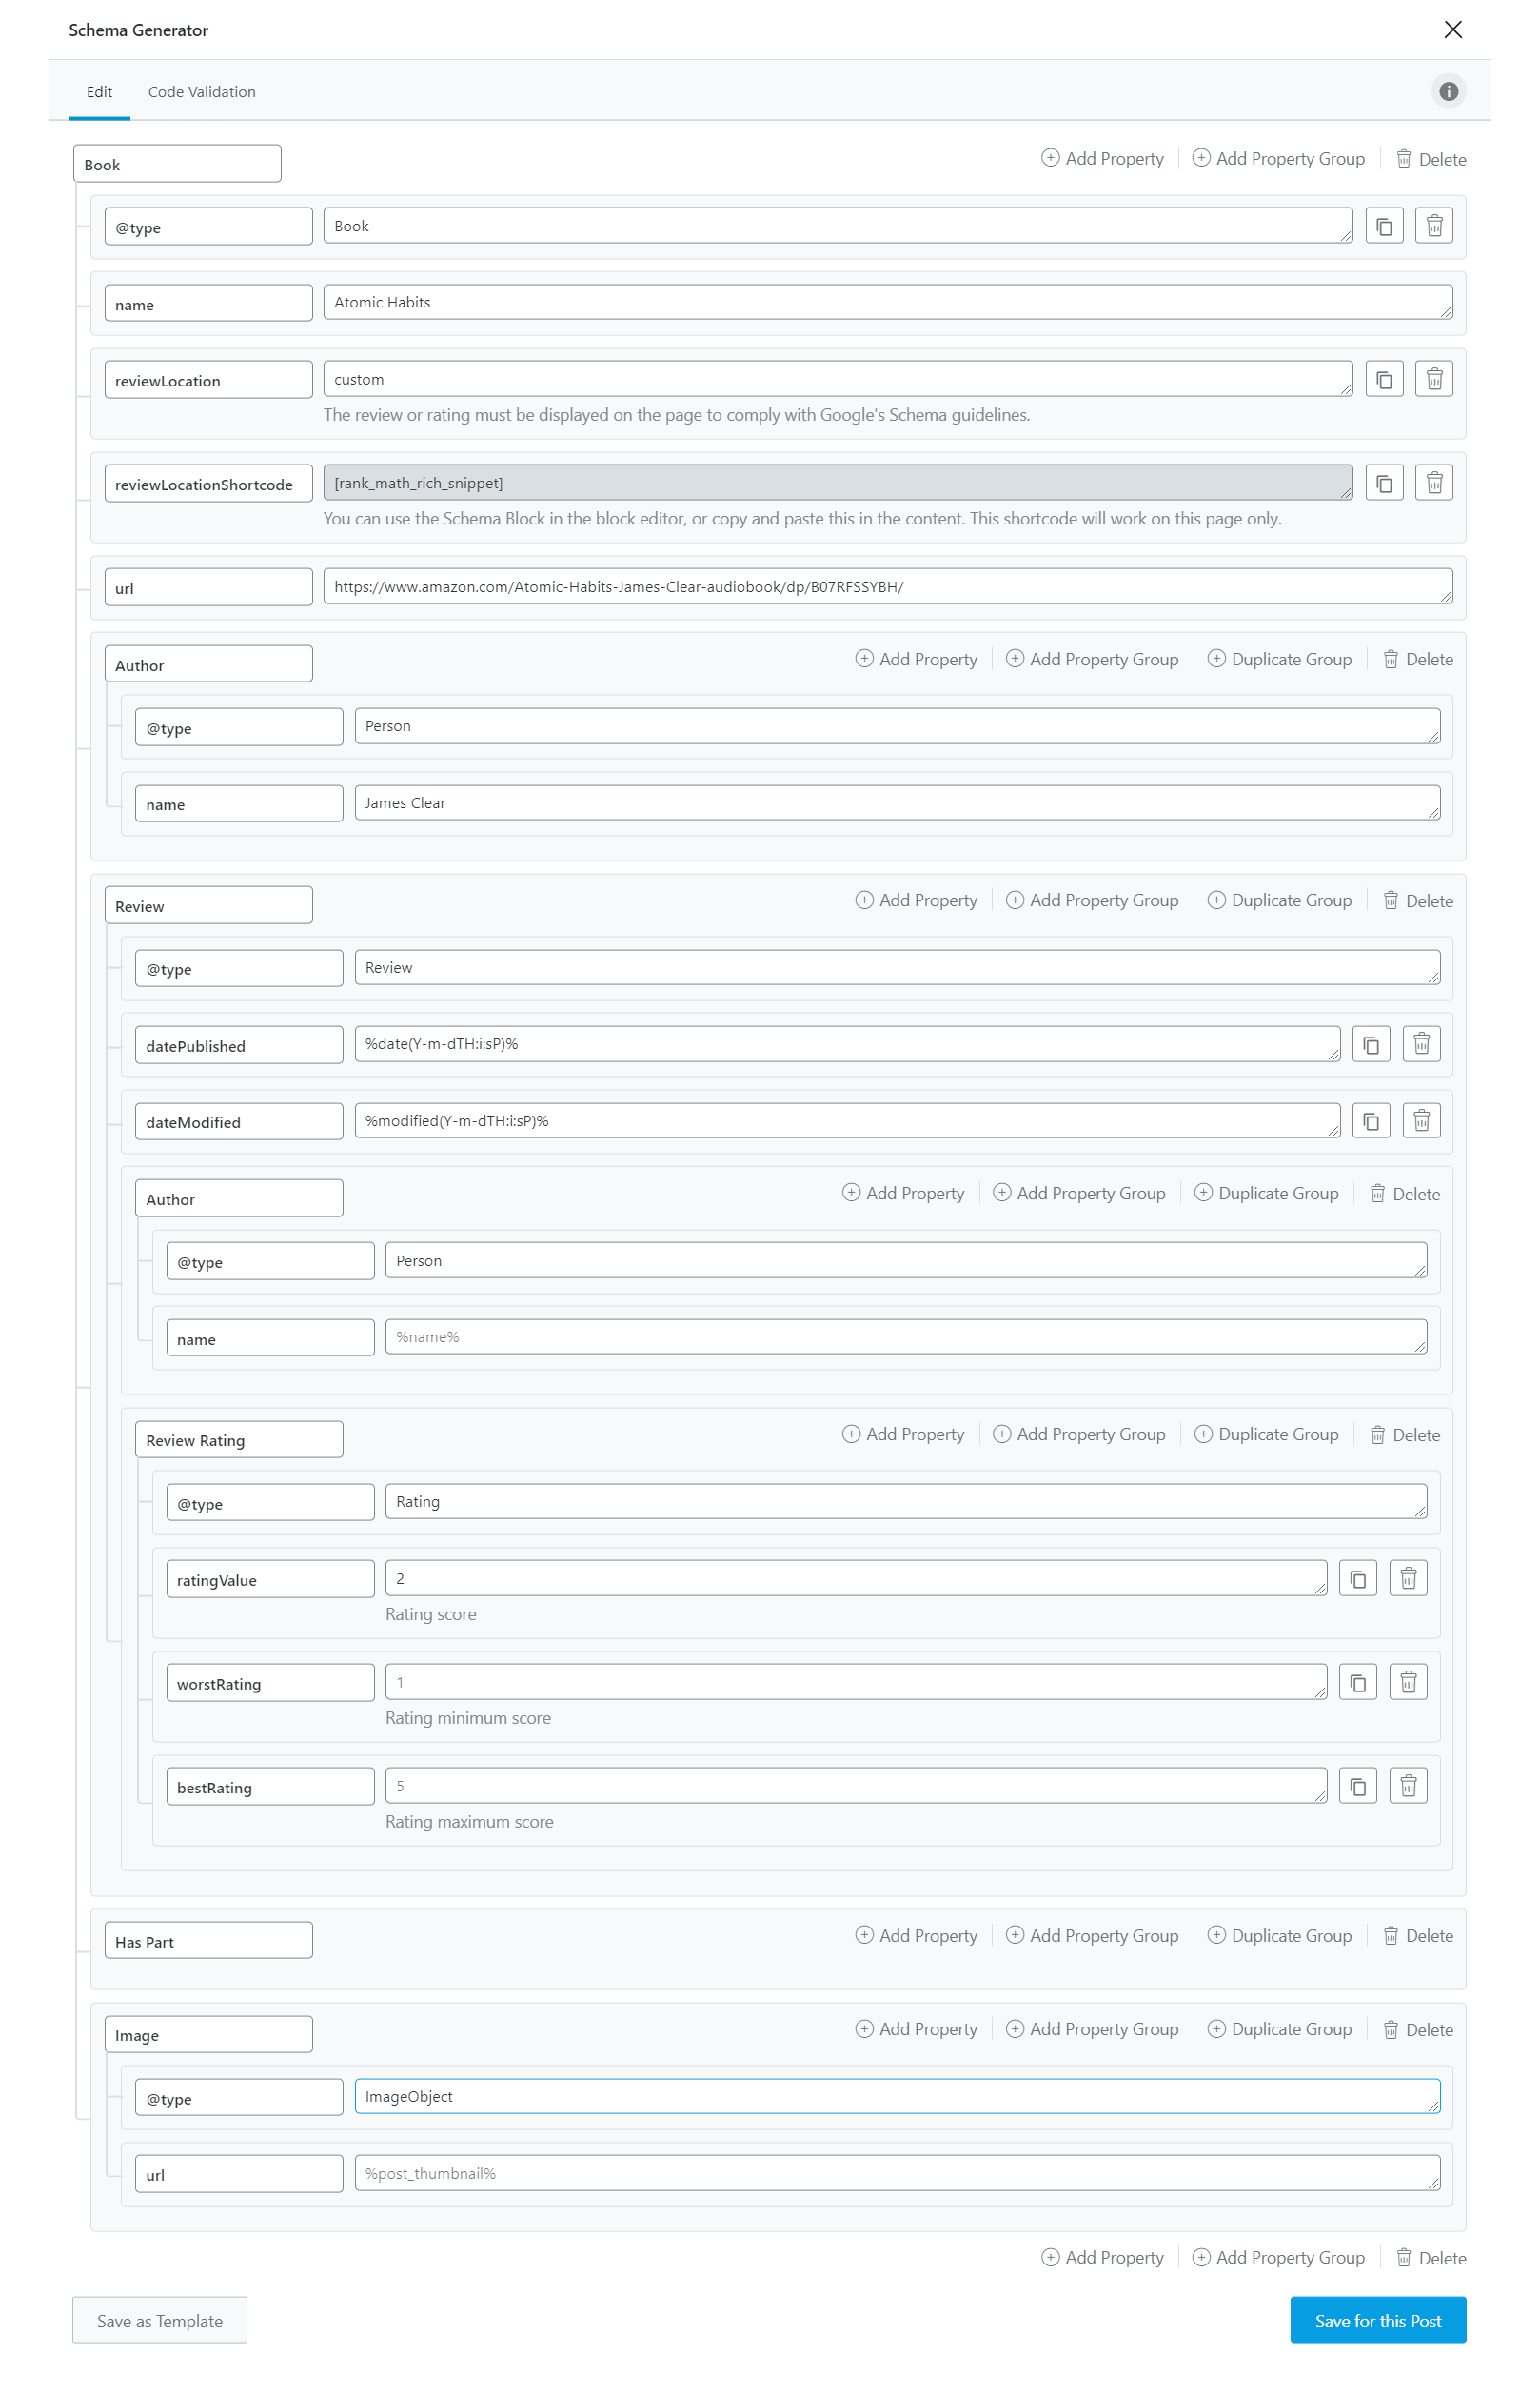
Once you click the OK button, the schema type that you selected (book type in our case) will open up in the Advanced Editor.
Fair Warning: Just as the Custom Schema creator, the Advanced Editor is also, well, advanced. And, if you don’t understand a few things here, that is all right. Here is how the Advanced Editor looked like for the book type schema we created.
Using The Advanced Schema Editor As a Reference
Let us circle back to the Custom Schema Generator for a second. As you saw, the Custom Schema Generator is not suitable for people who do not have a good understanding of Schema. Even then, you might need trial and error before it works on your page.
But, there is a silver lining. You don’t have to always start with a blank slate when creating a custom schema. You can use the Advanced Schema Editor as a guide.
If you didn’t notice already, the Advanced Schema Editor and the Custom Schema have identical interfaces. Here is an image comparing them side by side.
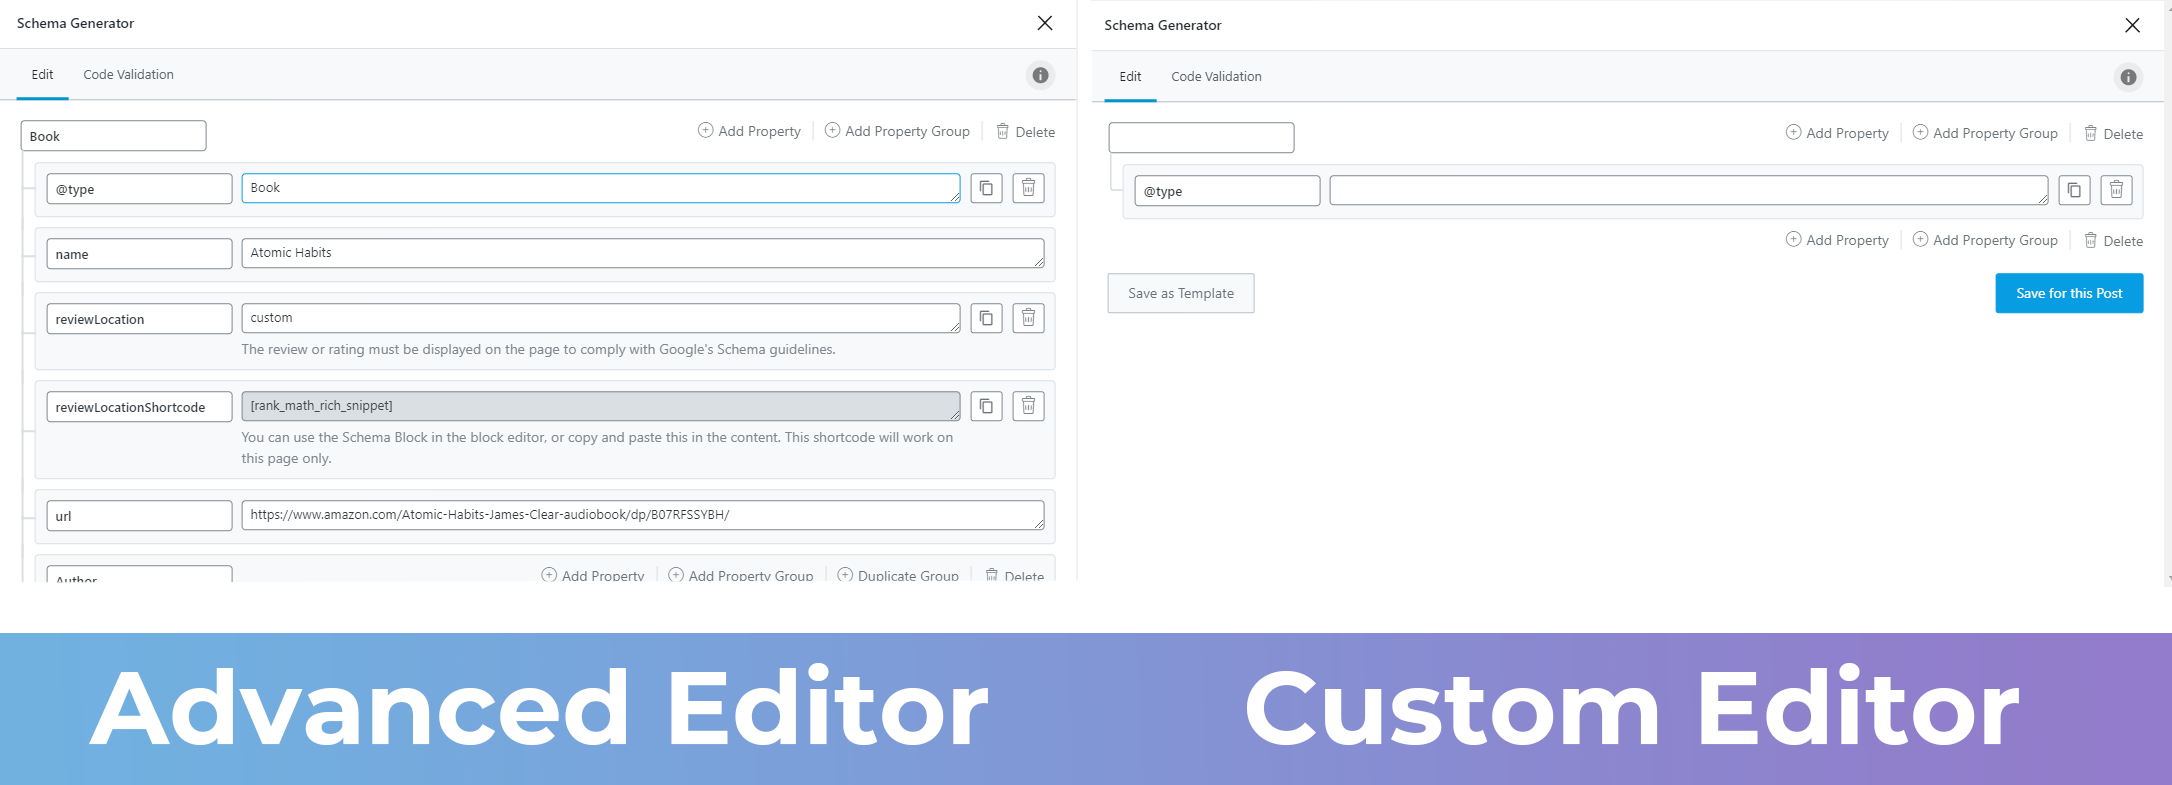
In fact, the Advanced Editor just looks like the Custom Editor was used to create the custom schema. And that is the idea here. If you’re using the Custom Schema option in Rank Math, you can use the Advanced Editor as a guide to help you out in the process.
Code Validation (Pro)
Having schema on your pages or posts in important. We’ve already established that. But, having the right schema on your page is even more important.
That is because if you have the wrong or incomplete schema on your page, then Google obviously will not consider your page for rich results, but Google will also be more careful in displaying rich results for your other pages. And even if you correct the schema on your page, Google will not immediately consider them for rich results, even the schema is correct. In some rare cases, Google might also give you a penalty.
We’ve built the Code Validation feature in Rank Math to avoid this issue. What the Code Validation feature does is help you identify schema issues with your code before you hit publish and Google indexes your page.
You will find the Code Validation option on the page, and also in the Schema Templates section, but you should use it only on pages. Because with templates, Rank Math will store variables for many of the fields. Since the actual value of the variable will depend on the post it is used on, and testing the template’s code is defeating the purpose of the Code Validation.
To access Code Validation, open up the Schema and click on the Code Validation tab.
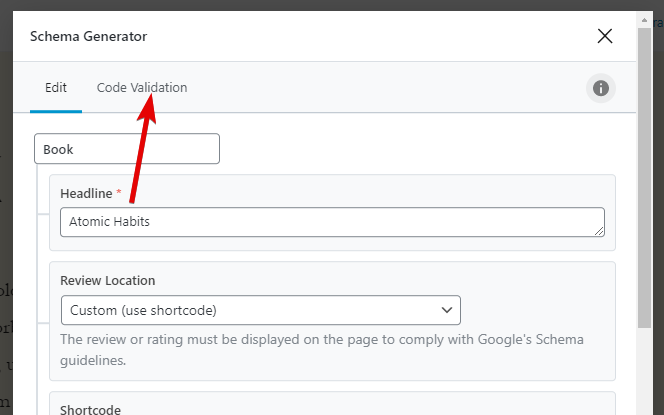
Once the tab is opened, you will see the actual JSON-LD code for the schema on the page. Make sure that your post is saved as a draft at least; otherwise you won’t see the complete code.
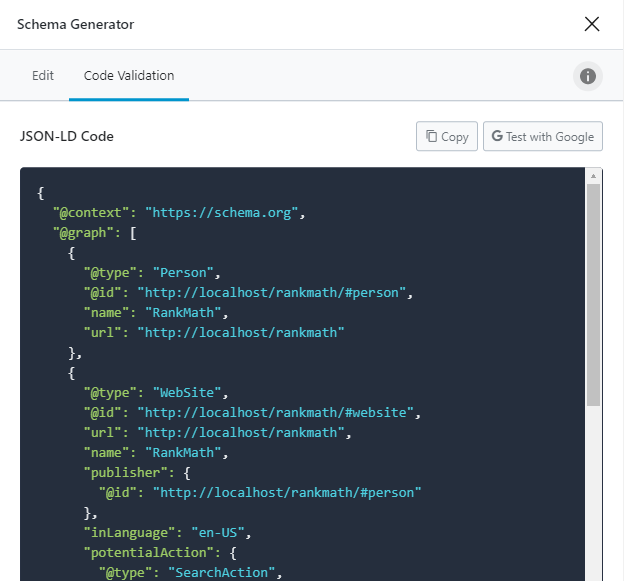
On the right, you will see 2 buttons as well. Clicking The Copy button will copy the code to your clipboard, and clicking the Test with Google button will open the Google Rich Results Testing Tool in a new tab with schema data already pasted in the tool. To test the code, all you have to do is click the Test Code button, and Google will test the code and tell you if it is valid.
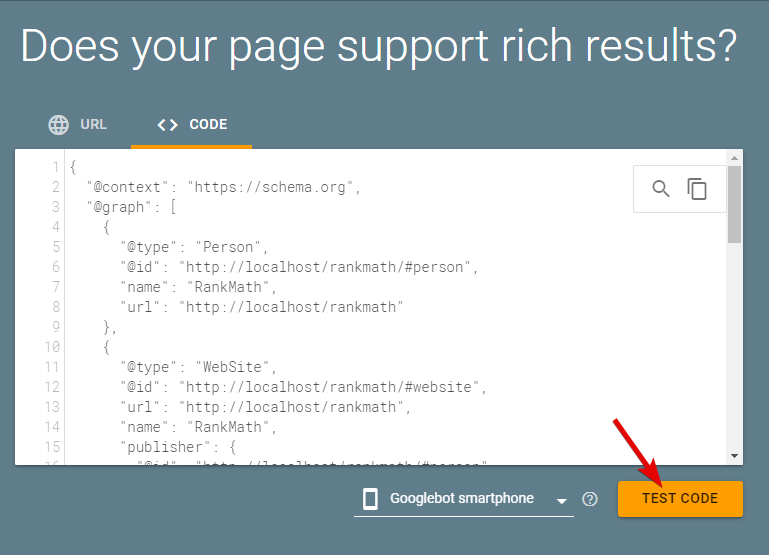
Rank Math pastes the code into the tool and not the URL of the page because if the page you’re adding Schema on is not live, then the test won’t work. Here is how the results should look like.

Using the Code Validation feature, you can quickly identify if the Schema you’re adding to your website or page is valid or not, which will save you a bunch of time and headaches in the future.
Adding Multiple Schema To A Single Page (Pro)
With Rank Math Pro, you can now add multiple types of schema to a single page. It is a powerful way of improving the schema on your page even further.
A practical example where you would need multiple schema types on a page is when you’re operating an ecommerce store. Your product pages would need the product schema, and also the review schema. Of course, that is not the only scenario, there are hundreds of others, but with that, we hope you understand where this would be useful.
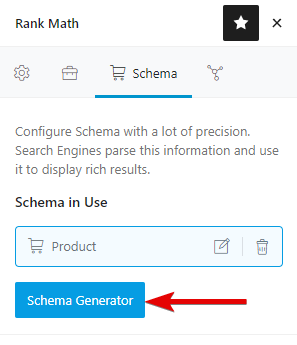
To add another Schema type to your post with Rank Math Pro, all you have to do is click the Schema Generator button when a schema is already present on the page.
Then follow the process that we’ve described above, just the same. Once you add the second schema, this is how Rank Math will present it.
Then you edit, delete, and add even more schema types to the page using the same process.
You can also do this by using Schema Templates. Just assign the display rules as such so that one page gets more than one type of schema. Once you do that, you will see all the schema types on the page by default.
WooCommerce Schema
If you’re operating an online store with WooCommerce, then you should definitely enhance your products with schema to get more sales and attract more traffic. Rank Math automatically detects if you install WooCommerce or similar plugins and also adds the appropriate schema to your product pages.
The interface looks different as WooCommerce uses the classic interface.
If you’d like to configure the details of the schema that is added to products, you can do so in the Titles and Meta settings inside Rank Math.
Easy Digital Downloads Schema
Rank Math works seamlessly with Easy Digital Downloads and similar plugins which help you sell digital products online with your WordPress website. Rank Math detects if the EDD is installed on your website and adds schema configuration settings to the Title and Meta settings inside Rank Math.
Rank Math will also add the appropriate schema to any of the products you create, and they will inherit the settings from the global settings. You can customize the schema just as you would customize any other schema.
Schema for Custom Post Types
Rank Math fully custom posts whether you create them with code or by using a plugin like CPT UI. Once you register a custom post type, Rank Math will a section in the Titles and Meta settings where you’ll be able to configure global options for the custom post type. For example, we just created a custom post type called tools.
And when created a new tools post, we instantly saw the global schema applied to it.
Conclusion
We hope that it is clear to you how you can use Rank Math to add structured Schema data on your website with a lot of precision. Although it may seem like it that you have to spend a lot of time creating schema templates, rules, display conditions, and custom schema, it is far more efficient than creating schema from scratch. Also, most of the time, you will create these once and add them to multiple pages on your website while retaining control over the schema on each page.
Also, remember that if you find adding schema difficult, then your competition will also feel the same way. Once you consider that and also weigh in the rise of structured data and the SEO benefits it brings, you will see how beneficial it can be to add schema to all your pages to beat your competition and also develop a competitive advantage. Of course, we will keep updating Rank Math to make it more powerful while making the process as simple as we can.


4 Comments
I think other site proprietors should take this site as an model, very clean and magnificent user genial style and design, as well as the content. You are an expert in this topic! This is a good ebook about how to start to sell online: http://bit.ly/How2SellOnline
ReplyDeleteI have been browsing online more than 3 hours today, yet I never found any interesting article like yours. It’s pretty worth enough for me. In my opinion, if all webmasters and bloggers made good content as you did, the net will be a lot more useful than ever before.
ReplyDeleteBest view i have ever seen !
ReplyDeleteIt's so easy, we can configure it, to followed your tips and techniques. People like your services. Further, I have an opportunity, you can get the Indoor Air Quality In Fort Worth TX and get more service.
ReplyDelete