
In fact, underlined text has become one of the most common, most recognizable features of our online experience. When we see an underlined word or sentence on a web page, we immediately assume it’s a link. In this Blogger Blog Tutorial Series, I’ll explain the concept of underlining links and provide a few tips on how to use it to improve the web experience.
Table Of Content
- Introduction
- Benefits Of Underlining Links In Web or Blog Sites
- How To Make Your Links Look Like Obvious Links
- How To Underline Links In Blogger Blog
Web page links are the primary means by which users navigate Web sites. If users do not notice or do not think, that links are clickable, they may not use the links. Simply put, there’s no guessing when links are presented consistently. Links are easy to find because users understand that underlined text means that it’s a link. The underlining draws their attention. When you remove the burdens for users, you prevent delays and speed access to the desired content.
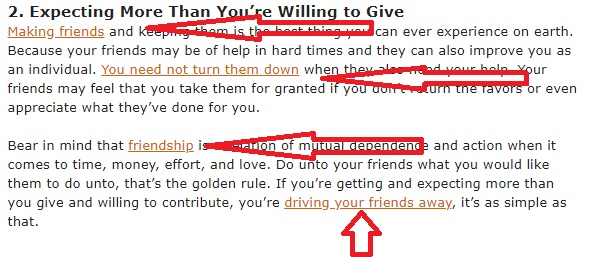
Links should be underlined because when a text link is in the middle of a chunk of text (or as a headline), even if colored differently it isn’t always plainly obvious what is the link and what isn’t. Think of people who are colorblind. They could look at a website and not be able to tell the links apart from the text if the links aren’t underlined. So, from an accessibility perspective, underlining your links is a good thing. And, when taken in combination with coloring your links the right way, it takes away any doubt the user might have about what is a link and what isn’t.
Other Blogger BlognTutorials:
Benefits Of Underlining Links In Web or Blog Sites
- Familiarity: Underline is one of the most widely understood conventions on the web. Underlines provide a strongly perceived affordance of clickability — the vast majority of users understand that underlined text is a link.
- Scannability: The underlined text is a great visual sign that guarantees link visibility when scanning text. As we scan pages vertically, any horizontal line will cut right through our line of sight. Underlining guides users to important information as they skim.
- Accessibility: When color alone is used to differentiate clickable elements, some groups of users (such as color-blind people) might have problems identifying links. If you want your website to be accessible, you’ll have to add another visual cue to links, and underlining is a logical choice.
How To Make Your Links Look Like Obvious Links
Your links should be completely obvious that they are something to be clicked on. Likewise, it should also be completely obvious that non-links are not links. Thankfully there are three easy ways to do this:1. Don’t underline anything that is not a link
Underlining your links is personal preference however it does make it painfully obvious that what you have underlined in a different color is a link. Don’t confuse readers by underlining anything that is not a link. It’s confusing.
2. Make your links a noticeably different color from your main text color
Use a color that stands out. I’ve seen blogs and websites where their links are the same color as the text and the only way to know it’s a link is by hovering over it. That’s bad user experience. Help your users by making them obvious. Choose one color for all of your links and only use that color for links.
3. Contrast Against the Page Background
On a lighter background (white, light grey, etc.), use either medium to darker shades of blue or red. Those options generally give the most contrast against the light background. On a darker background (such as black, dark blue, etc.), use very, very light shades of yellows, greens, oranges, blues, grays, or white.
Try to stay away from light reds, pinks, etc., since those can be too jarring to the eye in contrast to the background color. In either case, though, the specific choice depends on the color scheme that the designer is working with, so we need to use our judgment about what we think looks and works the best to make the links stand out.
4. Contrast Against the Text
Most text on websites is either black (on a white background) or white (on a black background). So if your links are already underlined and are a different color than the main text, you’ve done the job right. But when you’re picking the color of your links, please, choose a color with enough contrast so that there is a noticeable color difference between the text and the link!
5. Link States
While we’re on the subject of links, it’s a good idea to have your links look different on hover and also after they have been visited. Hover is the way, a link looks when your mouse hovers over it. This just gives an extra indication that the link is an active link. A visited link should also have a different color so that it indicates to the user that they have already visited that link and they don’t need to click on it again. This is especially useful when you have a list of links for someone to read through. It helps them know which ones they’ve already visited.
While we’re on the subject of links, it’s a good idea to have your links look different on hover and also after they have been visited. Hover is the way, a link looks when your mouse hovers over it. This just gives an extra indication that the link is an active link. A visited link should also have a different color so that it indicates to the user that they have already visited that link and they don’t need to click on it again. This is especially useful when you have a list of links for someone to read through. It helps them know which ones they’ve already visited.
How To Underline Links In Blogger Blog
Section 1: Underline All Links Including Post Titles, Pages, Categories, Blog Achieves, etc
Step 1: Go to Blogger Dashboard>>Theme>>Customise
Step 1: Go to Blogger Dashboard>>Theme>>Customise

Step 2: After Customise to Advance>>Add CSS and paste the below codes in the field provided, click "Apply to Blog" and "Go back to Blogger".
a:link {
text-decoration:underline;
}
a:visited {
text-decoration:underline;
}
a:hover {
text-decoration:underline;
}
a:link {
text-decoration:underline;
}
a:visited {
text-decoration:underline;
}
a:hover {
text-decoration:underline;
}

Section 2: Underline Links In Blog Post Only
Underlining all links including Post Titles, Pages, Categories, Blog Achieves, etc. is not advisable as in section 1 so use the one in section 2 here. I just put it there, perhaps some might want it. Follow the steps in section 1 and paste the below code.
Step 1: Go to Blogger Dashboard>>Theme>>Customise
Step 2: After Customise to Advance>>Add CSS and paste the below codes in the field provided click "Apply to Blog" and "Go back to Blogger".
.feed-links {display:none !important;}
.entry-content a {
text-decoration: underline;
}
.entry-content .btn.btn-default.read-more{
text-decoration: none;
}
An alternative CSS Code to the above is the one below, if the above code did not work for you, delete the first and follow the same steps (in section 1) and copy and paste the below code and it should work! And also, if you're using a custom template, it is most likely that the above code may not work, in this case, follow the steps in section 1 and paste the below code, apply to blog and go back to blogger and view any of your blog post where you have inserted some links and see for yourself. Personally, both codes worked for me, the one just above worked for me in the blogger default template that I have chosen, the below worked for me in a template that I have bought and uploaded on a different blog. The CSS code below is the best, I recommend it for you to implement it, it works in both default and custom templates!
Step 1: Go to Blogger Dashboard>>Theme>>Customise
Step 2: After Customise to Advance>>Add CSS and paste the below codes in the field provided click "Apply to Blog" and "Go back to Blogger".
.post-body a {
text-decoration: underline;
}
See the result below, isn't it nice?

What we're just doing is to overwrite the CSS codes in the blogger template, but if you think you can edit the template codes, then follow the following steps below.
Go to Blogger Dashboard>>Theme >> Edit HTML Search for a:link (Tip: Use Ctrl + F)
You will see a similar code there as:
a:link {
Now the above code specifies that there is no underline as dictated by text-decoration:
text-decoration:none
Here none specifies “No Underline”. To add underline simply change the command to:
text-decoration:underline
If it was originally underlined simply change it back to, yea you guessed it right,
text-decoration:noneIsn't it simple to underline links in blogger blog? I have tried so much to cover everything in this Blogger Blog Tutorial, How To Underline Links In Blogger Blog Step By Step. If you follow the tutorial strictly, I don't think you'll encounter any issues, however, if you encounter issues, comment it at the comment section below and I will attend to you! Happy blogging! And don't forget to share, thanks!
full-width
Step 1: Go to Blogger Dashboard>>Theme>>Customise
Step 2: After Customise to Advance>>Add CSS and paste the below codes in the field provided click "Apply to Blog" and "Go back to Blogger".
.feed-links {display:none !important;}
.entry-content a {
text-decoration: underline;
}
.entry-content .btn.btn-default.read-more{
text-decoration: none;
}
An alternative CSS Code to the above is the one below, if the above code did not work for you, delete the first and follow the same steps (in section 1) and copy and paste the below code and it should work! And also, if you're using a custom template, it is most likely that the above code may not work, in this case, follow the steps in section 1 and paste the below code, apply to blog and go back to blogger and view any of your blog post where you have inserted some links and see for yourself. Personally, both codes worked for me, the one just above worked for me in the blogger default template that I have chosen, the below worked for me in a template that I have bought and uploaded on a different blog. The CSS code below is the best, I recommend it for you to implement it, it works in both default and custom templates!
Step 1: Go to Blogger Dashboard>>Theme>>Customise
Step 2: After Customise to Advance>>Add CSS and paste the below codes in the field provided click "Apply to Blog" and "Go back to Blogger".
.post-body a {
text-decoration: underline;
}
See the result below, isn't it nice?
What we're just doing is to overwrite the CSS codes in the blogger template, but if you think you can edit the template codes, then follow the following steps below.
Go to Blogger Dashboard>>Theme >> Edit HTML Search for a:link (Tip: Use Ctrl + F)
You will see a similar code there as:
a:link {
color:$linkcolor;
text-decoration:none;
}
a:visited {
color:$visitedlinkcolor;
text-decoration:none;
}
a:hover {
color:$titlecolor;
text-decoration:underline;
}
OR Search this
a:link {
text-decoration:none;
color: $(link.color);
}
a:visited {
text-decoration:none;
color: $(link.visited.color);
}
a:hover {
text-decoration:underline;
color: $(link.hover.color);
}
Now the above code specifies that there is no underline as dictated by text-decoration:
text-decoration:none
Here none specifies “No Underline”. To add underline simply change the command to:
text-decoration:underline
If it was originally underlined simply change it back to, yea you guessed it right,
text-decoration:noneIsn't it simple to underline links in blogger blog? I have tried so much to cover everything in this Blogger Blog Tutorial, How To Underline Links In Blogger Blog Step By Step. If you follow the tutorial strictly, I don't think you'll encounter any issues, however, if you encounter issues, comment it at the comment section below and I will attend to you! Happy blogging! And don't forget to share, thanks!


16 Comments
Thank you much !! Love you. You helped me a lot ⚡
ReplyDeleteI am happy this tutorial helped you, happy blogging!
DeleteHello Buddy, thank you so much. It worked for me exactly what I wanted.
ReplyDeleteHello Rasel Sarder!
DeleteI am happy this tutorial helped you, happy blogging!
I’m looking for a diamond jewellery for my wife. Read this post its very informative. Keep it up buddy.I’m not too picky on price but I will want to see about getting a custom ring as I want it to be unique for my wife.
ReplyDeleteawesome post
ReplyDeleteskyservice
skyservice
skyservice
skyservice
Very interesting blog. Many blogs I see these days do not really provide anything that attracts others, but believe me the way you interact is literally awesome.You can also check my articles as well.
ReplyDeleteRowe Rowe
Rowe Rowe
Rowe Rowe
Rowe Rowe
Rowe Rowe
Thank you..
Your blog really nice. Its sound really good. I am very time read your blog. Thanks for the sharing this blog with us
ReplyDeleteCasual Dating
Casual Dating
Casual Dating
click for more/
click for more/
click for more/
Helpful!!! I am going to go through all of your posts. Thanks! Karen
ReplyDeleteThank you very much, it worked :)
ReplyDeleteVisit for tech news
ReplyDeletevisit for top tech trends
read about top tech trends
hi brother
ReplyDeleteservices
ReplyDeleteservices
services
services
services
services
Thank you, exactly what I was looking for. I used the .post-body and it worked perfectly
ReplyDeleteHey! I like your writing skills. Meanwhile, you can create your Kundali By Date of Birth And Time, which might help you in the predictions on several aspects of life.
ReplyDeleteBest time to plan child according to Kundli | Baby Name As Per Horoscope | IVF Pregnancy and Astrology
Great Information. Thanks for sharing with us.
ReplyDeleteUnlock steady rental income with Mobile Tower Installation! Telecom giants are actively seeking properties for new mobile towers. Whether you own land or a rooftop, this is a lucrative opportunity to earn from unused space. The process is simple, with companies managing all technical and legal aspects. Enjoy consistent income and support improved network coverage in your community. Don't miss out on this chance to monetize your property effortlessly. Contact us today or visit our website to apply and get started!