I need not slip on the same road more than once so I Set Up A Test Blog On Blogger which could help me try premium templates, codes, new hacks, and tweaks before actually transferring or implementing them on my real blog. I thought it wise to share with you how I set up my test blog here in Blogger so that what happened to me will not hit you!
Other Blogger Tutorials:
What Is A Test Blog
A test blog is a site where you do all your testing especially if you are unsure of the outcome. It could be installing a new premium template, adding a script or codes, trying out new hacks and tweaks and many more. It could really be risky to apply updates directly to your live blog especially if it's a major change. If you're installing a premium template on a Blogger blog that has existing content and is a live blog, I strongly recommend you first install the template on a test blog, set up and tweak your blog and then export your new setup to your live blog.The Benefits Of Setting Up And Using A Test Blog
A test blog will help you with testing templates and codes before making changes to your live Blogspot blog. By doing this, you won’t mess up with your blog by uploading a corrupt template. Always use a test blog when testing templates, scripts, and other hacks before implementing or updating the changes on your real blog.Regarding Premium Template Installation, A Test Blog will help you test the template on your content prior to installing it on your real live blog. You will be familiar with set up instructions, so installing on your live blog will be quicker with less disruption to your live blog. You will be sure and have confidence when implementing some changes to your real blog because you have tried and tested it on your test blog.
How To Create A Test Blog On Blogger For Testing Templates Codes And Hacks
SECTION 1: Setup Your Test Blogger Blog; Create A New Blog
- Sign in to your Blogger Dashboard. On the main dashboard page, at the top left, you will see the name of your current blog. Click on the down arrow to open the drop-down list.
- At the bottom of the list is the option New blog...
- Click on this link.

4. Create a new blog window will open.
5. Give your test blog a Title and enter an Address for your blog. You don’t need to worry about selecting a specific default template, just Choose one of the default templates.
6. Click the Create blog! button to create your test blog.

7. After you have created your new test blog, you will be directed to the main Blogger Dashboard page for that blog.
Take Away
If you used a similar name to your live blog, you might end up updating the wrong site so be sure to add an indication to your test blog's name that it is a test blog. I suggest that you use a URL that you can easily identify as your test blog.
SECTION 2: The Blogger Test Blog Settings
Since test blogs are used only for experimental reasons, we need to set them up in a way different from the way we set up our main blogs. First of all, we need to ensure that they are not listed in the public listing of Blogger.com, and not visible to search engines. Under the Permission section, we may also set the Blog Readers to Only blog authors. If you plan to use external apps to test your site, set it to Public instead to allow access.The Blogger Test Blog Basic Settings
After creating your test blog, then go to Settings>> Basic
There 4 main headings there, the "Basic", "Publishing", "HTTPS" and "Permissions". Under the Basic section, there are 3 settings there, Title, Description, and Privacy. You may change the Blog Title if you wish, as for the blog Description, leave it don't give any blog description as it would not be visible to search engines. Next to Description is Privacy, By default, it is set to "Visible to search engines", Click on "Edit" and set it to No "Not visible to search engines"

Under Publishing, there is only one setting here, that is "Blog Address" you may change it if you wish, or maintain the one you've already chosen from the beginning! The next heading is the "HTTPS", as for this one too, is not needed so leave it as it is.
Under the "Permission" heading, there are 2 settings, Blog authors and Blog Readers. You may Add authors, that is if you're not the only author on the blog. Set the Blog Readers to Only blog authors. If you plan to use external apps to test your site, set it to Public instead to allow access. Congratulations, you've just created your blogger test blog, where you'll be testing codes, templates and try new hacks and tweaks. Let's continue the tutorial, we need now to export data from the live blog.
SECTION 3: Export The Data From Your Real Live Blog
So that your blogger test blog will look as much as your real live blog as possible, you will want to export all your posts, images and pages to use for testing with the test blog you've created in Sections 1&2.Go to your Blogger Dashboard And select the blog which you'll like to export data from to your test blog. This should be the blog that you'll be doing the testing for.
Go to Settings>>Other>>Back up

Back up Content popup will appear. Click on the gray Save to your computer

A download popup should appear (depending on your operating system). Click the appropriate button to save the file to your computer into a location of your choice or your designated download folder. Go the folder that you chose to download the blog export into. You will see an XML file with a name like, blog-date.xml (the date will be substituted with the appropriate date abbreviation for the date on which you exported the file). This is the file you will need to upload your posts to your test blog.
SECTION 4: Backup And Export Your Real Live Blog Template
Now, if your want the template on your blogger test blog to be the same as your real live blog for which you will like to do the testings for, then you need to export your real live blog template to the test blog. This way, you'll be sure and certain on any update because whatever update or test you carried on your test blog, so will it appear on your live blog because the template, posts, and other contents are the same.If you want to export your current template and install it on your test blog, go Go to your Blogger Dashboard And select the blog which you'll like to backup or restore. So that the backup can be used to install on your test blog. In this case, the blog you have chosen in SECTION 3 above.
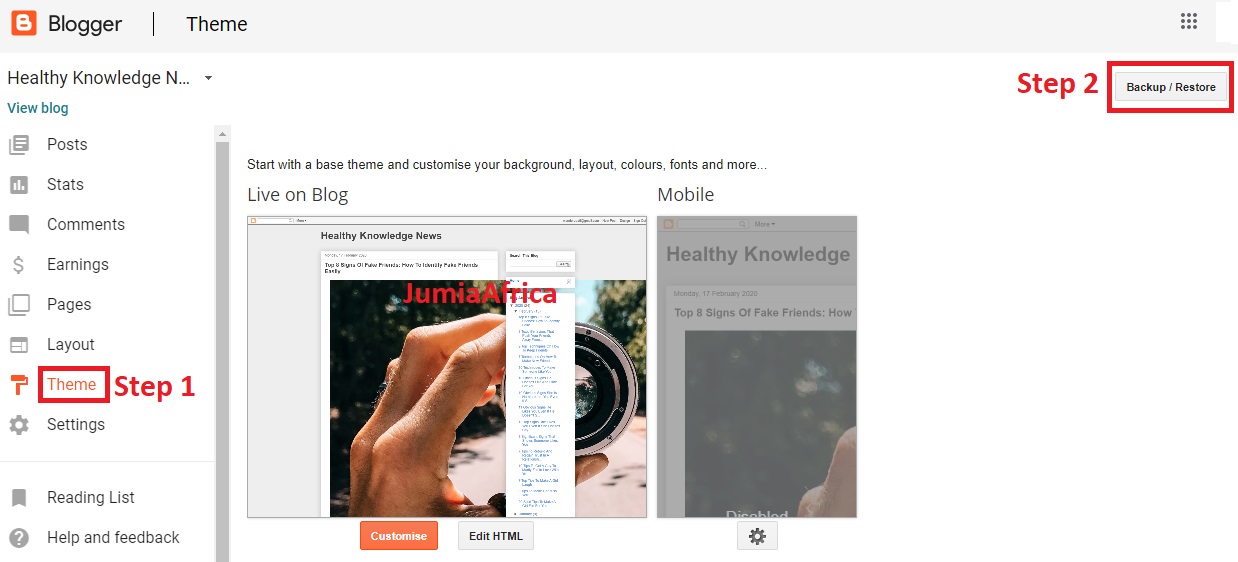
On Your Dashboard Go To Theme>>Backup/Restore.
In the upper right corner of the page, click on the gray Backup/Restore button.

 A download dialog box will open on your computer.
Save the file to your Downloads folder, desktop or file of your choice.
The file will look something like: theme-#################.xml.
You can then upload this theme to your test blog like any other theme from the Themes page.
The Theme > Backup/Restore popup will open.
Click on the orange Download theme button
Save the file to your Downloads folder, desktop or file of your choice.
The file will look something like: theme-#################.xml.
You can then upload this theme to your test blog like any other theme from the Themes page.
SECTION 5: Import Your Real Live Blog Posts And Pages Into Your Test Blog
Go to Settings >>Other>>Import content

The Import Content popup window will open.
Prove you're not a robot.
Then click on the Import from computer button.
Prove you're not a robot.
Then click on the Import from computer button.

SECTION 6: How To Install Template or Theme Into Your Test Blog
On Your Dashboard Go To Theme>>Backup/Restore

Find the downloaded template in SECTION 4 on your computer (theme-########.xml) and select it. Click the Upload button. Your template will be uploaded. A yellow success message will flash on your screen when uploading is complete.
An alternative method to the above is the clean installation. If you want everything to be carried over to your live blog, open the template that you have downloaded in notepad, copy all the codes, now go to your Dashboard>>Theme>>Edit HTML, delete all the codes there and paste the one you copied from your notepad. This is called a clean installation.
Congratulations! You've fully created A Blogger Test Blog, you may now test and try scripts, codes, new hacks and tweaks on your test blog. After you've tested some codes and hacks and it worked very well you can implement it directly in your live blog or you may like also to export it from your test blog to your real live blog. See SECTION 7 below.
If you want to install a premium template that you bought somewhere or downloaded somewhere, install it on your test blog by following the same steps in SECTION 6 above. Follow the instructions included with your premium template to set up all your menus and gadgets on your test blog. After you've installed the premium template, set up menus and gadgets and others and it worked very well, you can now install it directly on your live blog by following the same procedures as done on the test blog to setup everything on your live blog or you may choose to export it from your test blog to your live blog. See SECTION 7 below on how you can export your test blog to your live blog.
SECTION 7: Export Your Test Blog Setup To Your Live Blog
1. Download your test template setupOnce you have finished setting up your gadgets and customizing your test blog, you can export your setup to your live blog. Go to the Theme page on your Blogger Dashboard. Click on the gray Backup/Restore button at the upper right corner of the window. See SECTION 4
A file save popup box will appear (depending on your operating system). Chose the option to save the file to a location of your choice on your computer or to your designated downloads file. On your computer, open the folder to which you downloaded the template file. You will see an XML file named theme-############.xml (the # symbols will be replaced by a long string of numbers. This is the file you will be uploading to your live blog. See SECTION 4
Install your test setup on your live blog
Install the XML file you downloaded in the previous step onto your live blog. See SECTION 6
A few notes about what will be installed on your live Blog when you use this method:
- All gadgets will be installed, however, any of the HTML/JavaScript gadgets where you cut and pasted code, the code will not be transferred over but the empty gadget will be. You will need to set up these gadgets by pasting the code into the gadgets.
- Social media icon settings will not carry over. You will need to add your links to the live blog.
- Some gadget settings do not carry over like settings in the Labels, Popular Post or Archive gadgets. You will have to re-adjust those settings.
If you want everything to be carried over to your live blog, open the template that you have downloaded in notepad, copy all the codes, now go to your Dashboard>>Theme>>Edit HTML, delete all the codes there and paste the one you copied from your notepad. This is called a clean installation.
I have tried so much to cover everything in this tutorial, How To Create A Test Blog On Blogger For Testing Templates Codes And Hacks. If you follow the tutorial strictly, I don't think you'll encounter any issues, however, if you encounter any, comment it at the comment section below and I will attend to you! Happy blogging! And don't forget to share, thanks!
full-width
I have tried so much to cover everything in this tutorial, How To Create A Test Blog On Blogger For Testing Templates Codes And Hacks. If you follow the tutorial strictly, I don't think you'll encounter any issues, however, if you encounter any, comment it at the comment section below and I will attend to you! Happy blogging! And don't forget to share, thanks!


27 Comments
Nice post i get inspired from this article and this is very interesting hyip templates
ReplyDeleteHello Dear,
ReplyDeleteI Like Your Blog Very Much. I see Daily Your Blog, is A Very Useful For me.
You can also Find Testbericht Flirtmitreifen.comMit unseren ausführlichen Testberichten wollen wir Spreu vom Weizen trennen und euch dabei helfen eine besssere Entscheidung für eine seriöse Singlebörse zu treffen
Please Visit at: https://datingsieger.de/testbericht-flirtmitreifen-com/
Hi Your all posts are wondering!
ReplyDeleteFriends I created some SEO Tools for Blogger for Free of Use. Support me. Thanks.
Free SEO Tools for Blogger
Single Click Meta Tag Generator Tool for Blogger
Single Click robots.txt XML Sitemap Generator Tool for Blogger
Excluded Discovered - currently not indexed
ReplyDeleteGoogle search show me all of this url...
How can fix this issues?
Hi Dear,
ReplyDeleteThanks for sharing such useful blog. Really! This Blog is very informative for us which contain lot of information about Dating apps, I like this post. Please visit at "Testbericht MyLoves.com", i hope you may like our Dating apps.
Visit Here - https://datingsieger.de/testbericht-myloves-com/'
Thanks, Regards,
I am a Single full time dad on disability getting no help from their moms. It a struggle every day. My boys are 15 and 9 been doing this by myself for 8 years now it’s completely drained all my savings everything . These guys are the present day ROBIN HOOD. Im back on my feet again and my kids can have a better life all thanks to the blank card i acquired from skylink technology. Now i can withdraw up too 3000 per day Contact them as well on Mail: skylinktechnes@yahoo.com or whatsspp/telegram: +1(213)785-1553
ReplyDeleteHi, Your Blog is just lovely. Visit my blog for Sample files for testing at http://sample-files-for-testing.blogspot.com/.
ReplyDeleteThank you for discussing this very useful article. I heard something new from you. Keep blogging. SEO Dubai
ReplyDeleteThis is a really informative knowledge, Thanks for posting this informative Information. Wordpress Programmierer Berlin
ReplyDeleteblank ATM card is real i got one from brain hackers tech world...this company is real and they do as they advertised i want everyone to benefit from this that is why i am sharing this here...the company email is brainhackers@aol.com
ReplyDeleteAwesome content. It makes the readers to stay on the blog. Thanks for sharing.
ReplyDeleteSoftware Testing Training in Chennai
software testing online course
Software Testing Course in Bangalore
best
ReplyDeleteAll thanks to Mr Anderson for helping with my profits and making my fifth withdrawal possible. I'm here to share an amazing life changing opportunity with you. its called Bitcoin / Forex trading options. it is a highly lucrative business which can earn you as much as $2,570 in a week from an initial investment of just $200. I am living proof of this great business opportunity. If anyone is interested in trading on bitcoin or any cryptocurrency and want a successful trade without losing notify Mr Anderson now.Whatsapp: (+447883246472 )
ReplyDeleteEmail: tdameritrade077@gmail.com
I was suffering from herpes since January before I met Dr Ajayi who got me cured. Thank god, I'm cured. I had for some time now noticed having difficulty in pain. Never in my wildest dreams did it cross my mind that I may develop a serious herpes disease. Few months ago I purchased herbal remedy from Dr Ajayi, after taking it for 14 days, I was totally reversed. I'm so happy to share this great news to everyone and I want to advise anyone suffering from herpes diseases or any type of diseases he will get you cured. you may need his email for assistance. Email him at ajayiherbalhome@gmail.com you can also call or WhatsApp him +2348154724883. visit his website https://ajayiherbalhome.weebly.com for more information and don't forget to share as you read.
ReplyDeleteAll thanks to Mr Anderson for helping with my profits and making my fifth withdrawal possible. I'm here to share an amazing life changing opportunity with you. its called Bitcoin / Forex trading options. it is a highly lucrative business which can earn you as much as $2,570 in a week from an initial investment of just $200. I am living proof of this great business opportunity. If anyone is interested in trading on bitcoin or any cryptocurrency and want a successful trade without losing notify Mr Anderson now.Whatsapp: (+447883246472 )
ReplyDeletevery nice article on how to start a blog. you can check out my site to know more about free ai writing softwares. it can help you to write content wihout spending dollars on freelance content writers
ReplyDeletefree ai writing software
Deals harbour - free coupouns and deals
very nice article on how to start a blog. you can check out my site to know more about free ai writing softwares. it can help you to write content wihout spending dollars on freelance content writers
ReplyDeletefree ai writing software
Deals harbour - free coupouns and deals
If you are looking for robust business consultancy services in Pakistan
ReplyDeleteSEO services in Pakistan
Digital Marketing services in Pakistan , feel free to connect.
Crazy miracle product. Read my review here. […]
ReplyDeleteI was cured of herpes simplex virus his contact ___________Robinsonbuckler[@yahoo com].
this is the best herbal remedy
Great tips, many thanks for sharing. I have printed and will stick on the wall! I like this blog digital marketing expert in jaipur
ReplyDeleteThank you for the information. Besides also for those work we need to use a computer. And with a regular uses, sometimes we can face some issues with our laptop or pc. But now here the experts are here from ITFux24. They can help with Laptop reparatur Frankfurt. Enjoy the discount with 15% from the first call.
ReplyDeleteThis comment has been removed by the author.
ReplyDeletegreat platform to visit
ReplyDeleteCrazy miracle product. Read my review here. […]
ReplyDeleteI was cured of herpes simplex virus his contact our story
this is the best herbal remedy
Creating and managing blogs properly is very useful today, especially for education and information-based websites. Many parents and students rely on blogs to learn about opportunities like
ReplyDeletesainik school scholarship, which helps in planning a better academic future.
Nice and simple guide — very helpful for beginners! As a Resin Artist, I also use Blogger to share my handmade creations from Sia Resin Art. Thanks for the useful tips!
ReplyDelete— Sia Resin Art
Great post! This guide is very helpful for beginners who want to create a test blog on Blogger. The step-by-step explanation makes it easy to understand. Blogging is a great way to share information and promote services online. For example, businesses like
ReplyDeleteTaxi Service in Jodhpur can use blogs to connect with travelers and provide useful travel tips. A professional Cab service in Jodhpur and trustedJodhpurTaxi Servicecan reach more customers through quality blogging. Thanks for sharing this valuable information!