This tutorial is dedicated to Google Search Console Ultimate Guide In 10 Minutes. You can make use of the table of content. We'll touch on How To Setup Google Search Console And Verify Ownership Of Your Site Or App and how to to use Google Search Console for you to rank in search engines.
So if you're looking for how to How To Setup Google Search Console And Verify Ownership Of Your Site Or App, then you're in the right place. I will entreat you to read through the entire tutorial first, by so doing you'll get an overview of everything then you can proceed and take action.
What Is Google Search Console?
Google Search Console is a web service by Google which allows webmasters to check indexing status and optimize visibility of their websites. Until May 20, 2015, the service was called Google Webmaster Tools. In January 2018, Google introduced a new version of the search console, with changes to the user interface.
Google Search Console is a free service offered by Google that helps you monitor, maintain, and troubleshoot your site's presence in Google Search results. You don't have to sign up for Search Console to be included in Google Search results, but the Search Console helps you understand and improve how Google sees your site.
Is Google Webmaster Tools And Google Search Console Different?
No. They are not. As stated earlier, they are the same names for the single tool. Google Webmaster Tools is what Google Search Console used to be called. Google search console which was earlier known as Google webmaster tool (GWT) found its name in May 2015, when Google decided to rename the tool.
Since GWT was being used by bloggers, SEO’s, marketers, it made more sense to change it to a Google search console. The idea behind changing the name was to get more users. Google found that the “webmaster” title wasn’t inclusive enough for all its users who range from novice weekender search fans to certified webmasters.
Is Google Search Console The Same As Google Analytics?
No, Google Search Console tells you how your website is performing in Google search while Google analytics shows you what users do when they visit your website, from any online source and not just Google. With Google search console you can see which keywords generated organic traffic to your website and with Google analytics you can see which pages they visited first, how many pages they visited before leaving, and many other traffic analysis metrics.
Search Console Offers Tools And Reports For The Following Actions:
- Confirm that Google can find and crawl your site.
- Fix indexing problems and request re-indexing of new or updated content.
- View Google Search traffic data for your site: how often your site appears in Google Search, which searches queries show your site, how often searchers click through for those queries, and more.
- Receive alerts when Google encounters indexing, spam, or other issues on your site.
- Show you which sites link to your website.
- Troubleshoot issues for AMP, mobile usability, and other search features.
- Add A Nice HTML Sitemap Page To Blogger Blog
- Blogger And WordPress Which Is Better – 12 Comparisons
- Blogger Blog Review [10 Pros And Cons Of BlogSpot]
Who Should Use Search Console?
Anyone with a website! From generalist to specialist, from newbie to advanced, Search Console can help you.
- Site administrators: As a site admin, you care about the healthy operation of your site. Search Console lets you easily monitor and, in some cases, resolve server errors, site load issues, and security issues like hacking and malware. You can also use it to ensure any site maintenance or adjustments you make happen smoothly with respect to search performance.
- Web developers: If you are creating the actual markup and/or code for your site, Search Console helps you monitor and resolve common issues with markup, such as errors in structured data.
- Business owners: Even if you won't be using Search Console yourself, you should be aware of it, become familiar with the basics of optimizing your site for search engines, and know what features are available in Google Search.
- SEO specialists or marketers: As someone focused on online marketing, Search Console will help you monitor your website traffic, optimize your ranking, and make informed decisions about the appearance of your site's search results. You can use the information in the Search Console to influence technical decisions for the website and do sophisticated marketing analysis in conjunction with other Google tools like Analytics, Google Trends, and Google Ads.
Why I Must Use Google Search Console? The Importance Of Google Search Console
Google Search Console tells you the most popular queries causing your website to appear in search results. Google Search Console tells you which queries are driving the most traffic. You can see which websites are linking to yours. You can evaluate how well your mobile website is performing for people searching on tablets and phones.
Keywords Management
This is where you can see what keywords are performing and who is searching for what terms related to your industry.
Make Changes And Index Your Site
If you’ve made major changes to a website, the fastest way to get the updates indexed by Google is to submit it in the Search Console so they appear in search results.
Automated Diagnostic Notifications
Sometimes things break. Get automated notifications that something’s wrong with your site before any customers can have a poor experience.
Improve Your Website’s Appearance In Search Results
Google Search Console has various resources that can enhance the way your website appears in search. For one, you can use its Data Highlighter to create rich snippets.
Detect Security Issues
Google alerts you if your website has been hacked or is spreading malware. It also provides solutions that webmasters can take to address the problem.
Learn If Your Site Is Mobile-Friendly
You might have optimized your website for mobile, but do you know if Google really considers it as mobile-ready? Fortunately, Search Console comes with the Mobile Usability module, which reveals the problems that may keep your site from being seen as mobile-friendly. Additionally, Search Console offers a free tool that tests your site’s responsiveness on a mobile device.
Address Broken Links
The last thing you want on your website is a broken link. When a link directs users to a page that shows a 404 error, Google will perceive your site as no longer available. If not fixed promptly, it may remove your page from the search results. The error reports in the Search Console will list down the broken links you have at any given time, so you can address them immediately.
Improve Your HTML
There are a lot of issues that can spell trouble for your site. It can be faulty coding, large images, and duplicate title tags. Google Search Console can provide you with HTML Improvement suggestions so you can keep your website in peak performance.
Google Search Console Product Requirements
Search Console is a web-based product that you use in your browser. Here's what you need to use Google Search Console:
- A recent version of any of the following browsers: Chrome, Firefox, Edge, Safari.
- Both cookies and JavaScript must be enabled in your browser.
- A valid Google account.
Google Search Console Features
- The service includes tools that let webmasters:
- Submit and check a sitemap.
- Check and set the crawl rate, and view statistics about when Googlebot accesses a particular site.
- Write and check a robots.txt file to help discover pages that are blocked in robots.txt accidentally.
- List internal and external pages that link to the website.
- Get a list of links that Googlebot had difficulty in crawling, including the error that Googlebot received when accessing the URLs in question.
- See what keyword searches on Google led to the site being listed in the SERPs, and the total clicks, total impressions, and the average click-through rates of such listings. (Previously named 'Search Queries'; rebranded May 20, 2015, to 'Search Analytics' with extended filter possibilities for devices, search types, and date periods).
- Set a preferred domain (e.g. prefer example.com over www.example.com or vice versa), which determines how the site URL is displayed in SERPs.
- Highlight to Google Search elements of structured data that are used to enrich search hit entries (released in December 2012 as Google Data Highlighter).
- Receive notifications from Google for manual penalties.
- Provide access to an API to add, change and delete listings and list crawl errors.
- Rich Cards a new section added, for a better mobile user experience.
- Check the security issues if there are any with the website. (Hacked Site or Malware Attacks)
- Add or remove the property owners and associates of the web property.
How To Set Up Google Search Console
Start By Signing In To Google
Google wants to connect the dots between your website (or app) and you, so first you must log in to your Google account. You can sign in through Gmail or anywhere you have a Google account. While signed in to your Google account, navigate to this page in any browser: https://search.google.com/search-console/about. Or Sign in to Google Search Console through your Google account: https://www.google.com/webmasters/tools/
If you have already registered for a Google Analytics account, log in to the Search Console using your Analytics account user and password information. You can also log in with a Google account. If you don’t have a Google account, you must set one up. Go to Google.com and click Sign in. Then choose to create an account and complete the form. (Bonus: You now have access to Gmail and all other Google applications.)
Set Up Google Search Console
Click the Start Now button.

Type in your website (the domain URL, such as http://www.example.com/) or app (for example, android-app://com.eample/) and then click Add Property.
Click ‘Add a Property’.
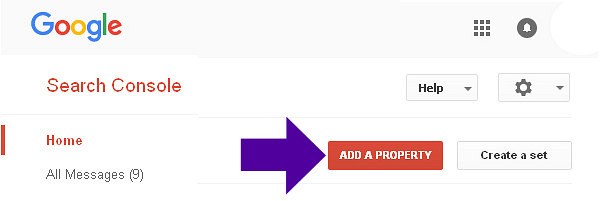
Type in the full path to your domain.
Click ‘Add’.

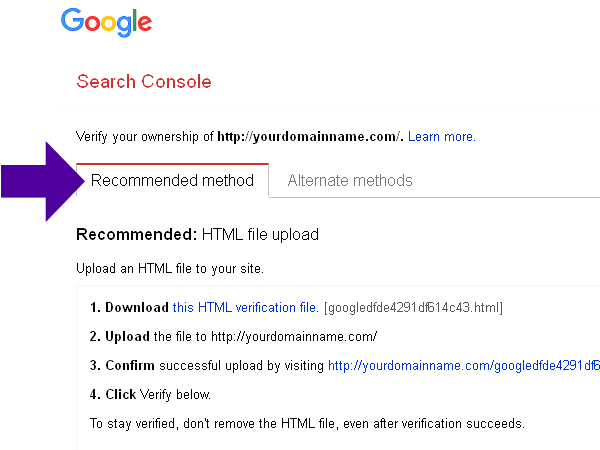
Verify Ownership of your Domain.
Choose from two tabs: ‘Recommended Method’:
and ‘Alternate Methods’:
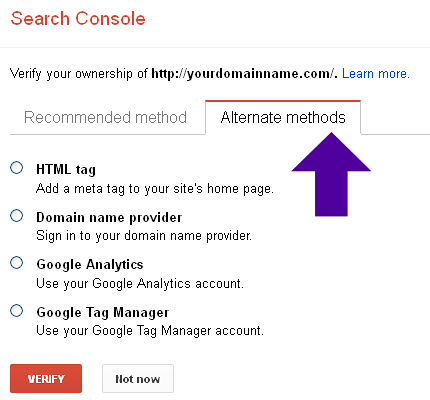
Google Search Console Verification Methods
HTML Tag
Select the 'HTML tag' option.
Copy the Google display text line in the shaded box (beginning with <meta name=). Open your home page in your preferred website editor and paste that text into the Head section (near the top) of your home page. This creates a new Meta Tag. Save your changes in your editor program. HTML tag: Add a <meta> tag to the <HEAD> section of a specific page’s HTML code. Go back to the Google Search Console setup page, and click the Verify button. The full tutorial is below!
Google Analytics
If you’ve already set up Google Analytics for your website and you have Administrator permissions, you can verify your site ownership instantly. Google Analytics tracking code: Copy the GA tracking code that you use on your site. (You need “edit” permission in GA for this option.) Select the 'Google Analytics' option. Click the Verify button.
Google Tag Manager
You have to have ‘manage’ permissions on the Google Tag Manager account
Select the Google Tag Manager option. Google Tag Manager container snippet code: Copy the GTM container snippet code associated with your site. (You need View, Edit, and Manage container-level permissions in GTM for this option.) Click the Verify button.
HTML file upload Method:
Upload a verification HTML file to the root level of your website.
Note: If you already have at least one property set up, you will see that display instead of the URL entry shown above. To add another website or app, to the extreme upper right corner of the Google Search Console page and just click the Add a Property button and then enter the new site’s URL. If you have multiple sites, you need to click on the drop-down arrow.

Click the Add a property button

After you click on "Add property above, a window will pop out, here you two options either to enter your domain or URL, choose the second option and enter your site URL and hit the "continue" tap.

On the Google Search Console dashboard, at the right side, scroll to the bottom and click on "Settings" under Property settings, you'll see "ownership verification" click on the arrow at the extreme end. You'll be provided with several verification methods, proceed and verify your site.
Note, if you've already added a site and verified it, the new site will be verified automatically, and a message will be displayed as such, but still, proceed and add other verifications method to it. That is it, go ahead and verify your site as explained above and below!
How To Verify Your Site Ownership
What is verification?
Verification is the process of proving that you own the property that you claim to own. We need to confirm ownership because once you are verified for a property, you have access to its Google Search data, and can affect its presence on Google Search. Every Search Console property requires at least one verified owner.
- Either add a new property or choose an unverified property from the property selector bar from the Google Search Console (GSC).
- All the verification methods have been explained, choose one of the verification methods listed below, and follow the instructions. Not all verification methods are available for all types of properties; the verification page will list which methods are available and recommended for your site.
Verify A Website
You can add additional verification methods to your property's verification settings page. You might want to add more than one verification method in case one of your existing verification methods fails (for example, if you verified using a Google Analytics tracking code, and someone changes a template on your website that omits the tag).
To add an additional verification method, visit the Settings page for the property and click Ownership verification.
How Long Does Verification Last?
Multiple people can add and verify a website property separately, using the same or different verification methods. If you use the same verification method, just be sure that you don't overwrite the verification tokens of any other owners.
Google periodically checks if your verification is valid (for example, checking if your HTML verification tag is still present). If verification can no longer be confirmed, your permissions on that property will expire after a certain grace period.
If all verified owners lose access to a property, all delegated owners (owners added by a verified owner), users, and associates of the property will lose access to the Search Console property.
When Will I Start To See Data?
Data is collected for a property from the time that you first add it as a Search Console property. Any gaps in verification do not typically cause a gap in data collection.
We Lost Our Site Owner!
If the verified owner of your site leaves or you're not sure who the verified owner is, verify another site owner. The new owner will be able to see the list of all owners and users verified to that site, as well as the verification methods for each owner. You can then optionally unverified previous owners by removing their verification token (for example, removing the HTML tag from the site, for HTML-tag-verified owners). See Add or remove owners for more information.
You can verify ownership of a site by uploading a special HTML file to your site. This file is tied to a specific user. Follow the instructions on the verification details page. Removing this verification file from your site will cause you to lose verification for the site.
HTML File Upload Google Search Console Verification Method - WordPress
Note: This is for WordPress Users, To verify ownership using an HTML file, choose the HTML file upload method on the verification details page for your site, and follow the instructions shown. The user agent that performs file upload verification has the user agent token Google-Site-Verification and the full user agent string Mozilla/5.0 (compatible; Google-Site-Verification/1.0)
To verify your website with HTML File on Google Search Console, you can download file manager plugin and upload your HTML file from Google Search Console, Don't forget to click on verified after you finish the upload. Alternatively, you can do that if you have access to your cPanel. So let's see how you can upload HTML File through your cPanel.
Step 1: Head over to Google Search Console and log in. Select the property you would like to verify (that is if you have multiple sites on Google Search Console) See the infographic for more information.

Step 2: After you select your site, scroll down to the bottom left corner and click on "Settings"

Step 3:When you click on settings above, it will take you to the "Ownership Verification" under property settings, click on it and select "Upload an HTML file to your website". The drop down arrow will expand, click on "download the file", save the file to the desktop or where convenient for you.

Step 4: Now the first part is done, let's move to the second part which is uploading the HTML File you've downloaded from Google Search Console to the root directory of our website. To login to your Cpanel under "FILES" locate "File Manager". I know there are several panels out there but they are similar so just follow this tutorial. For the purpose of demonstration, I m using the Cpanel from the stable host.

Step 5: After you click on "File Manager" above, it will take you to the root directory of your website. At the left pane look for "public_html" and click on it.

Step 6:Now, this is where we will upload our HTML file downloaded from Google Search Console. In the upper section, click on upload. In most cases, it will take to another window in your web browser where you will upload the HTML File. Locate the HTML File you downloaded from Google Search Console or you can just restore down your browser and drag and drop your HTML File, simple as that!

When the upload is successful, you'll see green. Click on "Go back" to the place you were before. See the infographic for more information.

Step 7: When you go back and browse through the directory, you will see your google site verification there! Now, it does not end there, go to Google Search Console and click on verify.

Step 8: A verification successful message should appear if you follow everything in the above tutorial. Congratulations! you'er now a verified owner of your website!

Potential Errors With HTML File Upload Method:
The following errors can occur with HTML file upload verification:
- Your verification file was not found.
Please download the verification file provided on the Verification page of Google Search Console, and upload it to the specified location without any modifications. If the file name or content does not match the HTML file provided, we won't be able to verify your site ownership. - Your verification file has the wrong content.
Google Search Console checks to see if your verification file has the same filename and content as the file provided on the Verification page. If the file name or content does not match the HTML file provided, we won't be able to verify your site ownership. Please download the verification file provided on the Verification page of google Search Console, and upload it to the specified location without any modifications. - Hacked verification file.
Your verification attempt failed in a way that indicates that your site might have been hacked. Learn more about detecting and fixing hacked sites. - Your verification file redirects to a disallowed location.
Googlebot will not follow redirects for verification files; if your site redirects all traffic to another site, we recommend using meta tag verification. Redirects within a single site—for example, from tohttp://www.example.com/—are allowed.
Google Search Console Verification With Domain Name Provider - WordPress
This feature is not available for blogger users as they don't have access to their Cpanel. So this aspect pertains only to self-hosted sites.
Choose the company your domain name is registered with. Domain name provider: Sign in to your domain registrar (like GoDaddy, eNom, or networksolutions.com), and verify your site directly from Google Search Console or add a DNS TXT or CNAME record. Follow the instructions displayed, it will vary according to which domain name provider you have. Click the Verify button. Follow the tutorial below:
You can verify ownership of a property at the domain level by adding a DNS record in your domain name provider. Search Console supports both the TXT DNS format and CNAME format for DNS verification.
To use this method, you must sign in to your domain name provider (for example, GoDaddy.com or networksolutions.com) and add a DNS record as described below. Google will verify that your personal record is present and assigned to your domain. Each DNS record associates a specific user with a specific domain.
Which record type to use?
- Use a CNAME record if you are verifying a domain or subdomain-level property that is itself defined using a CNAME record (for example, example.com or en.example.com).
- Use a TXT record for all other cases.
CNAME record instructions
Use a CNAME record if you are verifying a domain or subdomain-level property that is itself defined using a CNAME record (for example: example.com or en.example.com).
- Get your Google-generated DNS record
When asked to verify your property, choose the Domain name provider method (or create a Domain property) and you will be given a string value to use in the next step. - Generate a DNS record
- Open Webmaster Central.
- Enter your bare property URL (that is, example.com, not http://example.com) and click Continue.
- Select Alternate methods > Domain name provider.
- Choose your provider from the list, or select Other.
- Click Add a CNAME record to generate a CNAME record to use.
- Add the DNS record to your domain provider
- Find the G Suite documentation for your provider
- Ignore G Suite step 1 (Get your unique verification record) because you already generated your CNAME record in step 2 above.
- Follow G Suite Step 2 (Sign in to your domain host)
- Follow G Suite Step 3 (Add the verification record to your provider's DNS records)
- Ignore G Suite step 4 (the verification step): that will come next.
- Verify your property in Search Console: Open your unverified property in Search Console (or switch to your unverified property using the property selector). When prompted, click Verify. Successful attempts should be verified immediately; if you have an error, see the list of potential errors below. Note: DNS changes may take some time to verify; if we don't find your record immediately, wait a day and try step 3 again
TXT Record Instructions
- Get your Google-generated DNS record
When asked to verify your property, choose the Domain name provider method (or create a Domain property) and you will be given a TXT record as a string value to use in the next step. - Add the DNS record to your domain provider
Add your TXT record from step 1 to your domain provider's records by following these steps: - Find the G Suite documentation for your provider
- Ignore G Suite step 1 (Get your unique verification record) because you already generated your TXT record in step 1 above.
- Follow G Suite Step 2 (Sign in to your domain host).
- Follow G Suite Step 3 (Add the verification record to your provider's DNS records).
- Ignore G Suite step 4 (the verification step): Search Console has its own verification step, described next.
- Verify your property in Google Search Console: Open your unverified property in Search Console (or switch to your unverified property using the property selector). When prompted, click Verify. Successful attempts should be verified immediately; if you have an error, see the list of potential errors below. Note: DNS changes may take some time to verify; if we don't find your record immediately, wait a day and try step 3 again
Again, for the purpose of this tutorial, I will use the cPanel of Stable host. One of my sites is hosted there. If you're using SiteGround, HostGator, or any other Domain Name Providers, the procedure is similar.
Follow all the steps in HTML File upload method except that in step 3, Copy the Domain Name Provider Code

Copy the TXT record, which will be used into the DNS configuration. Then continue the tutorial below.

Now head over to your cPanel, under "Domain" click on "DNS" Editor

After you click on the DNS Editor, it will take you to the a window where you will find your way to all the TXT Record for your Domain Name Provider

When you arrive at Zone Records, click on "ADD RECORDS" to add a TXT record

Go ahead to add a TXT Record

Add your domain name and verification code at the appropriate places and Click on "ADD RECORD"

You're done but wait, go back to google search console and click on "VERIFY" to finish the process

Congratulations! You've Associated a DNS record with Google, the ends of the Domain Name Provider Verification Method!
Potential Errors With Domain Provider Method Of Verification:
The following verification errors can occur with DNS record verification:
- Your verification DNS TXT record was not found
Your verification TXT record was not found. It can take a few minutes after posting the record for it to be visible to Google; wait a bit then try again. - Your verification record did not match
No verification records on your DNS provider matched the value given to you by Search Console. Be sure to use the record provided by the verification page. - More common verification problems are listed below.
Common Google Search Console Verification Errors
In addition to any method-specific verification errors, the following verification errors are possible in most verification methods:
- Incorrect tag/snippet/file errors
Be sure to use the exact tag, code snippet, or file provided to you when beginning verification. - The connection to your server timed out.
We were unable to verify your file because we received a server timeout. This could be because your server is down or is busy and responding slowly. Make sure that your server is responding and try again. - We encountered an error looking up your site's domain name.
We tried to access your verification file but were unable to access your domain due to a DNS error. This could be because your server is down, or there is an issue with the DNS routing to your domain. Make sure that your domain is resolving correctly and try again. - The download request was redirected too many times.
Check the URL for potential issues, such as an infinite loop. - Your server returned an invalid response.
This can happen if your site requires password authentication, or if we cannot access it for other reasons. - We were unable to connect to your server.
Make sure that your server is not down, and that your domain is resolving correctly, and try again. - An internal error occurred.
If this problem persists, check the Webmaster Central Help Forum for updates. - Timeout
Either your site or the domain server stopped responding to our requests (depending on the verification method used). Confirm that your site is responding, and then try again. - Could not find your domain
We tried to resolve the site URL that you gave us, but it is unknown to the DNS service. Check that you are providing the correct URL for your property.
What Is A Sitemap?
First, we need to understand what a sitemap is, and why submitting your sitemap to search engines is important. An XML (Extensible Markup Language) Sitemap is a text file used to detail all URLs on a website. It can include extra information (metadata) on each URL, with details of when they were last updated, how important they are and whether there are any other versions of the URL created in other languages.
All of this is done to help the search engines crawl your website more efficiently, allowing any changes to be fed to them directly, including when a new page is added or an old one removed.
An XML sitemap is a way of organizing a website, identifying the URLs and the data under each section. Previously, the sitemaps were primarily geared for the users of the website. However, Google's XML format was designed for the search engines, allowing them to find the data faster and more efficiently.
How To Create And Submit Blogger Sitemap To Google Search Console?
Step 1: Sign in to your Google Search Console Account.
Step 2:If you have multiple sites, then select the desired blog you wish to submit the sitemap for. Go to the upper left corner of your Google Search Console to select your site. But if you don't have multiple sites, you may escape Step 2 and move to step 3.

Step 3: On the left side of the page, click on Sitemaps under the Index section.The "Sitemaps" page will appear, now at the very top of the page under "Add a new sitemap" you'll see your URL with a blank text field space following it with the word "SUBMIT" at the end.
Step 4: Add the below code in the provided text field. Here you have the option to choose whether you use an atom.xml or sitemap index file. Note, it is advisable that your sitemap should match the one in the robot.text file. See How To Add Custom Robots.txt File In Blogger Step By Step
atom.xml?redirect=false&start-index=1&max-results=500
Orsitemap.xml
Step 6: Press the “SUBMIT” button.

Step 7: Refresh the page.
Congratulation! You have finished the process of submitting your blog sitemap.
Note: The above sitemap will work for 500 posts only that is if you choose the atom file, the very first code. If you have more than 500 posts published on your blog, then you have to add one more sitemap following the same steps. The Whole procedure will be the same, but at this time you have to add this code.atom.xml?redirect=false&start-index=501&max-results=1000
That’s it. You are done with submitting your blogger sitemap to Google Search Console otherwise known as Google Webmaster Tools.
Tools To Validate XML Sitemaps
After creating your Sitemaps with all of the right elements and attributes in place, validate them using one of the following tools:
XML Sitemaps
XChecker
Get Started Using Google Search Console
Once Google verifies your site or app ownership, you can log in and start using your newly set up Google Search Console. Keep in mind that data takes time to collect, so it may be a few days before your new account has data worth looking at.
This is an excellent time to take care of a basic but important search engine optimization task: creating a sitemap that will help Google find and index your pages faster. To access the tools, go to http://www.google.com/webmasters/tools/. Sign in, then click the name of the website or app you set up in Google Search Console. Once inside, explore the left-hand menu to try out the many tools and reports.
Managing Owners, Users, And Permissions In Google Search Console
In the google search console, you can be an owner or user of a property. Each of these roles has different rights and capabilities. You can grant permissions to other users only if you are a property owner.
Permissions In Google Search Console
Each user for a Google Search Console property is assigned one of the following permissions:
- Owner: Has full control over properties in Google Search Console. Owners can add and remove other users, configure settings, view all data, and use all tools. A property must have at least one verified owner, or no users will have access to the property.
- Full user: Has view rights to all data and can take some actions.
- Restricted user: Has simple view rights on most data.
- Associate: Associates are people or accounts that can take certain actions on behalf of your site, or access certain data. Unlike site owners and users, associates can't open or view your Google Search Console account or data directly but they are authorized to perform other tasks. The actions and permissions vary depending on the type of association (for example, Chrome Web store or YouTube channel).
| Feature | Owner | Full user | Restricted user |
|---|---|---|---|
| View all reports | |||
| Property settings (geotargeting, crawl rate) | View only | ||
| URL Parameters | View only | ||
| Change of Address | View only | View only | |
| User administration | Details | Details | |
| Index Coverage | View only | ||
| Blocked URLs | |||
| URL Inspection | Fetch only | ||
| Performance | |||
| Links | |||
| Remove URLs | View only | ||
| Rich result status reports | |||
| Receive messages | |||
| Reconsideration request | |||
| Disavow links | |||
| Link Google Analytics account | |||
| Add / remove property owners | |||
| Data Highlighter | |||
| Verify fixes | |||
| Share report links | |||
| Add users | |||
| Submit sitemap |
1 Restricted users receive only messages that specifically affect them.
How To Add Or Remove Users In Google Search Console
A property can have a maximum of 100 users with edit or view-only permissions.
To add a new user In Google Search Console
- Choose a property in Search Console.
- Click the Settings icon in the navigation pane.
- Click Users & permissions.
- Click Add user and select the permissions to grant the user. Type the Google Account name (email) of the new user. (One must have a Google Account to be granted access to a Search Console property.)
- Choose the permission level to grant the user.
- The new user must add the property to their property list in order to access it.
To delete a user In Google Search Console
- Choose a property in Search Console.
- Click the Settings icon in the navigation pane.
- Click Users & permissions.
- Select the menu next to the user to delete and click Remove access. The change should take effect very quickly.
How To Add Or Remove Owners In Google Search Console
Verified owners
A verified owner has verified themselves through some sort of verification token (HTML page or tag, DNS record, or some other method).
If all verified owners are removed, then all users will lose access to the property, after a grace period. Data for the property will continue to be collected, but nobody will have access to it until someone verifies ownership of the property.
To add yourself as a verified owner
- Follow the verification flow.
You can't add someone else as verified owner, because they need to create a token associated with their personal Google account. If they follow the verification flow and give you the token (for instance, an HTML file for HTML file verification), you can upload the token for them to verify their ownership.
To delete a verified owner In Google Search Console
- To remove a verified owner from a property, you must delete all tokens used to verify their ownership of the property. For example, the HTML verification file for HTML file upload, or the Google Analytics tracking code for the Analytics code verification method.
- Open the Users and Permissions page.
- Next to the owner that you want to remove, select Manage property owners.
- Follow the flow to unverify the given owner immediately. The owner's verification token must be gone, or else the unverified request will fail.
Change permissions for an existing user In Google Search Console
You must be a verified owner to be able to change permissions of another user. You can change permissions for any non-verified owner. If you want to upgrade a user to an owner, or downgrade them from an owner to a user, see Add or remove owners.
To change user permissions:
- Open the Users and Permissions page for your property.
- Next to the user that you want to modify, select a different permission level.
- The change should take effect very quickly.
How To Remove A Property From Google Search Console
Property Settings page in Google Search Console
The Property Settings page enables you to view your settings for the current property. Click an item on the settings page to view or manage that setting.
| Setting or value | Description |
|---|---|
| Ownership verification | Manage the verification method used for this property. |
| Users and permissions | See and manage the list of users for the current property. (Management rights apply only to property owners.) |
| Removing a property | Remove a property from your list, with the option of adding it back later (in most cases). |
| Change of address | Use this when moving all pages on your site to a new domain (for example, moving from example.com to anotherexample.com) |
| European press publication designation | Manage your site's status as a European press publication. |
| International targeting report | Choose which country should be prioritized when showing your search results. |
| Limit the Google crawl rate | If your site is being overwhelmed by Google crawl requests, you can limit the request rate. |
| Indexing crawler | Which is the primary crawler used for this site: mobile or desktop. |
| Date property added | Shows the most recent time that you added the property to your property list. |
| Remove property | Click the Remove property button to remove a property from your property list. |
Owners can remove a property from their own list, or from the list of any non-owner.
Users can remove a property from their own list.
Removing a property has the following effects:
- You will no longer receive notifications for the removed property.
- If other verified property owners remain, the only effect is to remove the property from your list; other users will not be affected.
- You will not be able to see any information about the property or access the property settings.
- Your message history for the property will be retained.
- If you are the last verified owner of a property, all users of the property will lose access to the property in Search Console.
Remove a property from your own list In Google Search Console
You can either mute or permanently remove a property from your account. Both actions will have the effects listed at the top of this page.
To mute a property (owners or users)
If you mute a property, you can re-add the property yourself, and verification will automatically succeed at your previous access level (as long as at least one verified owner remains for the property).
- To mute a property, open the property settings page of that property and click Remove property.
To permanently remove a property (owners only)
Permanent removal is an option only if you are a verified owner. If you permanently remove a property, you will need to re-verify ownership (or be added by someone else) if you want access to the property again.
- Remove the access token you used to verify ownership. So, for example, if you used HTML tag verification, you must remove your tag from the site homepage; if you used domain verification, you must remove your TXT verification entry from the domain host. Be sure to remove only your own token; removing someone else's token will remove their access.
- In the Settings page, click Remove property.
Remove a property from someone else's account
Removing a property from someone else's account has the following rules and effects:
- An owner can remove access for any user. However, removing access for another owner will only work if that owner's access token (HTML file, meta tag, or whatever was used to prove ownership) is also removed. If the access token still exists and is valid, ownership status will be re-granted to the removed owner the next time Google sees the access token.
- Removing a property from someone else's account deletes their access to the property.
- In order to regain access, the removed user must be re-granted access by an owner, or else verify themselves as described in Verification.
- The removed user's verification history for the property will be deleted after 18 months.
To remove a property from someone else's account:
- If they are an owner: Follow the appropriate instructions for removing owners.
- If they are not an owner: Follow the instructions for removing users.
Re-add a removed property in Google Search Console
If your property was only muted, you can re-add it to your list without verification (as long as the property still has at least one verified owner).
If you were a verified owner and you permanently removed it, you must add a property in the normal manner.
I don't recognize this new owner
Whenever a new owner is added to your property, Google Search Console notifies all existing verified owners of the change. If you don't recognize the new owner, email that person; maybe it's an alternate email address of someone you know.
If the person doesn't answer, or if you're the only property owner and didn't add anyone else, it's possible that your site has been hacked, and someone is verifying ownership of your Google Search Console property in order to gain something.
If you think your property was hacked:
- Learn how the person verified ownership, as described below.
- If you can permanently eliminate the verification token (for example, an html file on your site), do so, then delete/unverify the owner. This is only a temporary solution: even if you remove the token, a hacker can probably add it back, so you'll have to take the next step to secure and fix your site.
- Either visit the Webmasters Hacked! site and try to fix the problem yourself, or else contact a website security professional to help repair your site.
How did this person verify ownership of my property?
To learn how this person verified ownership of your Google Search Console property:
- Open Site Settings (navigate to Settings > Users and permissions)
- In the list of verified owners, find the unknown owner and select Remove access from the menu for that user. You will be shown information describing how they verified, and what you must do to remove their access to the property. Here is a list of verification methods, with explanations.
- Remember that as long as you have to write ability on the property itself, a hacker can't permanently remove your ownership of the property in Google Search Console; if they remove your verification token, you can always add it back.
Change of Address Tool In Google Search Console
Move your site from one domain to another
About Address Tool In Google Search Console
Use the Change of Address tool when you move your website from one domain or subdomain to another: for instance, from example.com to example.org or example2.com. This tool tells Google about your change, and helps to migrate your Google Search results from your old site to your new site.
When not to use this tool
Don't use the Change of Address tool for the following moves:
- Changing address from http to https. For an http to https move, follow the guidelines for site move with URL changes, but don't use this tool; Google will figure out your changes for you.
- Moving some pages from one location to another within your site: For example, from example.com/oldpath/... to example.com/newpath/...). In this case, just add redirects, and update your sitemaps as appropriate. However, you can use the tool to migrate your site from one domain to a path within another domain. For instance, from example.com to example3.com/new/location/.
- Moving between www and non-www in the same domain: For example, www.example.com to example.com. In this case, use canonical tagging and/or redirects without using the change of address tool.
- Moving a site without any user-visible URL changes (that is, when your site URL remains the same but you are changing hosting providers or CDNs). For this, read Move a site with no URL changes.
Best practices in a site move
- Don't chain site moves. If you submit a change of address to redirect traffic from site A to site B, you can't immediately submit another change of address from site B to site C.
- Try not to combine multiple moves to a single location. Moving sites A, B, and C all to new location D can cause some confusion and traffic loss. You might want to move sites one at a time to the new, combined location and wait till traffic stabilizes before moving the next site.
- If you want to migrate a Domain property to one location (A.com to B.com) and a subdomain to a second property (m.A.com to m.C.com), create a property for subdomain m.A.com and migrate it separately.
- When moving a site, keeping the same site architecture in the new location helps to pass the signals more directly to the new site. If you combine a site move with a redesign of the site's content and URL structure in the new location, you will probably see some traffic loss as Google might need to relearn and reassess the individual pages.
Step 1: Pre-work
Perform these steps for all site moves:
- Implement a 301 redirect from your old homepage to your new homepage. we recommend also implementing 301 redirects for the canonical pages on your old site.
- Read the following topics:
- What is a site move? - Recommendations for all site moves.
- Move a site with URL changes - A step-by-step guide for moving a site from one domain to another.
- Perform any other pre-move actions described in Move a site with URL changes.
- Sites at the domain level (such as example.com, https://example.com, m.example.com) can then use the Change of Address tool (step 2).
Step 2: Use the Change of Address tool
After performing the pre-work, if you fulfill the requirements below, you can use the Change of Address tool to forward your old site signals to your new site.
Requirements:
- You must be a verified owner of both the old and new properties in Google Search Console. You must use the same Google account to manage both sites.
- The Change of Address tool can be used only on domain-level properties: that is, example.com, m.example.com, or http://example.com. It cannot be used for properties below the domain level, such as http://example.com/petstore/
- The tool does not move any subdomains below the specified domain (including www). So if you specify example.com in the tool, it will not move www.example.com or m.example.com. However, all paths under the domain are affected (example.com/any/path/here).
- The tool moves all protocols of your source property. So if you specify http://example.com, it also moves https://example.com
Use the Change of Address tool:
- Perform Step 1: Pre-work.
- Ensure that you fulfill all the requirements listed above.
- Open the Change of Address Tool.
- Follow the instructions provided in the tool. The tool runs a few pre-move checks before telling Google about the move. If you fail any critical pre-move checks, you must fix the issue before you can continue. If you fail non-critical pre-move checks, you will see a warning with recommendations, but your request can continue.
- If critical pre-checks pass, all sites being migrated from or to will display a notification in Google Search Console that the move is in progress. You will see these notifications for 180 days.
- Monitor your traffic as indicated in Move a site with URL changes.
- Maintain the redirects for at least 180 days--longer if you still see any traffic to them from Google Search. Remove your old pages, but we recommend continuing to pay for the old domain for at least a year to prevent others from buying and using your abandoned domain for malicious purposes. After the 180 day period, Google does not recognize any relationship between the old and new sites, and treats the old site as an unrelated site, if still present and crawlable.
What happens when I run The Address tool?
When you file a change of address request using Google Search Console, it tells Google to emphasize crawling and indexing your new site over crawling your old site. It also forwards various signals from the old site to the new site, and tells Google to prefer the new site over the old when determining canonical pages. These actions continue for 180 days after you start migration in Google Search Console.
Google does not erase the old site from the index, and URLs from the old site can continue to be shown in Search results if they are available and don't have an equivalent page on the new site. If you have equivalent pages on your new site, providing redirects from the old site to the new and providing rel=canonical tags can reduce the number of old URLs shown in Search.
The tool runs a quick check before sending the move request to Google, to confirm that you own both sites, and to check for 301s on a few pages on your site.
How To Cancel a change of address request in google search console
You can cancel a change of address request for 180 days after it was made.
To cancel an address change:
- Remove any 301-redirect directives previously set up on your server. If you don't do this, Google will see those directives the next time it crawls your site and might continue to redirect the URLs as instructed by the directive.
- Add 301 redirects from the new site to the old site.
- Open the Change of address tool in the old site and click Cancel Move. Repeat for every old site that you no longer want to move.
European press publication setting in google search console
Specify whether or not your site is a European press publication as defined by the 2019 Directive on copyright and related rights and implementing legislation in France. This setting affects the display of text snippets and thumbnail images from your property in France which goes into effect in October 2019.
Effects of this designation
If a property is designated as a European press publication in its site settings, then search results on Google for this site, such as in Web Search or Discover, will not include text snippets or thumbnail images when shown to users in France, unless the result page overrides the site setting with a directive such as max-snippet or max-image-preview.
The default result for a European press publication looks something like this in Google Search:

Does this setting affect my ranking? Some features depend on the availability of preview content - for example, there can’t be a Featured Snippet without a snippet. Other features may re-order results to group together results that take up less space because of their smaller previews.
Beyond those design considerations, Google isn’t making any changes to Search ranking on the basis of European press publication status. However, it is possible that you might see a CTR change if users prefer one style of preview to another.
How to enable snippets, thumbnails, and rich results
Text snippets and thumbnail images can help people who are looking at your result by giving them a preview of your page and a better sense of how it relates to their search. To enable these text or image previews, use max-snippet or max-image-preview directives. You can enable other special features and rich results by using structured data.
What pages are affected by this designation
Your designation, indicated by your property setting, affects all URLs in the same domain or subdomain, unless:
- It is overridden by a child property's settings (see Inheritance), or
- It is overridden by page-level directives such as max-snippet or max-image-preview.
Inheritance
This setting is inherited by all child properties. However, a child property can explicitly override its parent property's settings.
You can see the parent property's settings by opening the parent property in Search Console. If you don't have access to the parent property, you can perform a Google Search for pages on the child site to see the appearance of the results.
Alternate URLs
Designation as a European press publication does not affect alternate versions of a page, if the alternate version lives on a different property than the canonical version. For example, if a desktop page lives at example.com/page and the AMP version lives at exampleamp.com/page, the European press publication setting for each URL is managed by its own property.
However, if the alternate version lives in the same property or a child property, then the child property (m.example.com) inherits the parent property (example.com), unless the child property explicitly overrides the parent property.
Change your designation in google search console
To change your designation of a European press publication, open the settings page:
- If the "Inherit settings" box is checked, this property's setting is inherited from a containing property. To override the inherited setting:
- Uncheck Inherit settings.
- Check or uncheck the property setting for this property.
- If the "Inherit settings" box is not checked, check or uncheck the property setting for this property. The setting that you choose overrides the setting from any containing property.
Duplex on the web
Duplex on the web automates certain user tasks, such as buying movie tickets, for your site visitors. This page describes how to enable or disable Duplex on the web for your website.
Overview
Duplex on the web operates in two stages.
- Training: Duplex on the web trains periodically against your site to perform certain actions. To control how Duplex on the web crawls and analyzes your site, see Duplex on the web user agent.
- Serving: Serving is controlled by a setting in Search Console. If Duplex on the web is enabled for your site in Search Console, Duplex on the web can offer to perform supported actions for site visitors, such as purchasing movie tickets. Duplex on the web is enabled by default for all sites that fulfill the requirements described on this page. If this setting is disabled in Search Console, Duplex on the web will not be able to perform supported actions on your site.
If serving is enabled but training is disabled, Duplex on the web might work poorly or not at all on your site for supported actions.
Requirements and rules
The following rules apply to the Duplex on the web setting in Search Console:
- You must be a property owner to see or change the settings for Duplex on the web.
- Enabling Duplex on the web for your site can take a few hours or days. Disabling it takes place immediately.
- Property owners will be notified when the property settings change.
- Duplex on the web settings is visible and configurable only in a Domain property. URL-prefix properties cannot see or modify these settings.
- Duplex on the web settings are inherited from the topmost containing property and can be modified only in that topmost property. Child properties have read-only access to the settings. For example, in the properties
m.example.com,m.support.example.com, andexample.com, the setting can be viewed in all properties but changed only in the topmost propertyexample.com. - Duplex on the web currently works only for users in the US and the UK.
Enable Duplex on the web for your site
To enable Duplex on the web supported actions for your site:
- Read the Requirements and Rules.
- Follow the general guidelines for all actions.
- Follow the specific guidelines for the features that you want to support on your site.
- Open the Duplex on the web settings page for your property and click Enable (if not already selected). Enabling this setting takes a few hours or days. These rules apply when changing this setting.
- Optional: If your site is password-protected, we recommend providing a name and password in the Testing credentials section on your Search Console settings page. This enables Duplex on the web access to train against your site.
- Google will notify you when your request to enable serving has been processed and the Duplex on the web has begun training against your site.
Disable Duplex on the web on your site
- To disable serving (allowing Duplex on the web to perform actions on your site), click Disable in the Duplex on the web settings page. Disabling should be effective within a few minutes. You can enable it again later, but enabling can take a few days. Note that Duplex on the web will continue training against your site unless you explicitly disable training as described in the next bullet.
- To disable training by Duplex on the web, add one of these robots.txt rules to your site. The robots.txt rules take effect at the next training attempt. Note that Duplex on the web might continue to work on your site (although sub-optimally) when users visit, unless you specifically disable serving, as described in the previous bullet.
Supported actions for Duplex on the web
Duplex on the web can perform different actions on your site. The following list shows what actions are supported, and the requirements for that action.
General guidelines for all actions
Sites should follow these guidelines to enable any Duplex on the web actions, in addition to any additional guidelines for a specific action:
- Enable training:
- You must either allow anonymous access to your site or provide a name and password to Duplex on the web using the Search Console setting for your site.
- Do not block crawling by the Duplex on the web user agent.
- Follow HTML standards and best practices on your site.
Specific guidelines
Ticket purchases (movie theaters only)
Enable Google Assistant to purchase movie theater tickets for users on your website.
Requirements
The following additional requirements apply, in addition to the other requirements for enabling Duplex on the web:
- You will be contacted when your site becomes eligible for this feature.
- This action is supported in the US and UK only: both the theater and the user (based on query location) must be in the US or UK.
- The search language must be in English.
- You must not show paid ads in the movie ticket checkout flow on your website.
- You must offer credit card payment in the movie ticket checkout flow on your website. Other payment services are not yet supported.
You can test whether the movie ticket checkout flow is enabled for your site by doing a Google search for movies being screened by your theater, clicking links for showtimes, and confirming whether your theater is listed as one of the ticket suppliers.
Association In Google Search Console
Associate your Search Console property with another Google service
View or manage associations for all your properties using the Associations settings page.
Open the Associations settings page
About association
Association is a connection between a Search Console property, and some other entity or property in another Google service: for example, between a Search Console property and a Google Analytics account, a YouTube channel, or a Chrome Web Store account. A Search Console association is requested by the owner of the other entity to the Search Console property owner.
The effect of an association depends on the association type. For example, a Google Analytics association shares your performance data with the associated Google Analytics account; an Android Play Store app association enables Google Search to show deep links into the associated app in search results for your site and publicly display an official relationship with your site.
Read about association in your product documentation to learn about all the benefits of association.
Types of association
The following items can be associated with a Search Console property:
- Google Analytics account
- Chrome Web Store account
- Android Play Store app
- Google Ads account
- YouTube channel
- Google Assistant app
Check the help page for association in the other service to see what happens if an association is created.
Association flow
All association requests except for Google Analytics must be performed in the product that requests association with your site. Here is what happens:
- A property owner in another Google service requests association with your site. The request is made using the product interface for their service: for example, for a YouTube channel, the channel owner uses the YouTube channel administrator page. The requester requests association with your site's root URL.
- Search Console sends a notification of the request to all property owners of the corresponding Search Console property.
- The Search Console property owner gets the notification, and approves or denies the request in the Search Console Associations settings page. (If the requester and approver are the same Google account, the request is granted automatically, without any notification).
A single Search Console property can be associated with multiple other entities (for example, example.com could be associated with both a YouTube channel and an Android app).
Request an association
Requests for association with a Google Analytics property can be made either in Search Console or in Google Analytics. Association requests for other services must be made in the other product.
Request Google Analytics association
You can associate your Analytics property with your Search Console property either through Search Console or through Google Analytics
| If using Search Console | If using Google Analytics |
| You must be an owner of the Search Console account.Open the Associations settings page in Search Console.Click Associate, and choose the Google Analytics account and the Search Console property to associate. | You must be an account administrator for the Google Analytics property.Use the Analytics admin page and specify the full URL of your property. |
Search Console data should be available in the associated Google Analytics property soon after the association process is completed.
More about Google Analytics associations
When you associate a Search Console property with a Google Analytics property, Search Console data is enabled for all profiles associated with that property by default. As a result, anybody with access to that Google Analytics property may be able to see Search Console data for that site. For example, if a Google Analytics administrator adds a user to a profile, that user may be able to see Search Console data in Search Optimization reports.
A Google Analytics property can be associated with only one Search Console property, and vice-versa. Creating a new association removes the previously existing association. If an Analytics association disappeared, you or another site owner either removed it or overwrote the association with another.
Google Analytics account administrators can move their Analytics property from one Analytics account to another. Any associated Search Console properties will maintain their association as part of the move. After the move, any users of the new Analytics account will be able to see data from the associated Search Console property without notification in Search Console. Learn more
Request association with another service
All services other than Google Analytics use their own product's management console to request the association with a Search Console property. For example, on YouTube, you would use the Advanced Channel Settings page. Search your product's help center to see how to request the association with a website.
Approve or deny an association request
If you've received an association request, decide if this is an account that you want to associate with your site. Review the permissions that an association grants to the other service. If you want the association, click Approve next to the request in the Pending Requests table, otherwise click Deny. Approval requests that have not been approved or denied will remain active indefinitely in the Pending requests table.
Remove an association
You can delete any association type at any time for your property in Search Console.To delete an associate:
- You must be an owner of the Search Console property.
- Open the Associations settings page in Search Console.
- Find the association that you want to delete in the table.
- Select the more settings icon and click Remove association.
About the Associations settings page
The Associations settings page shows active and pending associations for all your sites. Active associations have been approved by you or another Search Console property owner. Pending requests are requests for the association that has not yet been approved or denied by a Search Console property owner. When an association is removed, its history is lost.
International Targeting report In Google Search Console
Use the International Targeting report to monitor your hreflang errors, or to choose a country that should be prioritized for your search results. This report has the following sections:
- The Language section: Monitor the usage and errors of
hreflangtags on your site. - The Country section: Set a site-wide country target for your entire site, if desired.
Open the International Targeting ReportTo learn about different mechanisms for targeting your site at specific regions or languages, read the Multi-regional and multilingual sites topics.
Language tab
The Language section of the International Targeting page shows the following hreflang errors in your site. Up to 1,000 errors can be shown.
| Error | Description |
|---|---|
| No return tags | An hreflang tag has no matching tag on the target page. The table aggregates missing return tags by implementation and locale for the following implementations:Page-level: The total number of hreflang errors by language in the <head> section of your pages. The details page shows a maximum of 1,000 URLs on your site, paired with the alternate-language page that's missing a return tag to its mate.Sitemap: The total number of hreflang errors found in your sitemap. The details page lists the sitemap that indicates the URL pairing and the alternate URL that has no return link.HTTP headers: The total number of hreflang errors for alternate files provided in your HTTP header configuration. The details page lists the configuration and alternate URLs with no return link. |
| Unknown language code | For unknown language (and optional country) codes that you have indicated in your site, the table displays the locale followed by unknown language code. As with the no return tag error, you can drill down to see URL-level details and total counts of unknown language codes for that specific locale. |
Click on a row to inspect error details, with a maximum of 1,000 rows.
Country tab
Google Search returns the most relevant and useful sites for a user. Because of this, search results can differ between a user in Ireland and a user in France.
If your site has a generic top-level domain, such as .com or .org, you can help us determine which countries are most important to you. If your site has a country-coded top-level domain (such as .ie or .fr) it is already associated with a geographic region (in this example, Ireland or France). If you use a country-coded domain, you won't be able to specify a geographic location. You can specify a target country in the International Targeting report.
Setting a country target
- On the International Targeting report, click the Country tab.
- Check the Geographic target checkbox and choose your country target. If you want to ensure that your site is not associated with any country or region, select Unlisted in the drop-down list.
This setting is only for geographic data. If you're targeting users in different locations—for example, if you have a site in French that you want users in France, Canada, and Mali to read—don't use this tool to set France as a geographic target. A good example of where it would be useful is for a restaurant website: if the restaurant is in Canada, it's probably not of interest to folks in France. But if your content is in French and is of interest to people in multiple countries/regions, it's probably better not to restrict it.
Change Googlebot crawl rate In Google Search Console
The term crawl rate means how many requests per second Googlebot makes to your site when it is crawling it: for example, 5 requests per second. You cannot change how often Google crawls your site, but if you want Google to crawl new or updated content on your site, you can request a recrawl.
Proper usage
Google has sophisticated algorithms to determine the optimal crawl speed for a site. Our goal is to crawl as many pages from your site as we can on each visit without overwhelming your server's bandwidth. If Google is making too many requests per second to your site and slowing down your server, you can limit how fast Google crawls your site.
You can limit the crawl rate for root-level sites—for example, www.example.com and http://subdomain.example.com. The crawl rate that you set is the maximum crawl rate that Googlebot should make. Note that it does not guarantee that Googlebot will reach this maximum rate.
We recommend against limiting the crawl rate unless you are seeing server load problems that are definitely caused by Googlebot hitting your server too hard. You cannot change the crawl rate for sites that are not at the root level—for example, www.example.com/folder.
Limit the crawl rate
- Open the Crawl Rate Settings page for your property.
- If your crawl rate is described as "calculated as optimal," the only way to reduce the crawl rate is by filing a special request. You cannot increase the crawl rate.
- Otherwise, select the option you want and then limit the crawl rate as desired. The new crawl rate will be valid for 90 days.
Emergency crawl limitation
If your site is being crawled so heavily that your site is having availability issues, here is how to protect it:
- Determine which Google crawler is over crawling your site. Look at your website logs or use the Crawl Stats report.
- Immediate relief:
- If you want a simple solution, use robots.txt to block crawling for the overloading agent (googlebot, adsbot, etc.). However, this can take up to a day to take effect.
- If you're able to detect and respond to increased load dynamically, return HTTP 5XX/429 when you're nearing your serving limit. Be sure not to return 5XX or 429 for more than two or three days, though, or it can signal Google to crawl your site less frequently in the long term.
- Change your crawl rate using the Crawl Rate Settings page, if the option is available.
- Two or three days later, when Google's crawl rate has adapted, you can remove your robots.txt blocks or stop returning error codes from step 1.
- If you are being overwhelmed by AdsBot crawls, the problem is likely that you have created too many targets for Dynamic Search Ads on your site using or page feeds. If you don't have the server capacity to handle these crawls you should either limit your ad targets, add URLs in smaller batches, or increase your serving capacity. Note that AdsBot will crawl your pages every 2 weeks, so you will need to fix the issue or it will recur.
- Note that if you've limited the crawl rate using the crawl settings page, the crawl rate will return to automatic adjustment after 90 days.
Crawl Stats report In Google Search Console
The Crawl Stats report shows you statistics about Google's crawling history on your website. For instance, how many requests were made and when, what your server response was, and any availability issues encountered. You can use this report to detect whether Google encounters serving problems when crawling your site.
This report is aimed at advanced users. If you have a site with fewer than a thousand pages, you should not need to use this report or worry about this level of crawling detail. This report is available only for domain-level properties. That is, the property must be either a Domain property (such as example.com or m.example.com) or a URL-prefix property at the domain level (https://example.com, http://example.com, http://m.example.com).
You can reach the Crawl Stats report in Search Console by clicking (Property settings) > Crawl stats.
Getting started
You should understand the following information before using this report:
- How Google Search works (the long version).
- Advanced users topics, especially the crawling and indexing, and sitemaps topics.
- Various topics on managing access to your site, including robots.txt blocking.
- If you have a large site (hundreds of thousands of pages), here's a guide about managing and troubleshooting your crawl budget.
About the data
- All URLs shown and counted are the actual URLs requested by Google; data is not assigned to canonical URLs as is done in some other reports.
- If a URL has a redirect, each request in the redirect chain is counted as a separate request. So if page1 redirects to page2, which redirects to page3, if Google requests page1, you will see separate requests for page1 (returns 301/302), page2 (returns 301/302), and page3 (hopefully returns 200). Note that only pages on the current domain are shown.
- Crawls that were considered but not made because robots.txt was unavailable are counted in the crawl totals, but not in the crawl details sections. More information
- Resources and scope:
- All data is limited to the currently selected domain. Requests to other domains will not be shown. This includes requests for any page resources (such as images) hosted outside this property. So if your page example.com/mypage includes the image google.com/img.png, the request for google.com/img.png will not be shown in the Crawl Stats report for property example.com.
- Similarly, requests to a sibling domain (en.example and de.example) will not be shown. So if you are looking at the Crawl Stats report for en.example, requests for an image on de.example are not shown.
- However, requests between subdomains can be seen from the parent domain. So for example, if you view data for example.com, you can see all requests to example.com, en.example, de.example.com, and any other child domains at any level below example.com.
- Conversely, if your property's resources are used by a page in another domain, you may see crawl requests associated with the host page, but you will not see any context indicating that the resource is being crawled because it is used by a page on another domain (that is, you won't see that the image example.com/imageX.png was crawled because it is included in the page anotherexample.com/mypage.)
- Crawl data includes both http and https protocols, even for URL-prefix properties. This means that the Crawl Stats report for http://example.com includes requests to both http://example.com and https://example.com. However, the example URLs for URL-prefix properties are limited to the protocol defined for property (http or https).
Known issue: The Crawl Stats report currently reports most crawl requests, but some requests might not be counted for various reasons. We expect our coverage to increase over time to cover most, if not all requests. Therefore you might see slight differences between your site's request logs and the numbers reported here.
Navigating the report
The report shows the following crawl information about your site:
- Total crawl requests
- Total download size
- Average response time
- Host status
- Crawl responses
- File type
- Crawl purpose
- Googlebot type
Click any table entry to get a detailed view for that item, including a list of example URLs; click a URL to get details for that specific crawl request. For example, in the table showing responses grouped by type, click the HTML row to see aggregated crawl information for all HTML pages crawled on your site, as well as details such as the crawl time, response code, response size, and more for an example selection of those URLs.
Hosts and child domains
If your property is at the domain level (example.com, http://example.com, https://m.example.com), and it contains two or more child domains (say fr.example.com and de.example.com), you can see data for the parent, which includes all children, or scoped to a single child domain.
To see the report scoped to a specific child, click the child in the Hosts lists on the landing page of the parent domain. Only the top 20 child domains that received traffic in the past 90 days are shown.
Example URLs
You can click into any of the grouped data type entries (response, file type, purpose, Googlebot type) to see a list of example URLs of that type.
Example URLs are not comprehensive, but just a representative example. If you don't find a URL listed, it doesn't mean that we didn't request it. The number of examples can be weighted by day, and so you might find that some types of requests might have more examples than other types. This should balance out over time.
Total crawl requests
The total number of crawl requests issued for URLs on your site, whether successful or not. Includes requests for resources used by the page if these resources are on your site; requests to resources hosted outside of your site are not counted. Duplicate requests for the same URL are counted individually. If your robots.txt file is insufficiently available, potential fetches are counted.
Unsuccessful requests that are counted include the following:
- Fetches that were never made because the robots.txt file was insufficiently available.
- Fetches that failed due to DNS resolution issues
- Fetches that failed due to server connectivity issues
- Fetches abandoned due to redirect loops
Total download size
Total number of bytes downloaded from your site during crawling, for the specified time period. If Google cached a page resource that is used by multiple pages, the resource is only requested the first time (when it is cached).
Average response time
Average response time for all resources fetched from your site during the specified time period. Each resource linked by a page is counted as a separate response.
Host status
Host status describes whether or not Google encountered availability issues when trying to crawl your site. Status can be one of the following values:
Google didn't encounter any significant crawl availability issues on your site in the past 90 days--good job! Nothing else to do here.
Google encountered at least one significant crawl availability issue in the last 90 days on your site, but it occurred more than a week ago. The error might have been a transient issue, or the issue might have been resolved. You should inspect the Response table to see what the problems were, and decide whether you need to take any action.
Google encountered at least one significant crawl availability issue in the last week on your site. Because the error occurred recently, you should try to determine whether this is a recurring problem. Inspect the Response table to see what the problems were, and decide whether you need to take any action.
What to look for
Ideally your host status should be Green. If your availability status is red, click to see availability details for robots.txt availability, DNS resolution, and host connectivity.
Host status details
Host availability status is assessed in the following categories. A significant error in any category can lead to a lowered availability status. Click on a category in the report to get more details.
For each category, you'll see a chart of crawl data for the time period. The chart has a dotted red line; if the metric was above the dotted line for this category (for example, if DNS resolution fails for more than 5% of requests on a given day), that is considered an issue for that category, and the status will reflect the recency of the last issue.
- robots.txt fetching
The graph shows the failure rate for robots.txt requests during a crawl. Google requests this file frequently, and if the request doesn't return either a valid file (either populated or empty) or a 404 (file does not exist) response, then Google will slow or stop crawling your site until it can get an acceptable robots.txt response. (See below for details) - DNS resolution
The graph shows when your DNS server didn't recognize your hostname or didn't respond during crawling. If you see errors, check with your registrar to make that sure your site is correctly set up and that your server is connected to the Internet. - Server connectivity
The graph shows when your server was unresponsive or did not provide a full response for a URL during a crawl. See Server errors to learn about fixing these errors.
More robots.txt availability details
Here is a more detailed description of how Google checks (and depends on) robots.txt files when crawling your site. Your site is not required to have a robots.txt file, but it must return a successful response (as defined below) when asked for this file, or else Google might stop crawling your site.
- Successful robots.txt responses
- Any of the following are considered successful responses:
- HTTP 200 and a robots.txt file (the file can be valid, invalid, or empty). If the file has syntax errors in it, the request is still considered successful, though Google might ignore any rules with a syntax error.
- HTTP 403/404/410 (the file does not exist). Your site is not required to have a robots.txt file.
- Unsuccessful robots.txt responses
- HTTP 429/5XX (connection issue)
Here is how Google requests and uses robots.txt files when crawling a site:
- Before Google crawls your site, it first checks if there's a recent successful robots.txt request (less than 24 hours old).
- If Google has a recent successful robots.txt response, crawling will start, respecting the retrieved robots.txt rules.
- If Google doesn't have a recent successful robots.txt response, or if the last response was unsuccessful, Google will request your robots.txt file:
- If successful, the crawl can start.
- If not successful, Google will stop crawling but will continue to request your robots.txt file for about 30 days. If Google still cannot get a successful robots.txt response after 30 days:
- If most other URLs on the site are accessible, Google uses the last successfully fetched robots.txt rules and will crawl based on that.
- If the site is generally inaccessible, Google will slowly stop crawling your site.
Any crawls that were abandoned because the robots.txt file was unavailable are counted in crawling totals. However, these crawls were not actually made, so you won't see any data for them in the grouping reports (crawls by purpose, crawls by the response, and so on).
Crawl responses
This table shows the responses that Google received when crawling your site, grouped by response type, as a percentage of all crawl responses. Data is based on total number requests, not by URL, so if Google requested a URL twice and got Server error (500) the first time, and OK (200) the second time, the response would be 50% Server error and 50% OK.What to look forMost responses should be 200 or other "Good"-type responses, unless you are doing a site reorganization or site move. See the list below to learn how to handle other response codes.
Here are some common response codes, and how to handle them:
Good response codes
These pages are fine and not causing any issues.
- OK (200): In normal circumstances, the vast majority of responses should be 200 responses.
- Moved permanently (301): Your page is returning an HTTP 301 (permanently moved) response, which is probably what you wanted.
- Moved temporarily (302): Your page is returning an HTTP 302 (temporarily moved) response, which is probably what you wanted. If this page is permanently moved, change this to 301.
- Moved (other): Another 300 redirect response (not 301 or 302).
- Not modified (304): The page has not changed since the last crawl request.
Possibly good response codes
These responses might be fine, but you might check to make sure that this is what you intended.
- Blocked by robots.txt: This is typically working as you intended. However, you might want to ensure that you are not blocking any pages or resources that you do want Google to crawl. Learn more about robots.txt files.
- Not found (404) errors might be because of broken links within your site, or outside your site. It's not possible, worthwhile, or even desirable to fix all 404 errors on your site, and often 404 is the correct thing to return (for example, if the page is truly gone without a replacement). Learn how, or whether, to fix 404 errors.
Bad response codes
You should fix pages returning these errors to improve your crawling.
- robots.txt not available: If your robots.txt file remains unavailable for a day, Google will halt crawling for a while until it can get an acceptable response to a request for robots.txt. This is not the same as Not found (404) for a robots.txt file, which is acceptable. See more robots.txt details.
- Unauthorized (401/407): You should either block these pages from crawling with robots.txt, or decide whether they should be unblocked. If these pages do not have secure data and you want them crawled, you might consider moving the information to non-secured pages, or allowing entry to Googlebot without a login (although be warned that Googlebot can be spoofed, so allowing entry for Googlebot effectively removes the security of the page).
- Server error (5XX): These errors cause availability warnings and should be fixed if possible. The thumbnail chart shows approximately when these errors occurred; click to see more details and exact times. Decide whether these were transitory issues or represent deeper availability errors in your site. If Google is overcrawling your site, you can request a lower crawl rate. If this is an indication of a serious availability issue, read about crawling spikes. See Server errors to learn about fixing these errors.
- Other client error (4XX): Another 4XX (client-side) error not specified here. Best to fix these issues.
- DNS unresponsive: Your DNS server was not responding to requests for URLs on your site.
- DNS error: Another, unspecified DNS error.
- Fetch error: Page could not be fetched because of a bad port number, IP address, or unparseable response.
- Page could not be reached: Any other error in retrieving the page, where the request never reached the server. Because these requests never reached the server, these requests will not appear in your logs.
- Page timeout: Page request timed out.
- Redirect error: A request redirection error, such as too many redirects, empty redirect, or circular redirect.
- Other error: Another error that does not fit into any of the categories above.
Crawled file types
The file type returned by the request. Percentage value for each type is the percentage of responses of that type, not the percentage of of bytes retrieved of that type.
Possible values:
- HTML
- Image
- Video - One of the supported video formats.
- JavaScript
- CSS
- Other XML - An XML file not including RSS, KML, or any other formats built on top of XML.
- JSON
- Syndication - An RSS or Atom feed
- Audio
- Geographic data - KML or other geographic data.
- Other file type - Another file type not specified here.
- Unknown (Failed) - If the request fails, the file type isn't known.
What to look forIf you are seeing availability issues or slow response rates, check this table to get a feel for what types of resources Google is crawling, and why this might be slowing down your crawl. Is Google requesting many small images that should be blocked? Is Google requesting resources that are hosted on another, less responsive site? Click into different file types to see a chart of average response time by date, and number of requests by date, to see if spikes in slow responses of that type correspond to spikes in general slowness or unavailability.
Crawl purpose
- Discovery: The URL requested was never crawled by Google before.
- Refresh: A recrawl of a known page.
If you have rapidly changing pages that are not being recrawled often enough, ensure that they are included in a sitemap. For pages that update less rapidly, you might need to specifically ask for a recrawl. If you recently added a lot of new content, or submitted a sitemap, you should ideally see a bump in discovery crawls on your site.
Googlebot type
The type of user agent used to make the crawl request. Google has a number of user agents that crawl for different reasons and have different behaviors. The following types are reported.
- Smartphone: Googlebot smartphone
- Desktop: Googlebot desktop
- Image: Googlebot image. If the image is loaded as a page resource, the Googlebot type is counted as Page resource load, not as Image.
- Video: Googlebot video. If the video is loaded as a page resource, the Googlebot type is counted as Page resource load, not as Video.
- Page resource load: A secondary fetch for resources used by your page. When Google crawls the page, it fetches important linked resources such as images or CSS files, in order to render the page before trying to index it. This is the user agent that makes these resource requests.
- AdsBot: One of the AdsBot crawlers. If you are seeing a spike in these requests, it's likely that you have recently created a number of new targets for Dynamic Search Ads on your site. See Why did my crawl rate spike. AdsBot crawls URLs about every 2 weeks.
- StoreBot: The product shopping crawler.
- Other agent type: Another Google crawler not specified here.
The majority of your crawl requests should come from your primary crawler. If you are having crawling spikes, check the user agent type. If the spikes seem to be caused by the AdsBot crawler, see Why did my crawl rate spike.
Troubleshooting
Crawl rate too high
Googlebot has algorithms to prevent it from overloading your site during crawling. However if, for some reason, you need to limit the crawl rate, learn how to do so here.
Some tips for reducing your crawl rate:
- Fine tune your robots.txt file to block out pages that shouldn't be called.
- You can set your preferred maximum crawl rate in Search Console as a short-term solution. We don't recommend using this long term, because it doesn't let you tell us specifically which pages or resources you do want crawled versus those you don't want crawled.
- Be sure that you don't allow crawling to pages with "infinite" results, like an infinite calendar or infinite search page. Block them with robots.txt or nofollow tags.
- If URLs no longer exist or have moved, be sure to return the correct response codes: use 404 or 410 for URLs that no longer exist or which are invalid; use 301 redirects for URLs that were permanently replaced by others (302 if it's not permanent); use 503 for temporary planned downtime; make sure your server returns a 500 error when it sees issues that it can't handle.
- If your site is being overwhelmed and you need an emergency reduction, see Why did my crawl rate spike? below.
Why did my crawl rate spike?
If you put up a bunch of new information, or have some really useful information on your site, you might be crawled a bit more than you'd like. For example:
- You unblocked a large section of your site from crawling
- You added a large new section of your site
- You added a large number of new targets for Dynamic Search Ads by adding new page feeds or URL_Equals rules
If your site is being crawled so heavily that your site is having availability issues, here is how to protect it:
- Determine which Google crawler is over crawling your site. Look at your website logs or use the Crawl Stats report.
- Immediate relief:
- If you want a simple solution, use robots.txt to block crawling for the overloading agent (googlebot, adsbot, etc.). However, this can take up to a day to take effect.
- If you're able to detect and respond to increased load dynamically, return HTTP 5XX/429 when you're nearing your serving limit. Be sure not to return 5XX or 429 for more than two or three days, though, or it can signal Google to crawl your site less frequently in the long term.
- Change your crawl rate using the Crawl Rate Settings page, if the option is available.
- Two or three days later, when Google's crawl rate has adapted, you can remove your robots.txt blocks or stop returning error codes from step 1.
- If you are being overwhelmed by AdsBot crawls, the problem is likely that you have created too many targets for Dynamic Search Ads on your site using
URL_Equalsor page feeds. If you don't have the server capacity to handle these crawls you should either limit your ad targets, add URLs in smaller batches, or increase your serving capacity. Note that AdsBot will crawl your pages every 2 weeks, so you will need to fix the issue or it will recur. - Note that if you've limited the crawl rate using the crawl settings page, the crawl rate will return to automatic adjustment after 90 days.
Crawl rate too low
You can't tell Google to increase your crawl rate (unless you've explicitly reduced it for your property). However, you can learn more about how to manage your crawling for very large or frequently updated websites.
For small or medium websites, if you find that Google isn't crawling all of your site, try updating your website's sitemaps, and make sure that you're not blocking any pages.
Why did my crawl rate drop?
In general, your Google crawl rate should be relatively stable over the time span of a week or two; if you see a sudden drop, here are a few possible reasons:
- You added a new (or very broad) robots.txt rule. Make sure that you are only blocking the resources that you need to. If Google needs specific resources such as CSS or JavaScript to understand the content, be sure you do not block them from Googlebot.
- Broken HTML or unsupported content on your pages: If Googlebot can't parse the content of the page, perhaps because it uses an unsupported media type or the page is only images, it won't be able to crawl them. Use the URL Inspection tool to see how Googlebot sees your page.
- If your site is responding slowly to requests, Googlebot will throttle back its requests to avoid overloading your server. Check the Crawl Stats report to see if your site has been responding more slowly.
- If your server error rate increases, Googlebot will throttle back its requests to avoid overloading your server.
- Ensure that you haven't lowered your preferred maximum crawl rate.
- If a site has information that changes less frequently, or isn't very high quality, we might not crawl it as frequently. Take an honest look at your site, get neutral feedback from people not associated with your site, and think about how or where your site could be improved overall.
Crawl totals much higher than crawling logs or crawls details section totals
If the total crawl count seems much higher than the totals for the Crawl requests breakdown sections (by the response, by type, and so on), this can occur when Google cannot crawl your site because your robots.txt file is unavailable for too long. In that circumstance, Google counts crawl that it might have made if your robots.txt file were available, but doesn't actually make those calls. Check your robots.txt fetching status to confirm if this is the issue.
Opt-out of display on Google Local and other Google properties
You can opt out of having content that Google has crawled from your site displayed on various Google properties:
- Google Shopping
- Google Flights
- Google Hotels
- Google Local (specialized search results pages that trigger in response to a local query)
If you choose the opt-out option, content from your site that has been crawled by Googlebot will not be displayed on any of the properties listed above. Content currently being displayed on any of these properties will be removed within 30 days of opting out.
The opt-out option applies on a domain name basis. For instance, you may designate example.com to subject all content on that domain name to the opt-out. If you own additional domains (like example.org or example2.com), including domains that may serve content to an opted-out domain, you must opt them out separately for the opt-out to apply to the content on each of those separate domains.
You may not designate only individual sub-domains (such as sub.example.com) or individual directories within a domain (such as example.com/sub). Note that for Google Local, this opt-out option applies globally. For the remaining covered properties, this opt-out option applies only to services hosted on the google.com domain.


![Blogger Gadgets: Add, Configure, Remove And Rearrange [3 Easy Steps]](https://lh3.googleusercontent.com/blogger_img_proxy/AEn0k_sSW1MnVO1zBPgSalQVdgeAw2ruZ57PBhdyPn0gRzpsALyCFCY7IK3ioUZ_BQrER69hlMifU6bqnZzvmMDw7d8RN1r3b98OO1KWzsRtnGsz0upMxHoAAkg22uXxJZC9DCfNZbel9oStgyFdMG4UYbE=w680)


14 Comments
Way cool! Some extremely valid points! I appreciate you penning this
ReplyDeletearticle and also the rest of the website is really good.
asmr 0mniartist
I'm curious to find out what blog system you are utilizing?
ReplyDeleteI'm having some small security issues with my latest website and I would like to find something more risk-free.
Do you have any suggestions? 0mniartist asmr
What's up everyone, it's my first pay a visit at this site, and piece of writing is truly fruitful in favor of me, keep up
ReplyDeleteposting such posts. asmr 0mniartist
What's up to every body, it's my first go to see
ReplyDeleteof this weblog; this webpage consists of amazing and
in fact good data in support of readers. 0mniartist asmr
Pretty! This has been an incredibly wonderful article.
ReplyDeleteThank you for providing this info.
You made some good points there. I checked on the net to find out
ReplyDeletemore about the issue and found most people will go along
with your views on this website.
I like looking through an article that will make men and women think.
ReplyDeleteAlso, many thanks for allowing me to comment!
Actually no matter if someone doesn't be aware of then its up to other people that
ReplyDeletethey will assist, so here it occurs.
Wow, incredible blog layout! How long have
ReplyDeleteyou been blogging for? you made blogging look easy.
The overall look of your website is excellent, as well
as the content!
Everything is very open with a very clear explanation of the
ReplyDeletechallenges. It was really informative. Your website is very helpful.
Thank you for sharing!
You've made some really good points there. I checked on the net to find out
ReplyDeletemore about the issue and found most individuals will
go along with your views on this site.
Excellent pieces. Keep posting such kind of info on your blog.
ReplyDeleteIm really impressed by your site.
Hello there, You have done a great job.
I'll certainly digg it and in my opinion recommend to my friends.
I'm sure they'll be benefited from this site.
This article is truly a nice one it assists new internet visitors, who are wishing for blogging.
ReplyDeletethanks for sharing this geat guide ... a big thanks from my team प्ले स्टोर डाउनलोड
ReplyDelete