Table Of Content
- Introduction To Sitemaps
- What Is An XML Sitemap?
- What Brought About XML Sitemaps
- Attributes Of A Good XML Sitemaps
- What Sites Need An XML Sitemaps
- What Pages Should Be In Your XML Sitemaps
- Benefits Of XML Sitemaps
- XML Sitemaps Size Limits
- File Types Supported By XML Sitemaps
- How To Create And Submit Wordpress XML Sitemaps To Google Search Console
- How To Create And Submit Blogger Blog XML Sitemaps To Google Search Console
- Tools To Check Or Validate Sitemaps
- Closing Remarks
What Others Are Reading:
An XML sitemap is a way of organizing a website, identifying the URLs and the data under each section. Previously, the sitemaps were primarily geared for the users of the website. However, Google's XML format was designed for the search engines, allowing them to find the data faster and more efficiently.
Through the XML protocol, search engines could track the URLs more efficiently, optimizing their search by placing all the information in one page. XML also summarizes how frequently a particular website is updated and records the last time any changes were made. XML Sitemaps allow search engines to make more accurate rankings and searches. It does this by providing the data that a search engine needs, and putting it one place-quite handy, given that there are millions of websites to plow through.
Sitemaps also help search engines crawl your pages more intelligently. They take ‘and` tags into account and can adjust their crawl frequency accordingly. You get to be a little proactive about getting search spiders to visit your pages. Upping the priority level of a page makes it more likely that pages will be crawled and indexed more frequently and before other, less important parts of your site.
If you’ve got a geo-targeted international site or a site that has the same page translated into multiple languages, you can use your XML sitemap to your advantage. Benefits of XML sitemaps, in summary, including but not limited to the following:
Log in to your WordPress admin.
What we’re going to do first is make sure that the Yoast plugin is all ready to create a sitemap for you. To do so, we’ll need to turn on Yoast’s advanced settings.
Click on the Yoast plugin.
It has a “Y” icon, and says “SEO.” It should be located on the left sidebar.
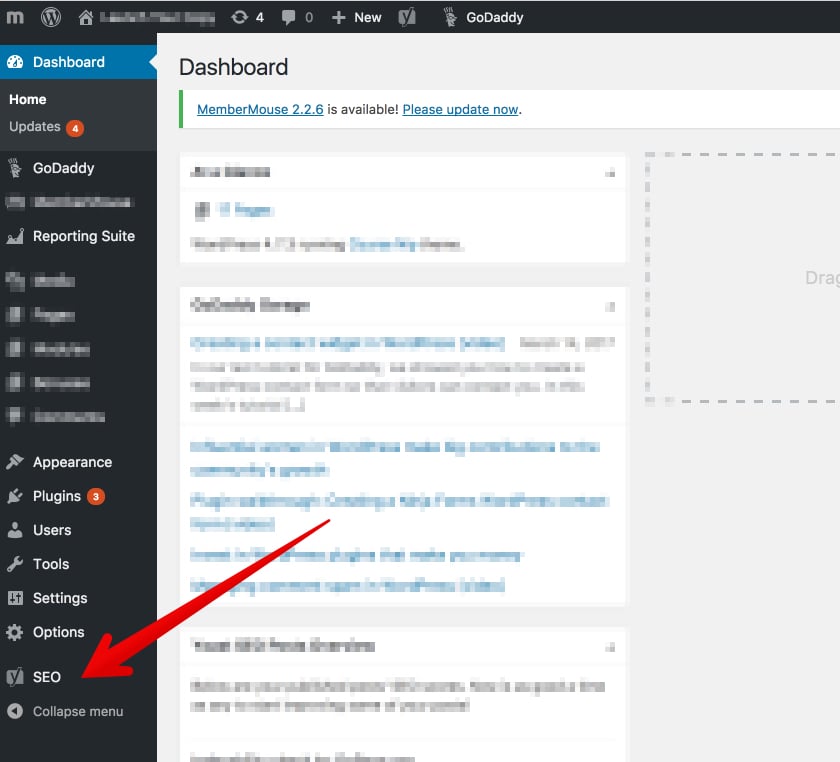
Click the “Dashboard” option.
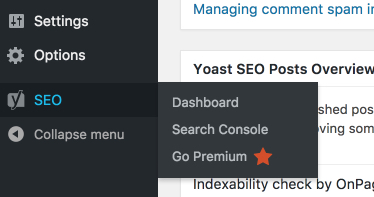
From the Dashboard, click “Features.”
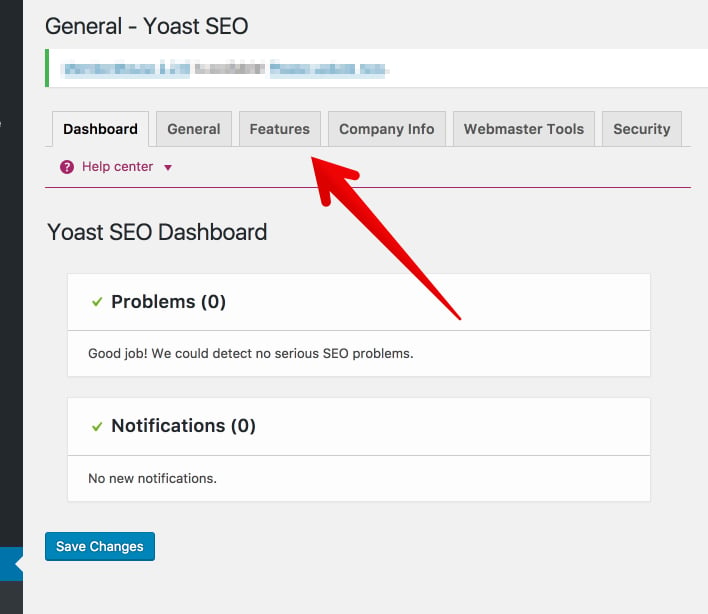
From the Features tab, find “Advanced settings pages.”
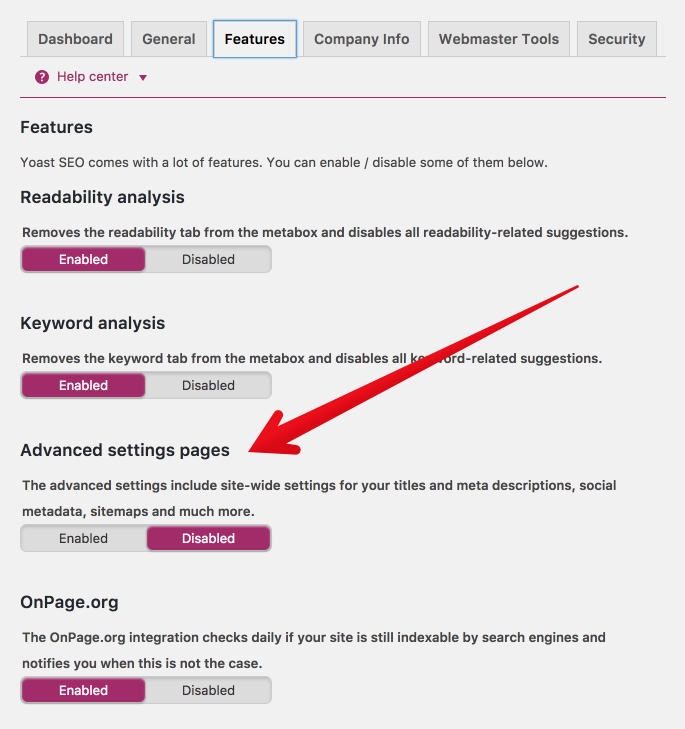
Switch the advanced settings to “enabled.”

Now, scroll to the bottom and click “Save Changes.”
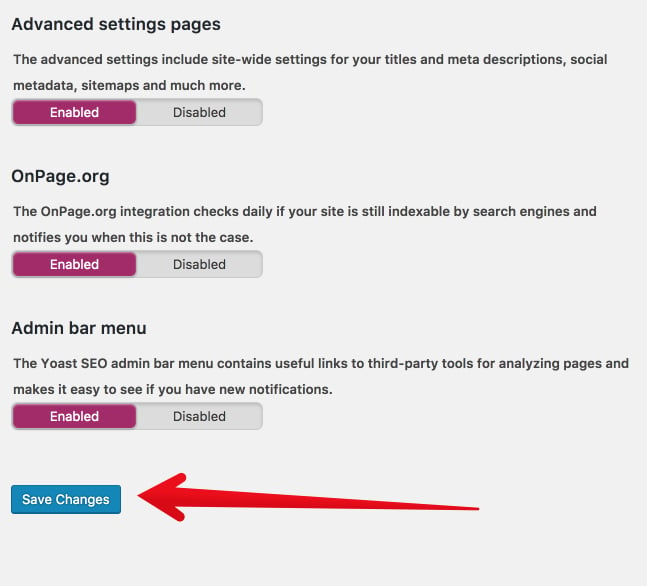
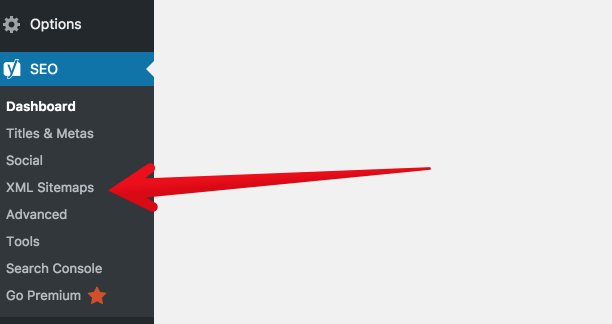
Great! Now that we’ve turned on Yoast’s advanced features, we have some fresh SEO firepower. You should see that the Yoast menu in the left sidebar has changed. There are a few additional options.

This is where we get into the details of creating your XML sitemap. It’s very simple to do, but I’ll give you the instructions in a detailed way. In the Yoast menu, click XML sitemaps. Note: If you don’t see the menu, click on the “Y SEO” main menu to make the dropdown menu expand.
Here is where you set up your XML sitemap functionality. This is the first tab, “General.” You can leave the settings where they are.
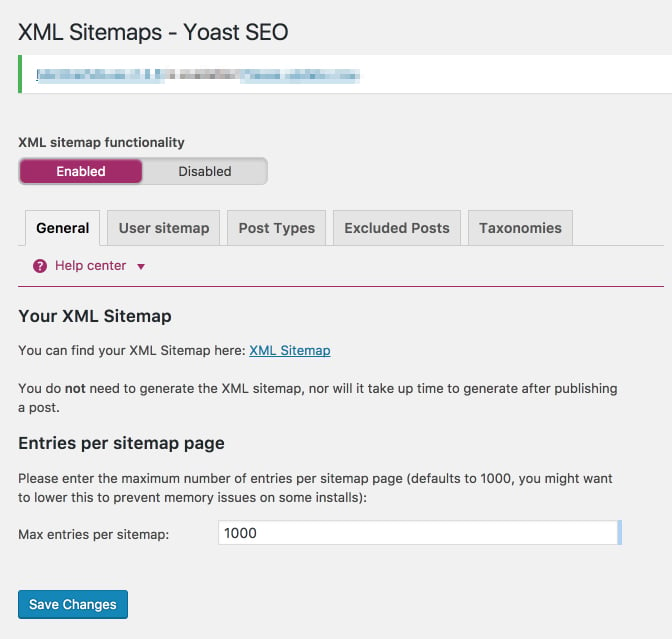
If you make any changes, be sure to click the blue “save changes” button at the bottom. Click the User sitemap tab. If your WordPress site has multiple authors, and you want their author archive URLs to be indexed, you can enable this tab. If you leave it disabled, it won’t harm the full functionality of the sitemap. I’ve left it disabled here because the WordPress site I’m using has a single author.
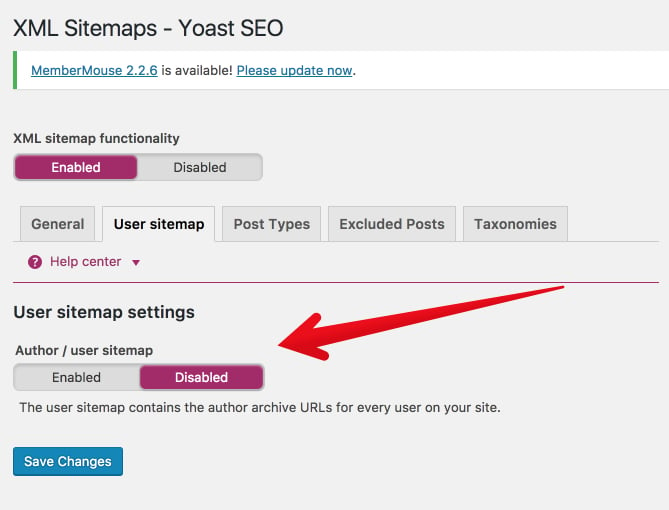
If you’ve changed anything, click “save changes.” Click on Post Types.
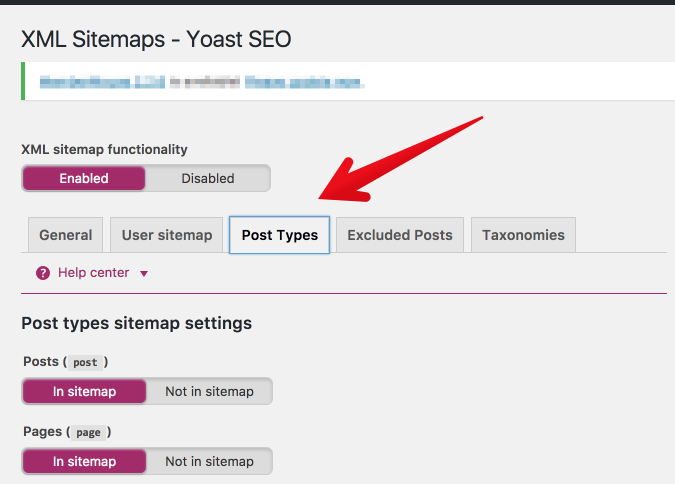
In this section, you’ll decide which types of posts should be indexed. In most cases, you’ll want to include everything (including media) “in sitemap.” If you prefer to keep some of your content hidden or gated, then leave it off the sitemap. Not sure what to do? Keep everything “In sitemap.”
Again, click “save changes.”
Now, click “Excluded posts.”
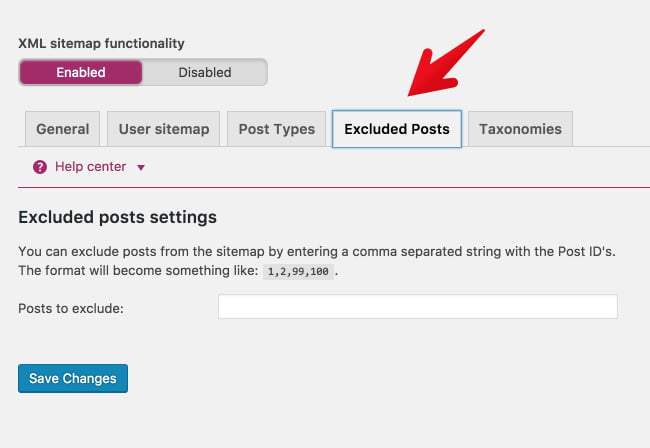
Do you have any posts that you know you want to keep off the sitemap? If so, add them here. Please keep in mind, if you keep a post off of the sitemap, people can still find it, access it, and view it. And, as if often the case, Google might still index it. If you’ve added any posts to the exclusion list, click “save changes.”
Finally, click “Taxonomies.”
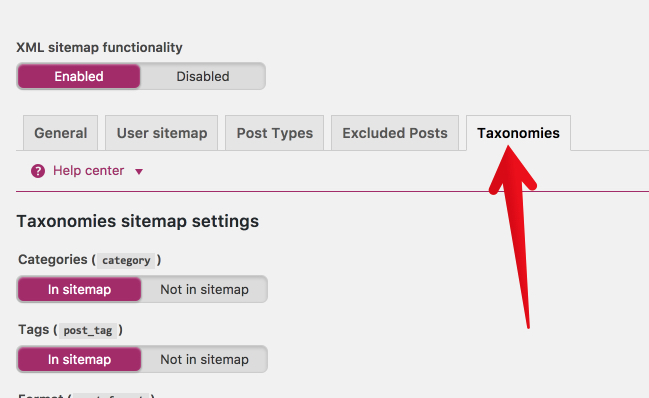
Most likely, you’ll keep the settings here the same. The more tabs you keep “in sitemap,” the fuller and more helpful your XML sitemap will be. If you do make changes, be sure to click “save changes.” Okay, your sitemap is ready! Let’s take a look at it! Go back to the “General tab.”
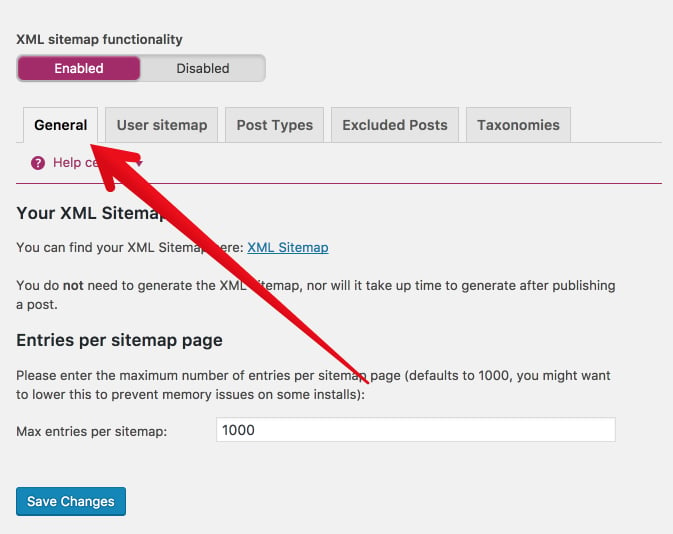
Under the heading “Your XML Sitemap,” click to view your XML sitemap.
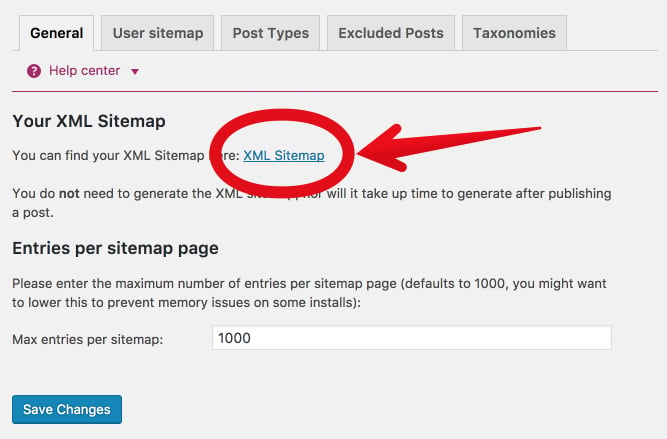
That’s your brand new, shiny XML sitemap. When you open it, you’ll be taken to an actual page on your site. Now, for a small but important part. Copy the last part of that URL
That’s the part of the URL that you’re going to submit to Google in the next step. I’ll include it in the step below so you can easily copy and paste it.
Now, it’s time to submit your Wordpress sitemap to Google.
Step 3: On the left side of the page, click on Sitemaps under the Index section.
Step 4: Add the below code in the provided text field.
Step 6: Press the “SUBMIT” button.
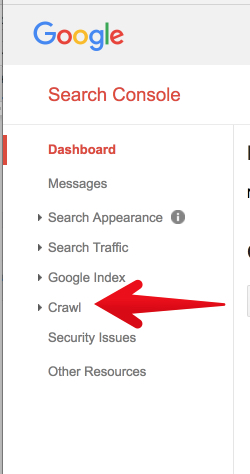
In the left sidebar, click “Crawl.”
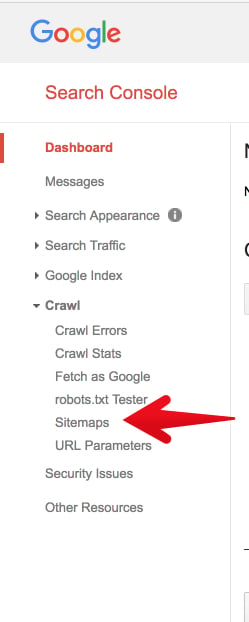
Then, click “Sitemaps.”
If this is the first time you’ve ever created or submitted a sitemap, there will be nothing to show.
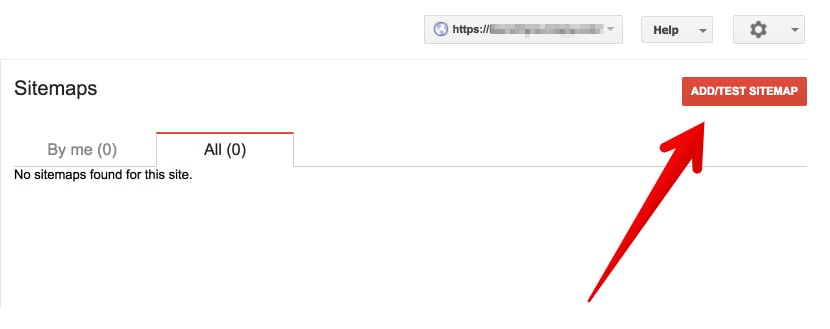
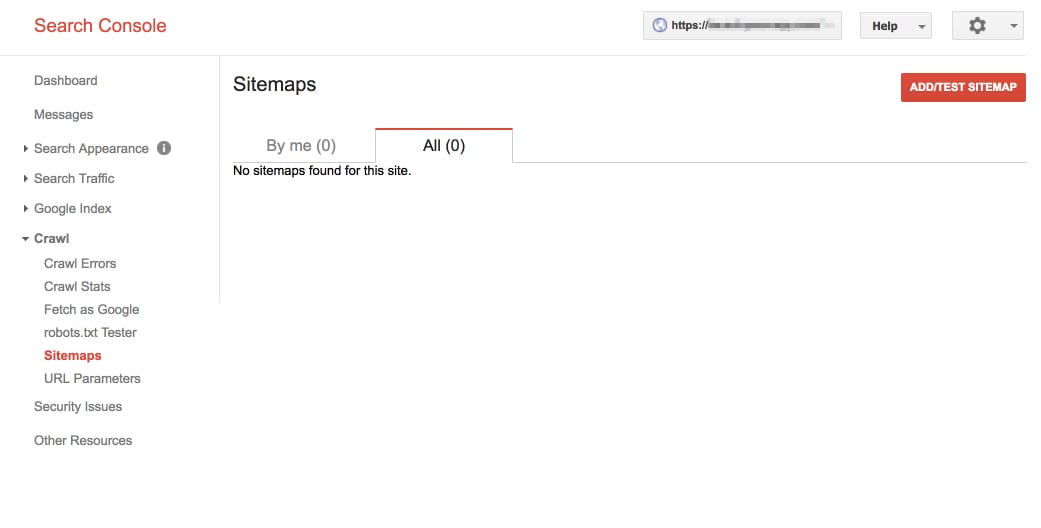
Click “Add/Test Sitemap.” A small box will appear with a place to add your sitemap URL.
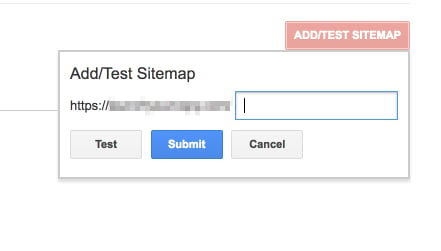
This is where you paste in the section of the URL from your sitemap:
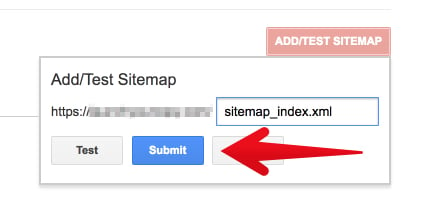
Search console will confirm your submission with the message, “Item submitted.” Go ahead and refresh the page.

After a few minutes of processing, Google will provide a full report of how your sitemap is functioning. That’s it! You’ve successfully generated an XML sitemap for Wordpress, submitted it to Google.
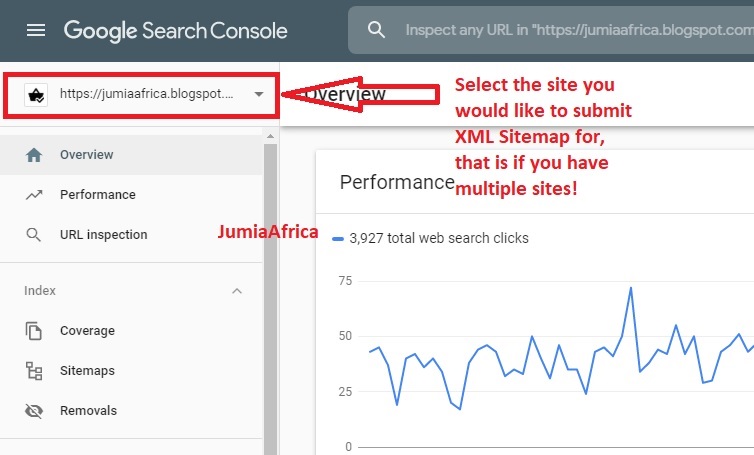
Step 2:If you have multiple sites, then select the desired blog you wish to submit the sitemap for. Go to the upper left corner of your Google Search Console to select your site. But if you don't have multiple sites, you may escape Step 2 and move to step 3.
Step 3: On the left side of the page, click on Sitemaps under the Index section.
Step 4: Add the below code in the provided text field. Here you have the option to choose whether you use an atom.xml or sitemap index file. Note, it is advisable that your sitemap should match the one in the robot.text file. See How To Add Custom Robots.txt File In Blogger Step By Step
Step 6: Press the “SUBMIT” button.
That’s it. You are done with submitting your blogger sitemap to Google Search Console otherwise known as Google Webmaster Tools.
XML Sitemaps
XChecker
You no longer need to rely on links to get your pages crawled. Search engines will see new or updated sites and pages more quickly. Bots can crawl pages more intelligently thanks to the meta-information available in sitemaps. You can make sure that search engines are finding important information about images and videos, which are inaccessible to crawlers.
Have you created and submitted an XML sitemap for your website? What benefits have you noticed? Did you encounter any challenges? What other SEO-related things do you do for faster indexing of your blog? Remember to share this post with anyone who might benefit from this information, including your Facebook friends and groups, Twitter followers and your LinkedIn Friends!
full-width
What Is A Sitemap?
First, we need to understand what a sitemap is, and why submitting your sitemap to search engines is important. An XML (Extensible Markup Language) Sitemap is a text file used to detail all URLs on a website. It can include extra information (metadata) on each URL, with details of when they were last updated, how important they are and whether there are any other versions of the URL created in other languages. All of this is done to help the search engines crawl your website more efficiently, allowing any changes to be fed to them directly, including when a new page is added or an old one removed.An XML sitemap is a way of organizing a website, identifying the URLs and the data under each section. Previously, the sitemaps were primarily geared for the users of the website. However, Google's XML format was designed for the search engines, allowing them to find the data faster and more efficiently.
What Brought About XML Sitemaps?
Google's new sitemap protocol was developed in response to the increasing size and complexity of websites. Business websites often contained hundreds of products in their catalogs; while the popularity of blogging led to webmasters updating their material at least once a day, not to mention popular community-building tools like forums and message boards. As websites got bigger and bigger, it was difficult for search engines to keep track of all this material, sometimes "skipping" information as it crawled through these rapidly changing pages.Through the XML protocol, search engines could track the URLs more efficiently, optimizing their search by placing all the information in one page. XML also summarizes how frequently a particular website is updated and records the last time any changes were made. XML Sitemaps allow search engines to make more accurate rankings and searches. It does this by providing the data that a search engine needs, and putting it one place-quite handy, given that there are millions of websites to plow through.
Attributes Of A Good Sitemap
A good XML sitemap acts as a roadmap of your website that leads Google and other search engines to all your important pages. XML sitemaps can be good for SEO, as they allow Google to quickly find your essential website pages, even if your internal linking isn’t perfect.What Websites Need An XML Sitemap?
Google’s documentation says XML sitemaps are beneficial for “really large websites”, for “websites with large archives”, for “new websites with just a few external links to it” and for “websites which use rich media content”.XML Sitemap Size Limits
XML sitemaps are limited by size, both in the number of URLs, you can include and in file size. Sitemaps can only have 50,000 entries, with up to 1,000 images and max size of 10MB. If you’ve got a really big site that has lots of pages, images and/or videos, you’ll need to create multiple sitemaps. If you encounter this, you’ll need to create a sitemap of sitemaps, known as a Sitemap Index File.Benefits Of XML Sitemaps
Why do you need an XML Sitemap, so why create an XML sitemap? The biggest reason you should create and submit your XML sitemap is indexing. Even though search engines can still technically find your pages without one, adding a sitemap makes it so much easier for them. You might have orphaned pages (pages that got left out of your internal linking), or that are harder to find. Your sitemap is especially important when you’ve recently added pages or created a whole new site that doesn’t have a lot of, or any links to it yet.Sitemaps also help search engines crawl your pages more intelligently. They take ‘and` tags into account and can adjust their crawl frequency accordingly. You get to be a little proactive about getting search spiders to visit your pages. Upping the priority level of a page makes it more likely that pages will be crawled and indexed more frequently and before other, less important parts of your site.
If you’ve got a geo-targeted international site or a site that has the same page translated into multiple languages, you can use your XML sitemap to your advantage. Benefits of XML sitemaps, in summary, including but not limited to the following:
- An XML sitemap helps Google and other search engines crawl your website in a more effective way.
- XML sitemap shows Google and other search engines all the pages on your website, even if they are deep within the architecture and might not otherwise be crawled as quickly.
- XML sitemap tells Google and other search engines to crawl and index your website.
- XML sitemap helps your website instantly gain indexation for dynamically-generated pages.
- XML sitemap helps to overcome the limitations of a website with weak internal linking.
- XML sitemap helps to overcome the challenge of not yet having a strong external link profile.
- XML sitemap helps extremely large sites gain better and more organized indexation.
- XML sitemap tells Google and other search engines what to crawl on your website.
- XML sitemap tells Google and other search engines what kind of information is on your website.
- XML sitemap tells Google and other search engines when your content was updated (which could result in more favorable or “fresh” rankings).
- XML sitemap tells Google and other search engines how often your content is updated.
- XML sitemap tells Google and other search engines how important your content is.
What File Types Are Supported By XML Sitemaps?
Google and other search engines can detect the various file types of Sitemaps. These are specific to the type of content on a site and help search engines identify the files much more easily. List of Sitemap Filetypes:- HTML
- Video
- Image
- Mobile
- News, etc.
Tools to Generate XML Sitemaps
- Screaming Frog SEO Spider and Sitemap generator
- Enarion phpSitemapsNG
- XML-Sitemaps
- Perl Sitemap Generator One
- Simple Sitemaps One
- Free Sitemap Generator One
How To Generate A Sitemap For WordPress Website:
Sitemaps can be generated in different ways depending on the platform you are using for your website. For example, WordPress sitemaps can be easily generated using a popular SEO plugin call Yoast SEO.Log in to your WordPress admin.
What we’re going to do first is make sure that the Yoast plugin is all ready to create a sitemap for you. To do so, we’ll need to turn on Yoast’s advanced settings.
Click on the Yoast plugin.
It has a “Y” icon, and says “SEO.” It should be located on the left sidebar.

Click the “Dashboard” option.

From the Dashboard, click “Features.”

From the Features tab, find “Advanced settings pages.”

Switch the advanced settings to “enabled.”

Now, scroll to the bottom and click “Save Changes.”

Great! Now that we’ve turned on Yoast’s advanced features, we have some fresh SEO firepower. You should see that the Yoast menu in the left sidebar has changed. There are a few additional options.

This is where we get into the details of creating your XML sitemap. It’s very simple to do, but I’ll give you the instructions in a detailed way. In the Yoast menu, click XML sitemaps. Note: If you don’t see the menu, click on the “Y SEO” main menu to make the dropdown menu expand.

Here is where you set up your XML sitemap functionality. This is the first tab, “General.” You can leave the settings where they are.

If you make any changes, be sure to click the blue “save changes” button at the bottom. Click the User sitemap tab. If your WordPress site has multiple authors, and you want their author archive URLs to be indexed, you can enable this tab. If you leave it disabled, it won’t harm the full functionality of the sitemap. I’ve left it disabled here because the WordPress site I’m using has a single author.

If you’ve changed anything, click “save changes.” Click on Post Types.

In this section, you’ll decide which types of posts should be indexed. In most cases, you’ll want to include everything (including media) “in sitemap.” If you prefer to keep some of your content hidden or gated, then leave it off the sitemap. Not sure what to do? Keep everything “In sitemap.”
Again, click “save changes.”
Now, click “Excluded posts.”

Do you have any posts that you know you want to keep off the sitemap? If so, add them here. Please keep in mind, if you keep a post off of the sitemap, people can still find it, access it, and view it. And, as if often the case, Google might still index it. If you’ve added any posts to the exclusion list, click “save changes.”
Finally, click “Taxonomies.”

Most likely, you’ll keep the settings here the same. The more tabs you keep “in sitemap,” the fuller and more helpful your XML sitemap will be. If you do make changes, be sure to click “save changes.” Okay, your sitemap is ready! Let’s take a look at it! Go back to the “General tab.”

Under the heading “Your XML Sitemap,” click to view your XML sitemap.

That’s your brand new, shiny XML sitemap. When you open it, you’ll be taken to an actual page on your site. Now, for a small but important part. Copy the last part of that URL
sitemap_index.xml
That’s the part of the URL that you’re going to submit to Google in the next step. I’ll include it in the step below so you can easily copy and paste it.
Now, it’s time to submit your Wordpress sitemap to Google.
How To Submit Wordpress Sitemap To Google
Step 1: Sign in to your Google Search Console Account. This is the new Google Search Console
Step 2:If you have multiple sites, then select the desired blog you wish to submit the sitemap for. Go to the upper left corner of your Google Search Console to select your site. But if you don't have multiple sites, you may escape Step 2 and move to step 3.
Step 2:If you have multiple sites, then select the desired blog you wish to submit the sitemap for. Go to the upper left corner of your Google Search Console to select your site. But if you don't have multiple sites, you may escape Step 2 and move to step 3.
Step 3: On the left side of the page, click on Sitemaps under the Index section.
The "Sitemaps" page will appear, now at the very top of the page under "Add a new sitemap" you'll see your URL with a blank text field space following it with the word "SUBMIT" at the end.
Step 4: Add the below code in the provided text field.
sitemap_index.xml
Step 6: Press the “SUBMIT” button.
Step 7: Refresh the page.
How To Submit Wordpress Sitemap To Google, Using The Old Google Search Console
In the left sidebar, click “Crawl.”

Then, click “Sitemaps.”

If this is the first time you’ve ever created or submitted a sitemap, there will be nothing to show.


Click “Add/Test Sitemap.” A small box will appear with a place to add your sitemap URL.

This is where you paste in the section of the URL from your sitemap:
sitemap_index.xmlClick “Submit.”

Search console will confirm your submission with the message, “Item submitted.” Go ahead and refresh the page.

After a few minutes of processing, Google will provide a full report of how your sitemap is functioning. That’s it! You’ve successfully generated an XML sitemap for Wordpress, submitted it to Google.
How To Create And Submit Blogger Sitemap To Google Search Console?
Step 1: Sign in to your Google Search Console Account.Step 2:If you have multiple sites, then select the desired blog you wish to submit the sitemap for. Go to the upper left corner of your Google Search Console to select your site. But if you don't have multiple sites, you may escape Step 2 and move to step 3.
Step 3: On the left side of the page, click on Sitemaps under the Index section.
The "Sitemaps" page will appear, now at the very top of the page under "Add a new sitemap" you'll see your URL with a blank text field space following it with the word "SUBMIT" at the end.
Step 4: Add the below code in the provided text field. Here you have the option to choose whether you use an atom.xml or sitemap index file. Note, it is advisable that your sitemap should match the one in the robot.text file. See How To Add Custom Robots.txt File In Blogger Step By Step
atom.xml?redirect=false&start-index=1&max-results=500
Or
sitemap.xml
Step 6: Press the “SUBMIT” button.
Step 7: Refresh the page.
Congratulation! You have finished the process of submitting your blog sitemap.
Note: The above sitemap will work for 500 posts only that is if you choose the atom file, the very first code. If you have more than 500 posts published on your blog, then you have to add one more sitemap following the same steps. The Whole procedure will be the same, but at this time you have to add this code.
atom.xml?redirect=false&start-index=501&max-results=1000
That’s it. You are done with submitting your blogger sitemap to Google Search Console otherwise known as Google Webmaster Tools.
Tools To Validate XML Sitemaps
After creating your Sitemaps with all of the right elements and attributes in place, validate them using one of the following tools:XML Sitemaps
XChecker
Conclusion On How To Create And Submit Wordpress And Blogger Sitemap To Google
When done right, XML sitemaps help search engines quickly find crawl and index websites. Make sure you’ve properly formatted, compressed and submitted your XML sitemap to search engines to get the most of their advantages:You no longer need to rely on links to get your pages crawled. Search engines will see new or updated sites and pages more quickly. Bots can crawl pages more intelligently thanks to the meta-information available in sitemaps. You can make sure that search engines are finding important information about images and videos, which are inaccessible to crawlers.
Have you created and submitted an XML sitemap for your website? What benefits have you noticed? Did you encounter any challenges? What other SEO-related things do you do for faster indexing of your blog? Remember to share this post with anyone who might benefit from this information, including your Facebook friends and groups, Twitter followers and your LinkedIn Friends!





19 Comments
This is really a awesome article. You said all in details. Thank you so much. Your article is really so useful.
ReplyDeleteThanks, Linda!
DeleteWow amazing article
ReplyDeleteThis post has valueable and informative
If you want to download premium blogger template then visit us
https://www.blogarticles.net/2020/09/palki-2-premium-blogger-template.html
This comment has been removed by the author.
ReplyDeleteHow To Create And Submit Wordpress And Blogger Sitemap To Google Is Very Helpful. Thanks for such Information
ReplyDeleteLooking for WordPress Support Visit :
WordPress Support
WordPress Technical Support
WordPress Support Phone Number
Great Article. Thank you for providing such a unique and valuable information to your readers. I really appreciate your work.If you require about pvt ltd registration delhi | pvt ltd company registration fees delhi please click on it.
ReplyDeleteSuperb Information
ReplyDeleteWP Support
https://www.seolivly.com/xml-sitemap-generator
ReplyDeleteThanks for taking the time to discuss this, I feel strongly about it and love learning more on this topic. If possible, as you gain expertise, would you mind updating your blog with extra information? It is extremely helpful for me. buy google reviews
ReplyDeleteThis comment has been removed by the author.
ReplyDeleteThanks for Share Useful content here on your blo. Eoxys IT Solution is leading Web Development company in India
ReplyDeleteEoxys IT
If you get a negative buy google reviews for your business or service the tendency is to feel that you've been attacked personally; especially, if you're not used to dealing with negative feedback. Here Are Six Steps to Help You Deal with Negative Feedback...
ReplyDeleteI think this is an informative post and it is very useful and knowledgeable. Keep it up. Hire Flutter developer to build a high-quality and feature-rich business app for a variety of platforms.
ReplyDeletehire flutter developer
Thanks for sharing this blog Very useful Post. A complete APP solution for dokan marketplace for your customer, vendor and Driver.
ReplyDeleteDokan driver apps
Dokan developer
woocommerce developer
Thanks for sharing this useful content. Hire Wordpress Developer to increase your business and build stunning websites
ReplyDeletewordpress developers for hire
Your post is useful that you explain in step by step manner. XML sitemap for Google .
ReplyDeleteGoogle News sitemap for WordPress site
How To Redirect From One Page To Another Page In Flutter
ReplyDeleteThe sample Google flutter code below illustrate how to redirect to a new page on button click in flutter..
For More Info:- How To Redirect From One Page To Another Page In Flutter
digital marketing services one stop solution for all your digital needs We understand the expectations of the businesses of today, thus providing efficient and reliable services that involve the latest trends in technology is our priority. Get Started Brands we work with Previous Next Our Expertise Website Design Your business’ website is the backbone of its internet-based presence.
ReplyDeleteplease visit our profile if you need google news Guest Post
ReplyDelete